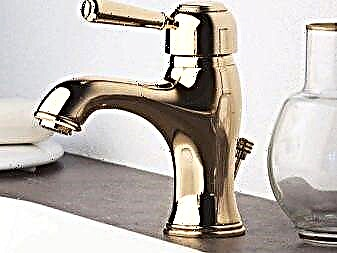
Cranes with one lever are rapidly replacing traditional valve devices in apartments and houses. But no matter how convenient such modern plumbing, it periodically fails for a variety of reasons.
In order not to spend money every time on the purchase of a new crane, it makes sense to deal with the causes of breakdowns and master the independent repair of a single lever mixer.
Features of the device of such devices
Ball, single lever, joystick, articulated - all these are the names of the mixer, which is controlled by only one lever. Using such a faucet is simple and convenient: the vertical movement of the lever controls the amount of water flow, and by turning it horizontally set a suitable temperature.
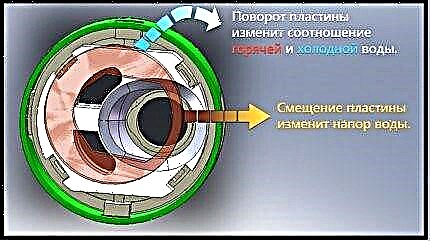
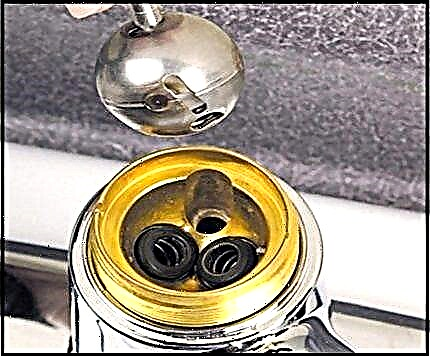
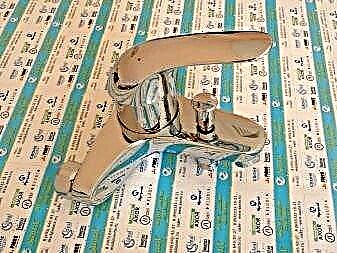
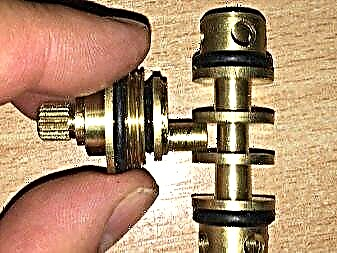
The internal arrangement of single lever mixers is usually of two types: a ball mechanism or a ceramic cartridge. The design center of the ball mechanism is a round mixing chamber. It looks like a hollow metal ball in which three holes are made.
Cold water enters one of the openings, and hot water enters the other. Inside the chamber, the flows are mixed and then fed to the third hole, which is connected to the spout of the mixer. The control lever moves the ball in such a way as to adjust the gaps in these holes, i.e. change the amount of hot and cold water entering the mixing chamber, and the size of the outgoing stream.
A ceramic cartridge consists of two or three plates. In the lower part, as in the ball mixer, there are three holes with exactly the same functions: hot water, cold water, mixed flow. But the mixing of hot and cold water is performed at the top of the device.
Mixers of both types work approximately the same, but they react differently to operating conditions. For example, limestone deposits almost never accumulate in a ceramic cartridge. The fact is that the plates in such a device are rubbed against each other very densely, the size of the gap is comparable to the parameters of the molecule.

But ceramics is not "friendly" with sand and other mechanical impurities. A small grain of sand that has fallen into the cavity of the mixer can lead to chips on ceramic elements, and the entire cartridge will have to be replaced. Sand is practically not afraid of a metal ball, but there are almost no obstacles for plaque.
The weak point of single lever mixers is rubber gaskets. In any situation, these elements will have to be replaced at least every two years. Some buyers complain no problem with the accuracy of temperature settings. This is a characteristic feature of low-cost models with a small angle of adjustment. Such devices break down much more often.
How to disassemble a single lever tap?
Very often, problems with such mixers arise due to a breakdown in their internal mechanism. The algorithm of actions in this case is quite simple: it is necessary to disassemble the crane, remove the damaged mechanism, replace it with a new, serviceable element, assemble the device in the reverse order.

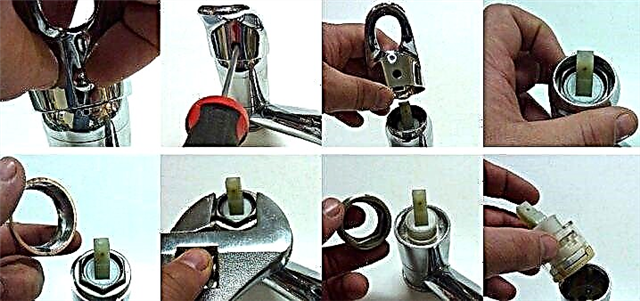
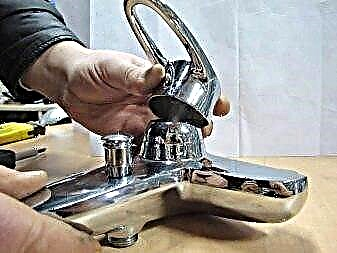
This is not a very complicated procedure, but all operations should be performed very carefully and accurately. First, of course, you need to block the pipes of cold and hot water leading to the mixer. To disassemble the ball valve, you must:
- Use a screwdriver to remove the decorative plug.
- Loosen and remove the fixing screw.
- Unscrew and remove the decorative nut, which acts as a mixer housing cover.
- Unscrew the nut holding the mixer mechanism in the correct position.
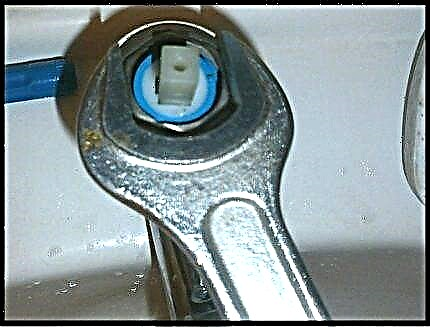
- Remove the cartridge or ball mechanism from the valve body.
To remove the decorative plug, use a conventional screwdriver. Be careful not to damage the element. To unscrew the fixing screw of the mixer handle, you can use a hexagon. In some models, the handle fits snugly. It can be pry off with the end of a screwdriver.

The mixer housing cover is not difficult to remove by hand without the help of special tools. But the fixing nut inside the mixer is more convenient to unscrew with an adjustable wrench. After that, it will not be difficult to remove the internal mechanism of the crane.
It should be remembered that the sizes of these elements vary over a fairly wide range. The height of the stem can vary significantly, as can the diameter of the cartridge. There are also various options for the landing part of the mechanism. Therefore, experienced craftsmen rarely purchase a new cartridge in advance.
It will be much more efficient to suspend the repair work at this stage, take the spoiled “stuffing” of the single lever tap and go with it to the plumbing store to buy an element that is exactly the same in size and device.
Due to the design features of the mechanism, it cannot be adapted or adapted in any way; an exact match of all parameters is necessary.

After acquiring a new cartridge, all work is performed in the reverse order: they install the cartridge, put the adjusting rod on top, fix it with a screw and cover it with a decorative plug. The direction of rotation for cold and hot water is usually indicated on the plug, this point must be taken into account during installation.

When installing the ball mechanism, inexperienced plumbers sometimes confuse the location of the holes and set the mechanism incorrectly. As a result, such a mechanism will not work correctly after installation. Therefore, after disassembling the crane, you should carefully inspect the ball and remember its correct position in order to act correctly in the future.
Upon completion of the repair of a single-lever mixer tap, cold and hot water are reconnected and the quality of work of the repaired device is checked. If any problems still occur, the cartridge may not be installed correctly or there may be some additional damage to the mixer. The process of repairing devices of this type is described in detail in the following video:
Overview of Common Breakdowns
Replacing a cartridge or ball mechanism is just one way to repair a single lever tap. There are other breakdowns of devices of this type, for the elimination of which different means and methods will be needed. The most common problems associated with joystick mixers are:
- cracked device case
- clogged aerator
- problems with the supply pipes or flexible hose,
- improper position or wear of rubber gaskets,
- water leaking through the shower head
- problems with the flow switch to the shower hose.
It is usually relatively easy to diagnose a problem, since each situation has its own characteristic symptoms. Sometimes you have to fix several breakdowns at the same time. This usually occurs when using poor-quality plumbing or non-compliance with the operating conditions of the mixer, which leads to increased loads.
Crack in device case
If water flows out from under the mixer, it is highly likely that its body has cracked or worn out somewhere. Such a situation may occur suddenly, for example, if a heavy object is accidentally dropped on the mixer. Sometimes gaps occur gradually, under the influence of water for a long time.
In any case, it is almost impossible to completely eliminate such a breakdown. The most reliable repair method is to completely replace the device, but usually the old mixer is simply dismantled and a new model is installed. As a temporary measure, a sealant is used.
Usually, a crack is simply covered with a suitable composition, for example, “cold welding”. Before starting work, you should study the instructions for using the sealant, and strictly follow the manufacturer's recommendations. But a mixer that has been repaired by such methods will look quite unpresentable. Over time, the sealant will crumble, it will be necessary to repeat the repair again and again. Therefore, after closing the crack, you should immediately plan the purchase and installation of a new mixer.
Replacing a worn gasket
If the faucet is leaking from below and its housing is crackless, the gaskets between the tap and flexible water hoses may have worn out. This problem is relatively easy to fix. First you need to block the flow of hot and cold water to the mixer.
At the same time, a certain amount of water will still remain in the mixer. You need to open the tap and drain this water. Now you should disconnect the hoses through which water enters the mixer. There are also water residues here, so a bucket should be placed below, a rag will not hurt to collect accidentally spilled water.
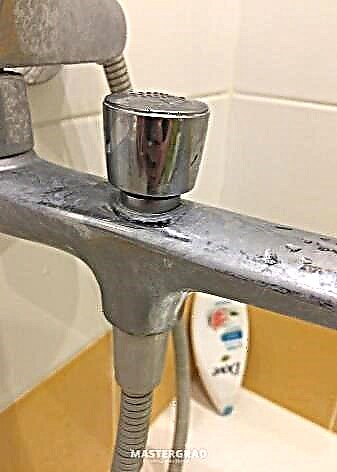
When the flexible leads are disconnected, you need to unscrew the fixing nut, which is located under the sink and holds the mixer in the correct position. There is a gasket under the nut. If it looks worn, cracked, or deformed, this is most likely the cause of the leak.
Such gaskets are sold in any plumbing store or you can cut a suitable element from a piece of rubber. Before installing the gasket, it is recommended to clean the installation site from accumulated contaminants. Then you need to assemble the system in the reverse order: tighten the fixing nut, connect flexible leads, restore the water supply. After that, you need to open the tap to check the operation of the device.
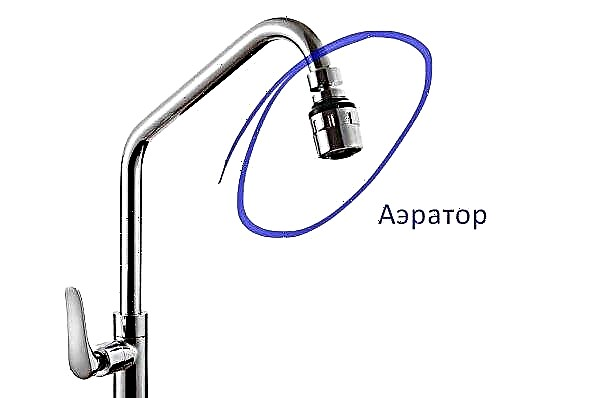
Problems with the aerator
A small nozzle, worn on the spout of the mixer, cuts the flow of water into separate streams and artificially increases its volume. The holes in this nozzle are small, if tap water contains impurities, they can easily become clogged. Sometimes problems arise because the aerator just rusted.

A characteristic sign of this problem is a decrease in water pressure at any one point, for example, in the kitchen. At the same time, water flows from other taps in the same amount. If the aerator is removed, and after that the water flow from the mixer has noticeably increased, then the cause of the breakdown can be considered precisely established.
Solving this problem is very simple. Normally, the aerator is easily unscrewed from the spout. After that, you need to rinse it or remove dirt in another way. You can even install a new aerator, if possible. After that, the previous pressure of water will be restored. Some refuse to use an aerator, but in this case it will not be so comfortable to use a mixer.
If the pipes are clogged
Is the aerator okay and the flow pressure noticeably weakened? Almost certainly clogged pipes or flexible inlets through which hot and cold water flows to the mixer. This problem is especially common in older plumbing systems. During the corrosion process, metal particles accumulate inside, reducing or completely blocking the lumen.

First shut off the water, and then proceed to fix the breakdown. With flexible hoses, everything is very simple. They must be removed, washed, cleaned and reinstalled. If the dirt is too serious, you can just put in new hoses. With pipes everything is a little more complicated. To clean them, use the “snake” cable.
At the same time, the part of the pipe in which the dirt has accumulated should be disconnected from the water supply system, and after cleaning it should be replaced. Sometimes such a section of the water supply system is replaced and new structures are installed. If the pipes are old and often dirty, it makes sense to think about upgrading the water supply system and installing plastic pipes, which are much less susceptible to corrosion than metal structures.
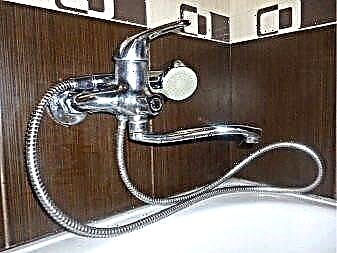
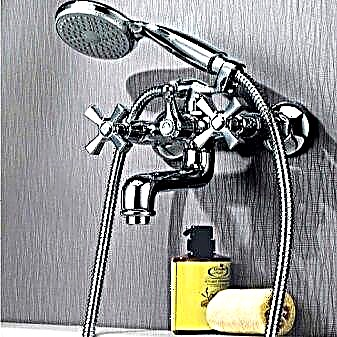
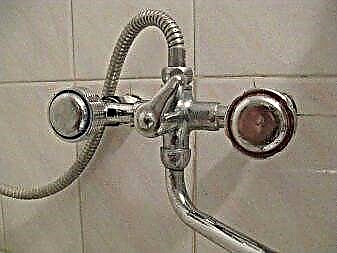
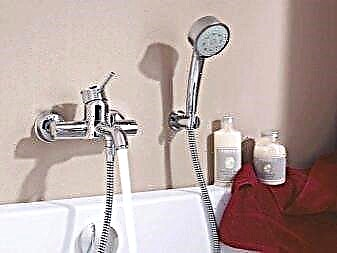
Bathroom faucet
A faucet with a more complex construction is usually installed on the rim of the bathroom than in the kitchen, because here, in addition to the usual spout, a shower head is used. To the problems described above, breakdowns associated with the mechanism for switching the water flow from the spout to the shower head and vice versa are added.

It happens that water gradually leaks through the shower head. This indicates the wear of the upper gasket of the device. It is relatively easy to fix the problem. It is necessary to remove the fixing nut and the shower hose that it holds. Thus, access to the upper gasket will be provided.
This element is removed and replaced with a new one, which can be bought or even cut from a rubber sheet, the thickness of which is about three to four millimeters. Of course, the installation location of the new gasket should be cleaned of accumulated contaminants. After repairing the faucet in the bathroom, the shower hose is replaced and the faucet is checked.
But if problems arise with the gasket, which is located at the bottom of the mixer, fixing the breakdown will be a little more difficult. Outwardly, such a malfunction is expressed in the fact that the control lever of the shower head is not held in the correct position and is lowered, preventing the water from switching.
First you need to shut off the supply of hot and cold water to the bathroom faucet, then unscrew the nut and remove the shower head. Then the adapter and the spout of the mixer are subsequently dismantled. To get to the bottom gasket, you will have to remove the entire “filling” of the mixer. After that, the gasket is replaced and the device is assembled in the reverse order.
It happens that the gaskets are not worn out, but they are not suitable in size or are installed incorrectly. This is not uncommon if gaskets are cut by hand. If the mixer starts to make a lot of noise when opening the water, it makes sense to check the condition of the gaskets. Usually it’s enough to crop them or just slightly change their position. If the gaskets are not to blame, the additional noise effect can usually be eliminated by installing filters.
How to prevent malfunctions?
The condition of the mixer and its service life depends on several factors:
- quality of tap water,
- proper installation of the water supply system ,,
- quality of a specific mixer model.
Inexpensive faucets may look attractive, but their lifespan is short. The case and the internal mechanism, made of low-quality materials, fail quickly and often. Water quality and the arrangement of the water supply system are interdependent factors. As soon as flaws in the installation of pipes become apparent, they must be immediately eliminated.
The presence of coarse filters can significantly increase the life of a single lever mixer. Do not neglect this useful device. Water hardness must be taken into account at the stage of purchase of the device. On the packaging and / or in the mixer passport it is indicated what water hardness the product is designed for. You should correlate these data with information about the quality of water in your own home.
Aerator is another useful factor that can positively affect the condition of the mixer. The device dissects the flow of water into separate streams, which visually increases the volume of the stream. This allows you to reduce the amount of water flowing through the mixer, which leads to savings in water and device life.
Design
Single lever mixers are fundamentally different from dual-valve mixers. A single lever mixer, as you understand from the name, has one handle, a lever, with the help of which the flow rate and water pressure in the tap are regulated. This type of crane is also called a “one-armed bandit”, joystick, articulated, ball.
A single lever mixer has three functions:
- Water mixing
- Change in its power,
- Jet formation.
The crane works very simply
It is only necessary to turn the tap handle in a horizontal direction and thereby the water temperature will change from cold to hot.
And if you raise or lower the lever in a vertical position, you can adjust the power of the water flow and the higher the position of the lever, the stronger the water stream.
Single lever mixer design:
- Swivel handle
- Crane cover
- Spout with mixer body,
- Internal camera or cartridge,
- Gaskets and gaskets.
In the mixer, cold and hot water are connected at the outlet, as a result, water of the optimum temperature is obtained. This process occurs due to the ball mechanism or ceramic cartridge.
The composition of the inner chamber of a single lever mixer is distinguished into two types:
Single lever ball mixer
 With ball mechanism. The single-lever mixer with a ball mechanism has a rounded mixing chamber. In this chamber, which looks like a metal ball, there are three holes. Cold water is supplied into one hole, hot water enters into the second, but the third is intended for the outlet of mixed water. A pivot arm moves this ball to control jet power and temperature.
- Ceramic cartridge. This cartridge consists of three separate plates, in the lower compartment there are three holes that are designed to supply hot and cold water and to supply already mixed water from the tap. But the mixing of water is carried out at the top of the cartridge, in contrast to the ball mechanism.
 With ball mechanism. The single-lever mixer with a ball mechanism has a rounded mixing chamber. In this chamber, which looks like a metal ball, there are three holes. Cold water is supplied into one hole, hot water enters into the second, but the third is intended for the outlet of mixed water. A pivot arm moves this ball to control jet power and temperature.
Pros
A single lever mixer is used by many homeowners because its repair, installation, and installation are quite simple. But it is very effective and functional. These mixers differ significantly from dual-valve mixers not only in their excellent appearance, but also in that they are much more convenient to use. Using them is easier to set the water temperature and flow rate.
Minuses
Due to the individual structures of their mechanism, single-lever mixers are very sensitive to the quality of tap water. If the water quality is low, then they become clogged and fail. From this problem, faucets with a ceramic cartridge more often deteriorate.
It is almost impossible to repair the mixer with your own hands, you can only replace some parts, for example, the entire cartridge or seals.
Problems when using
- Even very expensive and high-quality mixers are prone to breakdowns. The life of the mixer will depend on the material from which it is made, as well as on the intensity of use and the quality of tap water.
- Common problems that arise when using single lever mixers are:
- Crack in the housing.
- This problem occurs suddenly, for example, if a severity is accidentally dropped on the mixer. Gaps sometimes occur gradually, under the influence of water after a long time.
- There is almost no way to fix this damage. In such a breakdown, it is best to replace the mixer body, but most often the old mixer is removed and a new one is installed. But sometimes for a while, cracks close up with sealants.
Before using sealant, you must read the instructions for its use, but a crane repaired in this way will not look very nice. After some time, the sealant will exfoliate and crumble, and such repairs will have to be repeated again and again. For this reason, it is best to purchase a new mixer and install it.
Replacing the old gasket
If the mixer leaks at the bottom, and its body is intact, then there is a high probability that the rubber gasket has worn out, it is between the flexible hose and the tap. If the gaskets under the ball mechanism fail or are not installed correctly, the valve may leak or make a lot of noise.
This breakdown can be eliminated quite simply, it is necessary to first shut off hot and cold water. But after this manipulation, a certain amount of water may remain in the mixer, to drain it you need to open the tap. Then it is necessary to unscrew the hoses through which water enters the mixer. They also have water residues, for this reason, in order to prevent water from flowing from them onto the floor, they substitute a bucket or basin. Also, a rag will not hurt to collect spilled water.
After the flexible hoses are disconnected, it is necessary to unscrew the fixing nut. This nut holds the mixer in the correct position and under the sink. A gasket is located under this nut. In the event that the gasket looks deformed and cracked, this is the cause of the leak.
Rubber pads can be bought at any plumbing store or cut from a small piece of rubber. Before installing the gasket, the place where it is installed must be cleaned.
Then you need to assemble everything in the reverse order:
- Tighten the lock nut
- Connect flexible hoses,
- And turn on the valve that blocks the flow of cold and hot water. Then you need to open the tap and thereby check its operation.
DIY single lever mixer repair
Most often, they try to fix the breakdowns of the cranes on their own and many are interested in how to repair a single-lever crane with their own hands. Experts say that if the mixer fails, then you can replace the cartridge in it or clean it and replace the gasket. In order to repair the crane:
To begin with, cold and hot water is closed, then a decorative nozzle on the handle of the tap is removed with a screwdriver. Then unscrew the fixing nut and screw.
Then you can unscrew the nut that holds the internal mechanism of the mixer in the upright position.
The last step is to pull out the cartridge or the stepper mechanism and replace it with a new one, and after all these manipulations you need to assemble everything in the reverse order.
It must be remembered that the faucets have their own service life, it depends on the quality of the mixer and the period of use. But the life of the mixer can be extended if the quality of the water is improved using a cleaning filter. And also it is necessary to carry out regularly preventive maintenance of the mixer. Preventive maintenance of a single lever mixer consists in the fact that it must be periodically disassembled, cleaned and replaced with rubber gaskets.
Advantages and disadvantages
Many homeowners pay attention to a single lever mixer, because its installation and repair, as well as installation are simple, but at the same time very effective and functional. These more modern devices differ from two-valve ones not only in their more aesthetic appearance. They are also very convenient to use, they allow you to more accurately and quickly adjust the temperature of the water, reduce its consumption. But they also have disadvantages:
- Demanding for water quality. Due to the nature of their device, single-lever mixers are very sensitive to impurities contained in tap water. Due to its poor quality, they often become clogged and then stop working. Ceramic cartridge models are particularly affected by this problem.

- Low maintainability. It is almost impossible to repair a single-lever mixer with your own hands, you can only replace some of its parts, for example, seals or a cartridge as a whole.

Remember! To increase the life of a single lever mixer, you can improve the quality of tap water by installing a special filter, as well as timely preventive maintenance of the device.
Operational Issues
Even high-quality plumbing fixtures fail over time. The service life of the mixer depends on the material from which it is made, the quality of tap water and the intensity of use. The most common problems encountered when operating single lever models are:
- Cracks in the body of the device. They arise due to poor material quality and installation errors.
- Aerator clogging. The cause of this malfunction is the poor quality of tap water.
- Wear of rubber gaskets. Sealers are consumables, they wear out over time due to the high intensity of use of the device.


Important! No matter how high quality the mixer is, it needs preventative maintenance. Even if there are no operational problems, you need to disassemble the device once every 2 years, clean it, and also replace the gaskets. After all, even a small speck falling under the seal can cause leakage.
Single lever device design
A distinctive characteristic of this type of mixer can be considered a lever that simultaneously performs the functions of two heads at once. With its help, the temperature and pressure of the supplied jet are regulated.
In the first case, the crane handle moves to the right or left, in the second - up or down. Usually these processes are combined, allowing the user to set the most comfortable option for him.
The design of single lever accessories is extremely simple. Typically, such a device consists of the following parts:
- body - can be made of different materials,
- spout - depending on the purpose of the crane, it can be low, high or medium,
- switch - the lever with which the temperature and flow rate are set,
- cartridge - to regulate the flow of water, which is an analog of the crane box.
In addition, in single-vent devices, service elements, such as gaskets, are also used. Often, such accessories are also equipped with additional components that increase comfort in use. Among them are aerators, saturating the current stream with air, built-in dispensers for detergents and much more.

Single lever mixers can be made from a variety of materials. Particularly popular were chrome models, but in the market you can also find accessories made of copper, brass or imitation granite
Types: design features
Every modern bathroom has a faucet. Replacing a bath with an invigorating shower saves water. Sometimes the mixer fails, then repair or the acquisition of new components is required.
A faucet is one of the main devices in the bathroom, it is in the bathroom, in the shower, and in the sink, if it is installed separately. Using this unit, you can adjust both the pressure of the water and its temperature.


The mixer can be of the following types:
The first includes two valves, which by rotation allow you to achieve the desired current of water and its temperature. Such a unit is simply arranged, if necessary, it is easily disassembled and repaired. When working, it is important to follow the recommended sequence of operations, this is the best guarantee that there will be no extra parts after assembly.


The adjustment of the water by means of the second type is that the lever rises upward and rotates to the side. Inside this design is a large ball with special slots and in contact with the lever.
Through such slots water with different temperatures enters and mixes. The water pressure is regulated by changing the angle of rotation of the lever.
The model with a ceramic cartridge has two plates that are in contact with one another. The plates move relative to each other when the lever changes position. Due to this, cold and hot water can mix.

The overhead crane is reliably protected by gaskets, which can be:
Valve head assemblies can be changed. The box crane, in turn, may consist of:
A tee connects several pipes, the second type is connected using a special wiring.
The lever mixer is very popular, its main advantages:
- ease of operation
- reliability,
- Looks aesthetically pleasing,
- ease of installation.
The device design scheme for such structures is simple, unfortunately, it is not possible to repair them, it is possible - the case is designed in such a way that it cannot be disassembled.
Single lever mixers - causes breakdowns
Despite the fact that there are two types of faucets, the causes of breakage are often similar, although there is some difference:

Hinged faucet for the kitchen
- ball shutter is considered more reliable. True, over time, the steel ball corrodes. Teflon seals and gaskets also wear out and then water begins to seep out. They can be quickly replaced. However, if the ball itself is cracked, then you will need to buy a new one,
- disk ceramic cartridge is not afraid of rust and hard water. Such a single lever mixer for the kitchen will last for many years. The design itself consists of thin plates that are carefully adjusted to each other. The gap is hundredths of a millimeter, so trapped debris or grain of sand can cause chips and breakage. In this case, it will also be necessary to replace
- blockage sometimes leads to deformation of the rubber seat and the shutter itself. Therefore, it will be necessary to disassemble, clean and replace the rubber,
- A loose lever causes water to leak. To stop this, just tighten all the connections well,
- a small crack on the body itself can be repaired with sealant. If this does not succeed, then it is better to find another mixer.
A common cause of malfunctions is the water itself, or rather, its hardness. Even an ordinary filter for cleaning will allow the single lever bath mixer to last much longer and without breakdowns.
Mixer Repair: Procedure
Before starting work, it is necessary to close the valves for hot and cold water, after which it is necessary to open the tap and empty the available water. You can also cover the sink so as not to damage it.
The algorithm of actions is as follows:
- using a screwdriver, you can remove the decorative plug and unscrew the screw that secures the control lever,
- the lever must be removed very carefully, as for some models you will have to make a little effort,
- Now you can see the dome of the crane and the plastic cam. Underneath is the cartridge. Only such a decorative cap sometimes has to be unscrewed. It’s better to do it by hand, because it is made of plastic or thin metal,
- it remains only to take out the ball and make sure that it is not cracked. To get to the ceramic cartridge, you will have to remove the fixing nut. To do this, you need a Swedish adjustable wrench. In the event of a cartridge failure, you will have to buy a new one. It is very important not to make a mistake with the choice, otherwise the replacement simply will not succeed due to different shapes and sizes, as each manufacturer makes its own small changes,

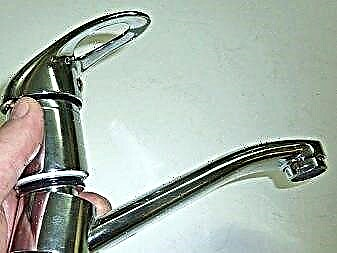
Disassembly of the mixer with one valve
However, the repair of a single lever mixer with your own hands on this may not be completed. You need to make sure that the cause of the failure has not yet served as any factor.
Trouble-shooting
In order to repair damage, you should use the services of masters with practical experience. In this case, it’s good to have certain ideas about how the mixers are arranged, and what types they are.

Any mixer consists of several nodes:
- case
- rubber pads
- axle box
- decorative elements
- valves
- spool
- adapter,
- crank.

Most often there are malfunctions in the form of a leak, they are:
- under the gander
- under the mixer lever
- under the mixer valve with two valves,
- at the connection points of the hose and shower.
- Water may leak under the mounting nut due to wear on the gasket.
In this case, repairs can be done with your own hands, the qualification of a plumber is not required here.
Often, malfunctions can easily be eliminated by replacing a worn ring with a new partonite ring. When winding the gander, it is imperative to lay the FUM tape so that the gaps are better sealed. Leakage in the lever mixer occurs when the cartridge itself breaks. Such a malfunction is resolved by changing the cartridge. It can be of different sizes, it depends on the manufacturer. When buying a new cartridge, it is advisable to take a failed one with them, their compliance should be 100%.
From under the lever, the leakage is eliminated in this way:
- first, the cap is removed, which is marked with a red-blue marker on the handle,
- the fixing bolt is unscrewed,
- the lever is removed
- the cartridge is changing
- The mixer is reassembling.


Leakage in a two-valve design occurs in most cases due to the failure of a non-ceramic axle box crane; in this case, it is recommended to replace the axle box. Also, wear of rubber or silicone gaskets is often found in this type of device. To determine the breakdown, the assembly is disassembled (if it is ceramic).
Further, the repair process is as follows:
- the plug is removed from the valve
- the bolt is unscrewed
- the stub is removed
- the valve is twisted
- the axle box crane is dismantled,
- are the causes of the malfunction.
Next, the assembly is reassembled, with new gaskets being installed. If water leaks at the junction of the shower hose, the cause is wear on the gaskets.

Repair should be as follows:
- unscrew the fixing nuts,
- change gaskets
- thread is fastened with FUM tape,
- all elements are reassembled in the same order.
- most often problems arise with classic two-valve bath mixers. They can have a movable spout, be round or flat configuration. Failures occur in most cases due to wear on the gaskets located under the fastening nut. There is always one reason: too hard water.

Prevention of damage to single-lever models
Since replacing a crane is quite expensive, you need to think about simple preventive measures that can extend the working period of this important part.
These include:
- regular inspection of the taps to detect any signs of leakage,
- installation of filtering equipment to improve water quality,
- elimination of increased humidity in the places of plumbing.
Before self-assembly or disassembly, and even more so before repairs, it is necessary to carefully study the mixer device and instructions and strictly follow the instructions. All connecting nodes must be sealed with special compounds or fum tape to avoid leaks.

The condition of the tap is positively affected by an aerator that mixes water with air. If the model does not have an integrated device, it can be purchased separately and installed on the mixer
It is also important to responsibly approach the choice of models for the bathroom or kitchen. When buying a crane, it is better to avoid silumin products made from an alloy of aluminum with silicon. Although such models are inexpensive, they quickly fail.
It is better to give preference to models made of brass, copper or chrome steel, produced by well-established brands.
Useful tips from the pros
Unfortunately, repair work will not always be able to solve all the problems and malfunctions that may arise during the operation of single lever mixers. Often, the faucet is no longer amenable to any repair, so the question will be about purchasing a new bathroom device. To reduce the likelihood of such situations and to maximize the life of the device, manufacturers are advised to carry out preventive measures and deliberately choose products for operation.

The list of recommendations of specialists:
- To prevent the failure of the faucets as a result of their contact with low-quality tap water, it will be proper to take care of the presence of a filter to purify the water entering the apartment or house.
- Among a wide range of products from different manufacturers, one can find products made from various materials. However, brass single lever mixers are still the most durable.
- If situations in which there was a need to repair the device could not be avoided, before starting to dismantle the mixer, you should familiarize yourself with the product instructions in detail or seek advice from a specialist.
- By regularly performing a routine inspection of the mixer, the possibility of serious damage can be ruled out on time.

See how to disassemble and repair a single lever mixer in the next video.
Conclusions and useful video on the topic
The video below describes in detail about the device of a single lever mixer, its disassembly and correction of the most common breakdowns:
Single lever taps - a modern type of sanitary ware, which has gained popularity due to excellent consumer properties. The advantages of such devices include a long service life and ease of maintenance.
The ability to properly disassemble an accessory will help to quickly replace a failed part. Thanks to this, the life of an expensive product is extended and there is no need to replace it.
Want to talk about how to select or repair a single lever tap? Have a desire to share your own experience as a beginner plumber, which may be useful to site visitors? Please write, ask questions, post a photo in the block below.
How to troubleshoot
Not every malfunction in a single lever water supply can be repaired. As for replacing the cartridge, it is necessary in the following situations:
- if it is leaking
- when the tap is opened to the maximum, the water pressure remains very weak,
- when a working device delivers water to both the shower and the spout.


To carry out repairs, you must have the following set of tools:
- screwdriver and wrench
- pliers and knife.
The main thing, before disassembling the device, you need to shut off the water supply to it.
Scheme of repair work:
- First of all, it is necessary to remove the plugs on the lever. To remove the lever, the screw is loosened.
- Then the nuts are removed from the housing with a wrench, after which a cartridge can be removed.
If the problem is leaking, replace the cartridge with a new part. When buying spare parts, it should be borne in mind that interchangeable elements can have different hole diameters and clamps located in the bottom plate. It is best to go to the store to take a part that has become unusable with you. This will help make the right choice. After purchasing a new cartridge, the mixer is assembled according to a similar scheme, but in the reverse order.
If the device is defective due to wear of the gland, it must be replaced. The order of work in this case includes the following actions:
- having fixed the lever in the closed position, you need to remove the hose from the shower,
- using pliers for operation, the switch button is removed from the housing,
- then the adapter is removed from the nozzle and the gland is replaced.


As for ball mixers, it will not be possible to repair them, an exception to the rule can be considered device malfunctions associated with sealing material. A weak water pressure will indicate the presence of debris in the aerator. Most often, the crane is noisy and creaks during operation. To fix the problem, do the following:
- remove the aerator, rinse it under running water,
- then reinstall the part by attaching it with the clamping nut.
Work on replacing old rubber bands is performed as follows:
- First of all, you need to remove the lever,
- a two-component element is removed from the housing, where the black part is the sealant, which must be put in order or changed,
- if the above actions did not help solve the issue with a leak, you need to replace the lower gum,
- after that the ball is inserted back and fixed with a nut,
- The final step will be to install the mixer handle.
To ensure a more productive operation of the single lever mixer after replacing the rubber bands, it is worth using an additional silicone grease.


In the single lever bath mixer there is a switch that is responsible for supplying water either through a faucet or through a shower head. This device may experience various malfunctions over time. Most common problems:
- Often there are times when water enters the bath from two sources at once. This is a sign of spool valve problems.
- Over time, the button for switching the water supply works tight, as a result of which it does not become in its usual position. The cause of this malfunction is a failure of the stem spring.
As for the spool gaskets, the main catch will be that they are not individually available for sale. These accessories are usually included in the kit for the mixer. If one is not available, then the way out of the situation will be the independent manufacture of gum. A home-made product will help to eliminate the malfunction of the mixer for a while.

The switch itself has two seals that are located at the top and bottom of the spool. In the event that the upper gum has become unusable, the switch is not disassembled, since to replace the part it will be enough to remove the cap and install a new element. The option to install the lower gum needs to be dismantled.
The principle of product replacement is as follows:
- position the lever in the closed position and disconnect the shower hose,
- remove the cover and unscrew the screw,
- then you can get the button and spool, and replace the seals,
- assembly of the device is performed in the same way, starting from the end.

If the life of the spring located in the button is exhausted, problems may arise related to the non-return of the switch to the starting position. In this embodiment, repair work includes the following steps:
- you need to get the adapter and stem with a spring,
- the defective part is removed, and with the help of a tool, a new one is put on the rod.
In order for the purchased product to work, the diameter of the spring must be smaller than that of the old one.
In addition, it is worth buying steel springs with galvanic coating.