Choose reliable craftsmen without intermediaries and save up to 40%!
- Fill out an application
- Get offers with prices from masters
- Choose artists by price and reviews
Grouting the joints on the tiles on the floor is the final stage of the repair, and the final result largely depends on the quality of its implementation. Moreover, this procedure is quite simple, and it is quite possible to perform it yourself, without the help of professionals. Nevertheless, in the arsenal of professional finishers there are useful tips that will help to properly prepare the tiles, choose materials for grouting and fill the seams.
How to choose a grout?
Before grouting the joints on the tile, you should decide: what shade the grout will have. It can be white, and bright, contrasting. It all depends on the tone of your tile, the general concept and design of the room, as well as your personal wishes. Remember that it is better to choose a mixture for colored tiles one tone lighter or darker than the material itself. So the seams will not visually be erased, but will look clearly. In favor of choosing a dark grout for tiles, there are several reasons:
- the overall picture looks more geometric and beautiful
- dirt that, one way or another, accumulates over time, is not so noticeable
- no need for continuous cleaning
- grout color remains intact for a long time
As for the white seams of the tile, they inevitably turn yellow, and it is not always possible to solve this problem with detergents.
Do not save on grout mixes - choose one that will not fade, crumble and turn yellow.
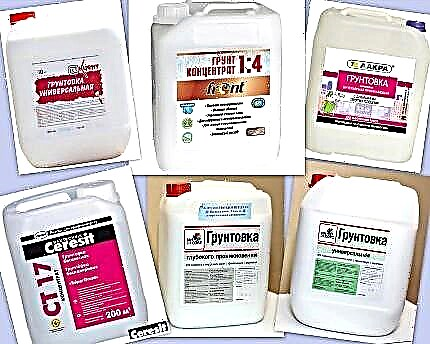
Types of grout materials
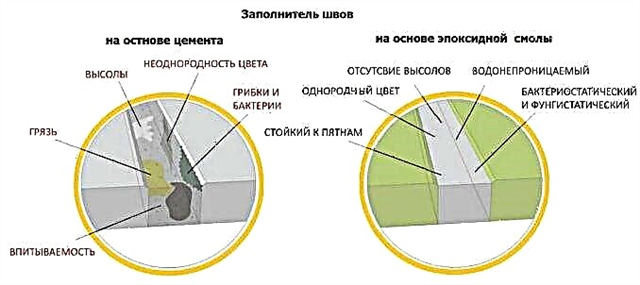
The most common grouting materials are a mixture of cement and a mass based on epoxy.
epoxy grout
cement grout
pros: resistant to reactions with chemicals, as it contains a hardener
pros: durable, easy to use (you can buy ready-made grout, which does not need to be bred)
minuses: high price, viscous consistency (it is not always convenient to work with such a mixture, especially if you do not have experience), suitable for industrial and commercial premises
minuses: allergic reactions (redness, irritation of the skin and eyes) may occur during work - it is recommended to use gloves, glasses and respirators
The differences between the two types of grout
The cementitious composition dries in about half an hour, forming a white coating after itself. You can remove it with a damp grater from foam, several times running it diagonally. Try not to wash the grout.
In order to subsequently improve the properties of cement grout, it is possible to use a hydrobysifier applied with a brush in one layer. Basically, cement grouts are used to repair houses, apartments and other residential premises, as well as offices.
Epoxy mixtures are chosen for large-scale objects: automotive services, factories, swimming pools. Among the advantages of grouts of this type are resistance to the penetration of dirt and water, as well as inertness to the effects of acids and alkalis. In the production of epoxy, the hardener is mixed with a mixture of epoxy resin containing silicon. Because of this, the mixture is called "two-component."
Often, special components are added to the epoxy mixture that allow you to create visual effects, for example, glow in the dark. At the same time, there are standard epoxy grouts of different shades, which makes it easy to choose the right one for your room.
Remove epoxy grout no more than after 24 hours after its application. In case of later cleaning (in a day, two or a week), the composition can simply not be washed off.
Surface preparation
Before rubbing the tiles, prepare the surface. To do this, you need to clean the seams of debris: the remains of the solution, crosses.
Important! To start grouting tiles, you need only at least 24 hours after laying the tiles.
Some manufacturers claim that their crosses do not need to be removed to adjust the seams between the tiles. However, our experts assure that if you do not want the fugue in these places to be two shades lighter than in all areas, then you should still remove this element.
Joint jointing
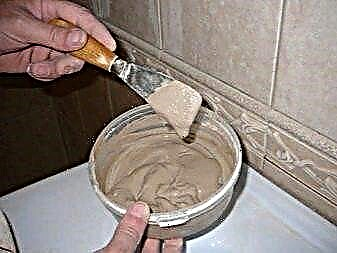
Before rubbing the tile, of course, you need to dilute the mixture itself.

Pressing the mixture into the seams
Advice! You need to breed a small amount, not the entire package!
Of course, if you need to grout the tiles on the floor, then use a larger capacity than for grouting the tiles on the walls.
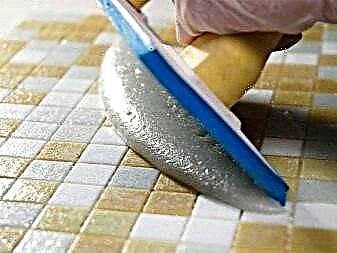
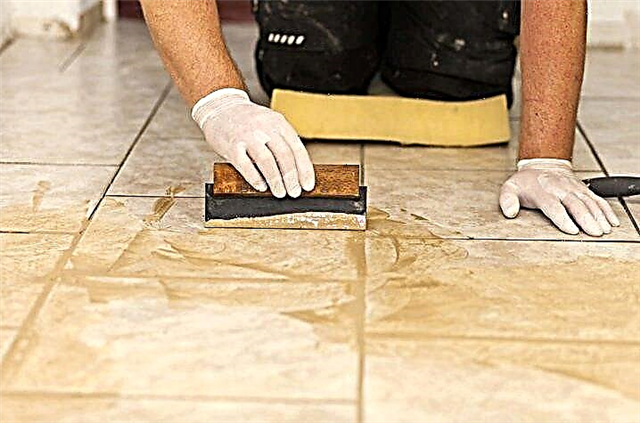
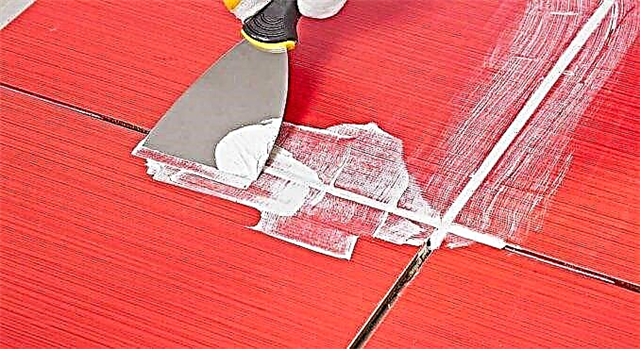
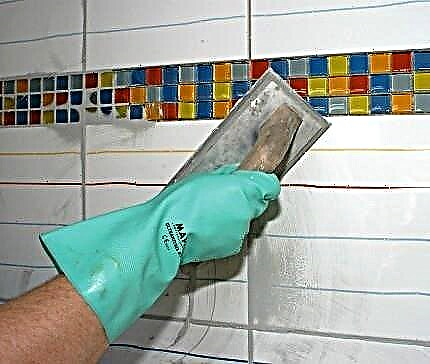
It is best to wipe the tiles on the walls with a small rubber spatula, with which the mixture is applied directly to the joints. But in order to overwrite the tiles on the floor, especially for large volumes, they often use a tool that resembles a “grater” for smoothing a concrete surface. Gathering a sufficiently large amount of the mixture on this spatula, the grout is applied to the tile itself, moving diagonally.
Important! At one step, you should grout the seams on a tile with an area of 1-2 squares, more at a time it is not recommended, since the mixture itself can seize, and then the high-quality jointing will not work.
However, the method using the above grater is a little poor quality, it is suitable, say, for the master’s work, but when you do it yourself, it’s better to use a rubber spatula in your apartment when you plan the joints.
When applying grout to the joints with a rubber spatula, you will exert sufficient efforts to press the mixture. This effort is necessary so that when filling there are no voids, only then the grout will fully justify its protective functions. Seam protection is an important step in laying the tile itself.

Remove excess mixture with a sponge
If the fugue is applied correctly, then this will help you avoid many problems in the future. The grout itself does not let water in, and therefore, the solution on which the tile is laid will not be exposed to the destructive effect of moisture.
Also, if you decide to overwrite the tiles on the street, say, on the terrace or in the gazebo, we recommend using mixtures for outdoor work. And here grouting tiles is a must!
If moisture in the warm season gets into unprotected seams and seep under the tile, then be prepared to completely shift the floor next year. Why? Yes, because in winter the moisture turns into ice, which, as is known from the lessons of physics, is not only much larger than water, but also completely incompressible.
And in the end, the tile that was laid on the street without grouting will simply either “tear” from the inside or fall off.
Another way to grout tiles is to use a building cone. The construction cone in its function resembles an ordinary bakery bag, inside which cream is placed and, extruding, put it on the cake.

The principle of operation here is similar, a grout mixture is placed inside the cone, which, under pressure, will be distributed at the seams.
Stitching
So, overwriting the tiles is not so difficult. The next stage is the seam stitching.
To embroider, some craftsmen walk along the seams with a piece of cable of a suitable diameter, while the excess grout will protrude onto the surface of the tile, and all the seams will be neat, equally filled.
However, this step is not necessary at all, so it will be only your decision to overwrite the tile.
Tile cleaning
After you have grouted, and even the seams, you should immediately begin cleaning.
Why do we recommend performing it right away? Until the fugue is completely seized, cleaning the tile will not be as problematic as when the process was completed. Moreover, if your tile has a porous, corrugated surface, remove the excess mixture immediately, just when you start to overwrite the tile.
Use clean rags, a sponge to clean - because if you have a light shade of fugue, there will be a chance that you are still at the initial stage, during the cleaning after repair, not wanting to do so, contaminate it.
So, you have learned not only to overwrite the tiles, but also to embroider the seams, which is why, without putting things off in the long drawer, get to work!
| MAPEI grout: characteristics and comparison of epoxy and cement mortar, calculation |
| Professionals: how to stick tiles on drywall |
| How can I cut ceramic tiles? |
| How and how to wash tiles in the bathroom |
Thank you very much for the article! I rarely put tiles and only for myself. Some nuances are simply forgotten, and help is only you. Regards V.
Vladimir, many thanks for the rating. It is very pleasant when your work is evaluated in this way and thank you for taking the time to write a review - this is really important for us!
Just looking for guidance on this work. I want to replace the grout and thought whether it is worth hiring this job or doing it on my own, after reading your article - I decided that I could do it, so we will save! thanks
Thank you for your feedback - in fact, we are reducing it to the fact that it’s quite possible to do such work on our own, and it was for such users that our resource was created - mainly for those who want to learn the nuances of laying and grouting tiles in order to finally make all on their own, or at least already competently to control the work of hired craftsmen.
It seems that everything is so simple to overwrite the tiles, but I think that not everything is so in reality. I think - is it worth taking it on, do it yourself - everything is clear, nothing complicated, judging by the description, but I don’t want to screw it up, so that I can redo it later
And why not - you are sure to handle this work, and if you have time for this, then why not save money? Indeed, there is nothing complicated here, in fact there is rather a monotonous and monotonous job, take your time, follow the manual and you will surely succeed. If you have any questions, then contact, we will be happy to answer.
And my trustee entrusted me with the grouting business - he said that the best painters were women and that my nerves were stronger)))) I agreed - he laid the tiles, and I wiped them, so I went to the Internet for advice and stumbled upon your article - awesome , everything is very clear, managed quite quickly and I liked the result myself. Thanks to your site and for sharing the nuances in the work, because, as they say, the devil is in the details
A wonderful division of labor)) Well, the most wonderful thing is that you did this work with your own hands, and you were satisfied with the result, but usually you yourself are the most severe critic, so well done! Also, many thanks for your feedback.
Excellent, just by the way ... In principle, there is nothing complicated, if you wish, you can do everything yourself without hired labor. At the same time, if you have never done anything like this, then it’s better to practice at the neighbors :))) But seriously, I found a lot of useful information here. Everything is useful in life ...
A good option is training at the neighbors))) For one thing, “your hand will get full”. Thank you for your feedback and contact us if you have any questions while working after reading our articles and manuals.
Here I have this question arose. Then yesterday I went to a building materials store and saw just a huge selection of spatulas. It would seem that this is nonsense, but thought. Do you have any recommendations for choosing spatulas?
For example, regarding the size of the spatula - it all depends on preference. Plaster and putty professionals usually have a complete set of completely different sizes, with the solution being first applied to the wall with a rather large spatula (300-450 mm), although if you do not have skills, I would recommend using the smaller option - with a long blade up to 200 mm, so slower, but it is much more convenient to control the process. The blade should not be too high, as it will begin to bend, due to which the quality of work will be reduced. Well, regarding the material of the blade itself - there are rubber, metal, plastic - each of them has its own purpose. Well, regarding the pen - you should take it and it should be convenient for you - this is the main thing that you should pay attention to initially.
Hm, good advice. Somehow it didn’t occur to me to mix the colors in the grout. Well, there he is, as the color is from the beginning, and let it remain so. In the end, tile appearance defines the walls, as I always thought. And now I’m thinking. But it’s true that if these stripes are also colored to match the color of the tile, then the look will be more interesting. Thanks!
Yes, it's just the most detailed instruction for mashing tiles. Where else to find so much information in one place? Everything is detailed, explained and justified. Also the video is attached. Guys! If you are real men, you simply must read this (and others too) article.
Where you used to be with your advice, when I was doing the repair I didn’t know how to do it right, but now at least redo it, I don’t know what to do now!
Do not worry, if it is only a matter of grouting, then it will be possible to change it, and only on your own, while your cash costs will be minimized. The problem will be poor-quality laying of the tile itself - it will have to be seriously “sweated”, since it is difficult to carefully remove the tile and not split it, but it is possible, so if this is the case, then be patient and everything will turn out right!
Thanks for the interesting article. I learned a lot about repairing and grouting tiles in particular!
A very valuable repair blog actually. It’s a pity I myself am a layman in this matter.
Use the information and very soon you yourself will be able to do almost everything that is described on this site.
Beauty! Here we had a tiler ... when I laid out the tiles on the walls, fastened it with wide adhesive tape, then removed it, and let's wipe the seams, including with adhesive from the adhesive tape too. Until now, we wash both glue and grout.) After this article, if necessary, I can overwrite myself. By the way, advise a good and inexpensive domestic production. Thanks!
Unfortunately, this is not as rare as we would like, and as a result of a seemingly small error, you have to make very big efforts to clean the surface of the tile from grouting, and if, in addition, the grout has managed to dry properly, then this the work can hardly be called fun. At the expense of grouting - it all depends on what kind of grout you want to use, because as grout you can use it as tile adhesive or ordinary cement-sand mortar, or puffer - it all depends on what is planned for the design, if you specify then I can tell you more specifically.
I do not have building skills to say exactly what I need. And in a hardware store, eyes run up from the number of grouting companies. I realized that this is not a tile adhesive, namely grout. She still has different colors: caramel, walnut and others. I asked about such a grout ... Once I bought wallpaper glue, trusting the seller, and lost, it turned out to be disgusting. I hope with your help not to get into trouble with the grout.)
It is better to use a puffer as a grout, since it is this option that is the most durable and durable. Fugue is usually sold in white, so you will need to buy a color if you want to add color.If you choose a grout in the tone of the tile, this will help to hide flaws that could appear during installation and the surface will seem more “homogeneous” or solid, but often the owners want to highlight the masonry on the contrary - here you can play with contrast. At the expense of the manufacturer - I like Sopro and Litikol both in terms of quality and in work.
Hello! It’s a very interesting article, since I don’t know such a person who wouldn’t have faced with how to lay the tiles and grout correctly and efficiently ... Given that most ordinary normal people with mediocre financial income try to do this work on their own in order to save a little ... It’s good that there are professionals laying tiles who share their personal experience ... You trust such people more ... Our family was very interested in how to grout the joints between the tiles so that it is beautiful and neat ... T Now, thanks to your article, we will do it step by step as you recommend ... Very beautifully, everything turned out in the photo, attracts the attention of readers ... Yes, repair is like a small earthquake, it doesn’t need to be afraid, but it’s also not necessary to tighten worth ... Regards, Anna.
Thank you, Anna, for your feedback. We are very glad that this article was able to help you in your work - this is exactly what we aimed at while working on our portal. Our experience is more than decent, so in practice we often met with this type of work and described everything in great detail, so that as a result, any reader could perform similar work at the highest quality, while knowing all the nuances, now you can do it not only excellent, but also pretty fast.
I'm still interested in what grouts are there? That is, the material itself? Do they differ in something? And which is better to use, for example, for a bathroom?
In fact, there are quite a lot of grouts and it all depends on which option you prefer. For example, it can be an ordinary cement-sand mortar (sometimes this option is also preferred), or tiled glue itself - they release a special glue (often it is taken specifically for majolica), which has a pure white color, i.e. quite suitable for grouting. There is a fugue - a special grout mixture that is resistant to water. Initially, it is white, but you can use colors to give the desired shade. Therefore, when choosing a grout, you should pay attention to the design of your room and with this in mind, you can already decide which type is mainly worth using. The most important thing about a bathroom is its water resistance.
Features
Today, it is simply impossible to imagine a well-laid tile without grouting. The technology of laying tiles in our time implies that seams are made between decor elements. Seams are called the gap between the ends of two adjacent tiles that is not filled with tile adhesive. You need to know how to properly grout the seams on the tile.

Tile joints have a purely utilitarian purpose:
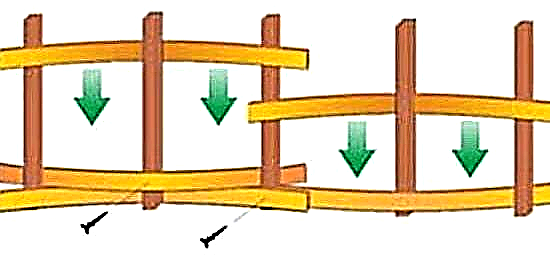
- They create a thermal gap.. Everyone knows from the course of physics that bodies expand when heated. With very narrow seams or in their complete absence, ceramic tile can crack in any direction, squeezing one another.
- Tiles from different manufacturers are calibrated differently. Tile calibration is the tolerance for deviation of the finished product size from the dimensions declared by the manufacturer. Sometimes calibration can go up to 1 mm. When laying such unevenly sized tiles without seams or with narrow seams, it is impossible to get a more or less decent wall.
In order for the final result to have clear horizontals and verticals, a poorly calibrated tile needs to be shifted, centered, changing the size of the seam for each adjacent pair.


In order to prevent gaps between the laid wall and floor decoration elements, into which water and dirt will fall, the joints are filled with a special solution called grout. Ceramic tile, for the most part, has a slight rounding at the edges due to the peculiarities of its manufacturing technology.
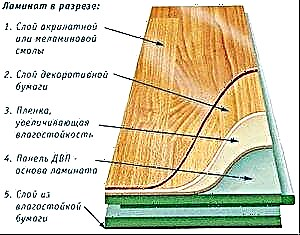
The glaze covering ceramics is applied on only one surface. Therefore, the ends of the tiles have the color of the clay from which it was made, and differ from the color of the picture on the front side. With open seams, brown edges are visible to the naked eye and spoil the whole picture.

A common mistake of amateurs is that they believe that defects in tile laying and mechanical damage in the form of small chips can be hidden by grouting. She, like paint, only emphasizes all the shortcomings. Therefore, it is better to immediately replace the defective tile or lay it in an inconspicuous place, for example, for a bath or shower.
The composition and basis of the grout varies from manufacturer to manufacturer. Some add special antifungal additives, others add hardening components, still others try to give the grout more elasticity, while others add water-repellent properties.
The more such consumer properties of the grout mixture, the more expensive it is.

The basis for the most commonly used grouts are usually gypsum or cement, the resulting seam is opaque, uniform in composition and color. To give a tiled surface of an aesthetic appearance, the grout is tinted (color pigments are added) in various colors. But in special cases with such a composition, it is impossible to achieve the desired result.
To obtain a transparent or translucent seam, use compositions based on epoxy resin, which can be tinted in different colors or add different fillers. Fillers can be finely ground powder of silver or gold color and small beads, as well as small holographic sparkles, as for decorating nails.
The strength of such a grout will be no less than that of the tile itself, and the dirt will not eat into the seams.

Another type of grout is based on the use of furan resin. Its feature is its exceptionally deep black color. In gypsum or cement based grouts, the darkest color is anthracite, black with a gray tint. This is due to the characteristics of the base materials, which no one has yet been able to select the daughter of.
Today, silicone-based sealants painted in different colors are increasingly being used as grouts in places of increased load and humidity.

Tile adhesive on clinker has been and remains a classic grouting material. The seam is durable, its width does not matter, the color is only gray.
Grout is sold in any construction supermarket both in a ready-to-use form and in the form of a mixture for preparing mortar on a clinker tile. This is an equivalent replacement.

How to breed?
Those who make repairs with their own hands should learn the rule of preparing solutions from dry mixes: the mixture is added to water, not water to the mixture. But grouts are an exception to this rule. Since the features of their composition are such that they take a little water, water is added to a dry powder to obtain a solution of the desired consistency.
The water used for the preparation of any mortar should in no case be warm or hot, otherwise the mixture will immediately turn into a frozen formless lump with which nothing can be done. First of all, it is necessary to correctly calculate the proportions.
Manufacturers, as a rule, indicate on the packaging the recommended amount of water per 100 g or 1 kg of dry mix. But this figure is optional. The density of the solution depends on the result that you want to get in the end. For the standard grouting method, the solution should be like thick homemade sour cream or tomato paste. If, when kneading, part of the mixture remains dry, you need to add water in very small portions until the solution reaches the desired density.
If, on the contrary, the mixture turned out to be very liquid, similar to kefir, you can gradually add dry grout, again in small portions. And it’s good to knead so that there are no lumps.

Some additives make grout mixes very non-hygroscopic, and the particles of the mixture do not want to get wet. Knead such formulations need to be thoroughly and fairly long, until you get a thick homogeneous mass.
The life span of the diluted grout is small, from the strength - half an hour or an hour. After this time, the solution begins to harden, clump, lose plasticity, and it is no longer possible to work with it. Therefore, it is most preferable to spread the grout in small portions. If during the work the composition began to thicken, you can add a small amount of water to it and mix well.
If you cook a lot of grout, then to develop it all without loss of quality is very difficult. Preparation of a large amount of the mixture at once is logical only if several people are working on the grouting at once, each of which performs a certain stage.

The most suitable tank for grouting is a rubber or flexible polymer cup with a volume of 300 to 500 ml. The flexibility is due to the fact that when hardening the mixture becomes very solid and it is almost impossible to scrape it away from hard dishes. When twisting a soft cup, the frozen grout “snaps” from the walls and breaks out with a slight tapping. If you try to knock on a rigid container, then the cup will rather crack than the grout will lag behind the walls.

In the case of using the finished grout mixture, the manufacturer did everything for us. It can be used directly from the bucket. Just remember to close the lid tightly so that unused grout does not dry out. After 12-24 hours in the open air, the finished mixture is first covered with a film, and then turns into a solid, unsuitable for grouting.


Tools
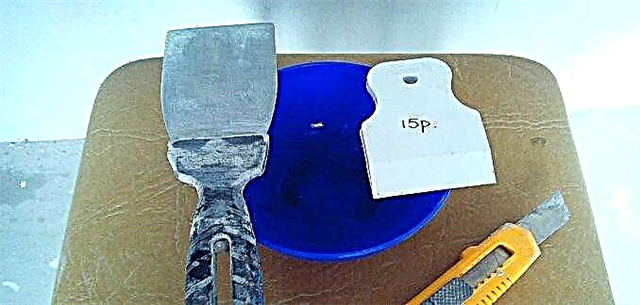
Before you begin to overwrite the seams, you need to prepare a bucket with clean cool water, latex or vinyl gloves and a few dense sponges (like for washing dishes) with small pores, as well as two absorbent cloth napkins. For convenience, a stepladder is needed. To fill grouting joints directly, a flexible polyurethane spatula with a width of 5-10 cm and a container with ready-made mortar are required.
If grouting skills are not worked out, it is better to take a small tool. It’s good to have a paint knife on hand for partial correction of the seam. To form an aesthetic seam you need a round ebonite stick of small diameter - 3-5 mm.


In special cases, masking tape with good adhesion may be required. You can choose a device such as a special machine for filling seams. This will greatly simplify your work and you will do it faster.


How to apply?
Be sure to use gloves, so you will close the seams without fear for the condition of your hands. The composition of the grout is quite aggressive. Without hand skin protection, you run the risk of contact dermatitis.
To make the seams neat, without extraneous inclusions and color deviations due to uncleaned tile glue from the ends, they must be cleaned before work. Experienced craftsmen wash the seams with a richly soaked sponge directly in the process of laying tiles. They do this because updating dried tile adhesive is much more difficult. But if it so happened that the dried glue still remained in the seams, it can be cleaned with a small spatula or a paint knife. This operation must be carried out carefully, since mechanical action can damage the glaze of the ceramic product. It will turn out chips that are very difficult to fix.
After cleaning the seams, it is preferable to rinse them with a damp sponge and grind.


It is necessary to cover the seams as quickly as possible, apply the solution with confident movements and close up all the chips. You can also darken the seam or repaint it. You can change the color by adding special paints.
There are several ways to get beautiful and even seams using grout.
Based on gypsum or cement
In any case, you can overwrite the seams only after the tile adhesive has lost its mobility and the tile is clearly fixed in its intended place. For floors, this moment is determined by the time when it will be possible to walk on the tile without pushing the tile with the weight of its own body.
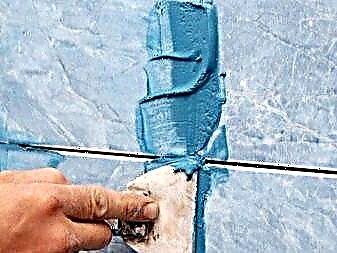
The composition is applied to the clean seam in the transverse direction to it with little effort, continuous strokes along its entire length. The remnants of the grout are removed from the tile with the same spatula, conducting them along the seam. The seam becomes smooth. Excess grout is sent back to the container with the finished composition. Visually immediately you can evaluate the full filling of the seam grout. If somewhere you get a gap (hole) or an insufficient amount of grout, it is advisable to fix these defects without waiting for the seam to harden. Similarly, fill the seams on the entire wall. Then they return to the place from which they started, and already clean the grout.

Cleaning the grout with this method of applying it, aims to make all the seams equally smooth and smooth. Do this operation with a round ebonite stick. If there is no such tool, then you can use a round pencil or an oval lighter. Passing the stick along the seam with slight pressure on the grout that has begun to solidify, remove all excess from the seam and form its slightly concave smooth surface. The seams are slightly recessed, even along the entire length.
After the seam is formed, the tile is first wiped with a slightly damp, and then with a dry cloth. It is very important here to begin the process of forming a beautiful seam until the grout begins to gain strength.

In another case, the composition is applied in the same way, only the seam is formed immediately with a wet sponge or finger, holding a sufficiently wet sponge with a little pressure. With this method, you do not have to return to the already wiped area. In addition, the tile is washed directly during the grouting process. After drying, it will be enough to wipe the surface with a dry cloth.

The finished composition is placed in a trowel bag with a nozzle of the size necessary for the seam. First, either vertical or horizontal seams are filled. When squeezing the mixture, you need to carefully monitor so that it fills the seam completely, without gaps. Since any mixtures diluted with water have the property of shrinkage, that is, a decrease in volume during drying and evaporation of moisture from them, it is necessary to apply grout in a slightly larger amount than it seems immediately at the time of mashing the seam.
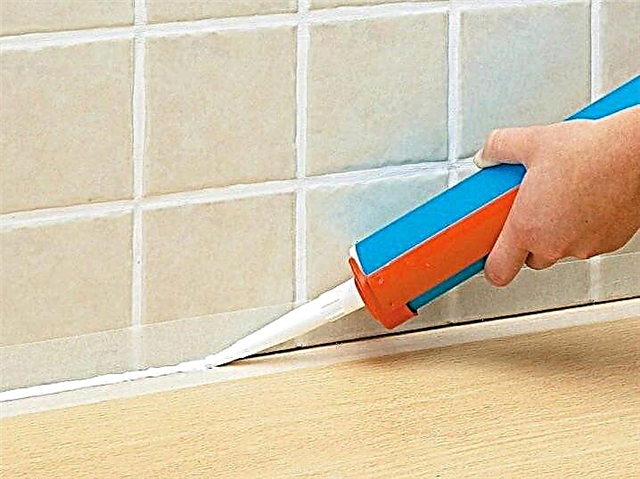
Sealant
Sealants are available in tubes and cylinders for special pistols. To grind the seams, the second option is used. The sealed tip of the cylinder is cut with a sharp knife, after which a conical nozzle is supplied with it, which comes complete with sealant. The cylinder is inserted into the gun, the tip of the cone nozzle is cut so as to obtain the desired joint width. The sealant is extruded exactly into the seam. Leveling it can be done with a wet finger or sponge. From the surface of the tile, the excess sealant must be immediately washed off with a damp sponge and wiped dry with a cloth.
Resin based
The composition usually has a two-component structure consisting of directly the resin and hardener. To obtain a more uniform mass without air bubbles, before mixing the resin must be heated in a water bath to a temperature of about 50-60 degrees. Add hardener, tinting paste, if required, and selected filler, designed by design. The mixture should be tried to be applied directly to the seam. You can use the cooking bag with the nozzle or buy a special trowel bag. To align the seams with the most convenient bending plastic spatula.
If the trowel gets on the surface of the tile, immediately wipe the dirty place dry, then rinse with a damp sponge and wipe it dry again.

Useful Tips
When grouting joints on a tile having not a smooth, but a relief surface, the mixture from the front surface of the tile should be immediately washed with a copious amount of water. Otherwise, it will be extremely difficult to bring it into a decent appearance. The grout that has eaten into shallow depressions of the relief during hardening is very poorly cleaned. You can ruin all the work.
If the tile "does not fit", then the seams are obtained in different widths in one row - vertical or horizontal. In this case, after the standard filling of the seams, you can use this trick: on a dry and clean tile along the entire length of the seam, which must be adjusted, stick masking tape on both sides. The width of the seam is selected based on the widest. The grout is diluted a little more liquid than for filling the seams.
The mixture is carefully applied to the seam being formed, immediately smoothing it and eliminating defects. The adhesive tape is removed without waiting for the mixture to solidify. Otherwise, the grout will begin to crumble along the edges of the seam and the edge of the seam instead of a straight one will become serrated. Masking tape can also be used for grouting tiles with a small relief, in order to protect the edge of the front surface from getting into the grout mixture. In this case, you do not have to spend a lot of time washing. The same applies to porous structure materials. Here you can’t do without scotch tape.


After grouting all vertical and horizontal joints, do not forget to fill in the mixture with all the technological cutouts on the tile near the heated towel rail, hot and cold water outlets, taps for connecting the washing machine, and so on.
When filling seams on a tile with straight (non-smoothed) ends, the seams must be made without deepening. That is, the seam and the front surface of the tile should be a single surface. Otherwise, the brown side surface will be visible from under the grout and spoil the whole impression.

For grouting, you can buy a mixture that matches the color of the tile. But sometimes manufacturers use such colors and patterns that it is simply impossible to buy a finished mixture. In such cases, you need to buy either just a white grout, or the one closest in color, and bring it to the desired shade, adding tinting paste of the desired color scheme.

With perfect laying and tiles of good calibration, you can grind the seams exactly in the color of the finishing material used to get the effect of a solid surface. If the tile is not of the best quality, it is curved (very often found on tiles with a size of one of the sides more than 40 cm), and the installation is not done "perfectly", it is better to use a grout of a contrasting color. So you can "hide" minor differences between adjacent tiles, if one of them could not be "squeezed into the plane" and it "jumped out".
If you use ready-made grout, be sure to “collect” first of all the composition that “spreads” onto the walls of the bucket. Otherwise, this mixture will dry very quickly, particles of the dry solution will fall into the finished composition and then stick around with fragments in the formed seam.
They will have to be removed from the finished seams and do double work, glossing over the formed defects.

When assessing the quality of the grout after it dries, small defects may appear in the form of a roughness of the seam. You can remove them using abrasive materials with fine grain, or, more simply, grind. Do this until the grout has turned to stone. You can still go over such defects manually with a grout diluted to the state of liquid kefir. Be sure to ensure that the seam as a result is smooth, without transitions.
Grouting on the floor is not done in light color. Over time, after numerous mopping and dust and dirt getting on it, it will darken and lose its appearance. Therefore, to grout floor tiles, either buy a ready-made mixture of a darker color, or tint it yourself to the desired shade.

Grouting at the joints, especially if they are wide, remains soft and plastic much longer than on the surface of the tile. After grouting the seams on the floor, any operations are best done after three to four hours after filling the seam with it. Otherwise, you can push the finished seam and you have to start all over again.

When using a cement-based grout, it is sometimes difficult to remove its residues from the front surface of ceramic tiles. Now in construction stores they sell special mortars for flushing cement mortars, usually in the form of bottles with a spray trigger. To simplify the work, you can use them.


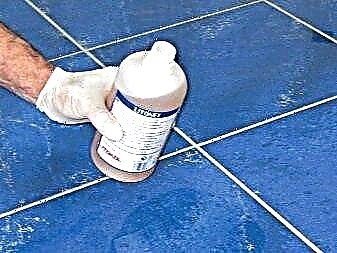
If the selected grout does not have water-repellent or antifungal properties, you can buy these funds for joints separately. They are sold in liquid form in small bottles. Suture processing is done with a small brush, thoroughly washing or rubbing the tile after such a procedure, without waiting for the composition to dry.

See how to wipe the seams on the tile in the video below.
What materials will you need in your work?
Prepare everything you need in advance. The tools that are required are:
- grout mixture
- mixing bowl
- water (s t near 5-20 degrees)
- brush (more convenient if its bristles are soft)
- sponge or rag
- rubber spatula
- whisk / special nozzle
- a tool with a hard end, with which it is convenient to clean out the remnants of the solid solution (a screwdriver is suitable)
After collecting the necessary equipment, proceed with the preparatory work. Clean out the remaining tile adhesive and debris with a screwdriver. Half an hour after the installation is completed, remove the remaining glue so that the material does not have time to become very hard. Wipe the seams with a rag, especially carefully walking along the unglazed ends. Thanks to this, the grout will subsequently be better distributed and more reliably connected to the tile. On this the preparatory part is completed.
Stages of dry mix preparation
The result of all work depends on the quality of preparation of the dry mixture. The main thing is to strictly follow the instructions given by the manufacturer on the packaging of the mixture.
It is better to act in this sequence:
- add to water t 5 - 20 degrees mix in the right amount, mix thoroughly (add the mass to water, not water to the mixture, to mix a small amount of the solution thoroughly, use a simple whisk, but if you need to cook a lot of grout, a special nozzle is better)
- after thorough kneading and achieving a homogeneous consistency, allow the mass to rest for several minutes (the consistency of the grout will resemble sour cream of medium density)
- if the mixture turned out to be thicker than necessary, add water, if the mass is very liquid, pour in another dry solution
Useful advice: the best option for the mixing form is an oval deep bowl (basin, bucket) made of plastic. You do not need to pour the whole mixture into the water if you are overwriting the seams for the first time - make half a kilogram of the mass or even less.
The process of mashing seams
Wipe the seams vertically and mentally divide the wall into blocks - so it will be easier for you to work. Use a simple rubber spatula. The whole process consists of the following parts:
- applying a grout to the tool and its neat distribution between the squares of the tile (apply a small amount, slightly pressing the mass into the floor)
- periodically removing excess mixture
- wiping the tiles with a wet sponge as the mixture does not completely dry (every half hour)
If you have glazed tiles, you can proceed to grouting almost immediately. For unglazed tiles, first moisten the side and top of each piece of tile so that the tile does not “take” moisture from the prepared grout.
You can moisten the surface with a conventional sprayer. However, a measure is needed in this matter. Excessive moisture will lead to the fact that water can harm the grout and contribute to its cracking.
Tricks that come in handy at work
There are some subtleties that will help you make the grouting process much easier. For example:
- Do not grout the entire area at once. Start with a small space of approximately 1-2 m 2 especially if you are practicing for the first time. This approach will allow you to evaluate the speed of work and the frequency of cleaning
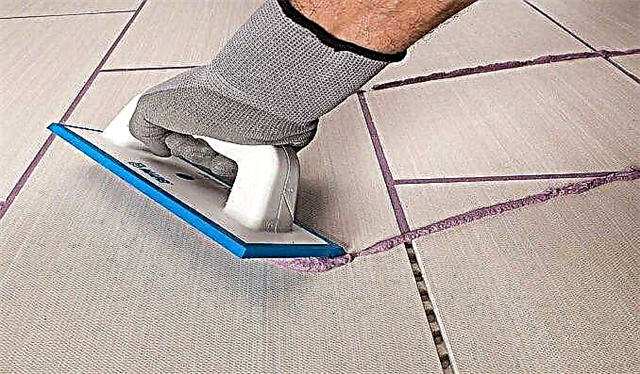
- after you have diluted the mixture and achieved the desired consistency, put a little mass on the tile (if you rub the floor, put a slide from the bucket, a rectangular trowel is suitable for grouting the walls)
- grout will help you to distribute the mixture as competently as possible (place the tool diagonally at an angle 30 degrees)
Walk the grater on the tile several times (3-4) and rub the grout mass into the joints. The seam as a result should turn out to be smooth and maximally filled, without voids.
To summarize: it is much more convenient to overwrite tiled seams gradually. After processing the seams, sweep the sponge over the surface again and let it dry for 4-5 hours.
What is a trowel bag for?
To make your task easier, you can use a practical tool. This is a trowel bag that is often used for difficult to clean surfaces. By the principle of its work, it resembles a pastry bag. A metal tip with a width corresponding to the grout joint is attached to it, and a mass is placed inside, which is subsequently distributed along the seam through the metal tip.
Using a bag, remember:
- the tip is better to move from the top of the seam to its bottom
- you can fill the entire seam at once, and not just a section of several separate plates - this will reduce the time of work
- it is better to squeeze out a little more mixture than necessary (during operation, the grout will be pressed into the seam, after which its remnants can be removed with a stiff brush)
The use of the bag will be appreciated by those who already know how to grout the seams, and who already had a similar experience. For beginners, the simpler option described at the beginning of the article is suitable.
Several steps to remove grout
The remaining mixture can be cleaned with a grater located at right angles to the surface. The grater must be moved diagonally in relation to the seams, and in no case horizontally and vertically - so you risk damaging them. After the process is completed, wait 5-10 minutes. Another useful tool for work is an abrasive grater, working which you will not scratch the tile. Using it, it is convenient to remove dried-on mixture residues.
The following factors affect the drying rate of surfaces:
- base type
- kind of tile
- glue composition
How to control the drying of joints on the tile? Take a damp cloth and do a little test. If the mixture in the seams has become dense, but not completely hardened, proceed to wet grout. If the mixture still sticks to the rag, wait a little longer. And only then go from dry to wet grout.
Wet Grout Steps & Finishing Steps
This procedure helps to permanently remove the remains of the mixture and give the tile a pristine hue and shine.
For wet grout you need a sponge and a bucket. To properly overwrite the seams, you need:
- quickly remove grout marks with a sponge (circular movements will help to remove cement-sand residues most effectively)
- make sure that no bumps are formed in the seams
- rinse and squeeze the sponge well before each new action
- with a screwdriver, if necessary, give the joints the same appearance (if they are identical to each other, the overall picture will become harmonious and complete)
Upon completion, proceed to final cleaning to give the seams on the tile a perfect look. Here again, you will need a sponge or a soft cloth, which after each action must be thoroughly rinsed. After cleaning, all traces of repair work should be removed from the tile. Wipe the surface thoroughly and wait 15 minutes.
Now you can proceed to the application of sealant. It gives durability to the joints and increases resistance to chemical and mechanical damage. They cover the entire tile along with the joints on the tile when they are completely dry. However, in some cases, only seams are covered with a special brush, without touching the tile. If you decide that it is better to cover the seams and tiles on the floor with sealant, use a compact roller.
After you have wiped the seams, fence off the “repair” area with plywood or place any “identification marks” around it. This will serve as a reminder to you and your family that you cannot walk at the seams on the tiles in this area.
Manufacturers of mixtures always indicate the drying time of the material, so in each case everything is individual. Tile grout can dry for two to three days or two weeks.
Types of grout for tiles, their properties
Before grouting the joints on the tile, you must choose the type of composition. There are two types of grouting compounds: cement-based and polymer-based. Polymeric are polyurethane and epoxy based. Epoxy ones cost a lot, but good grouting mixtures with small grains based on light (white or pink) cement cost no less, and are inferior to epoxy in performance. But working with epoxy is more difficult. In the sense that you need to work quickly, immediately form a seam and clean the surface - the life of the composition is short.
 If you properly grout the seams on the tile, there can be a very interesting effect.
In cement-based grouts, sand is present as aggregate. Maybe it is of a different fraction and the smaller it is, the smaller the width of the seam is acceptable and its surface is smoother. At the same time, the price of fine-grained cement grouts is higher.
Fine grout should be taken to get a smoother seam. This is especially critical for floor tiles. It is difficult to remove grease or dirt that has become clogged in a rough surface. Although, it is worth knowing that the roughness when using cement grouts still remains, there will not be perfect smoothness, even if you grind and form a seam immediately. Grain remains - sand, although fine, but there is. Absolutely not work out. Some over the grout pass the seams with varnish, polish for the laminate, wax. But, if you summarize all these materials, the amount will be exactly no less than the cost of even a very good epoxy grout.
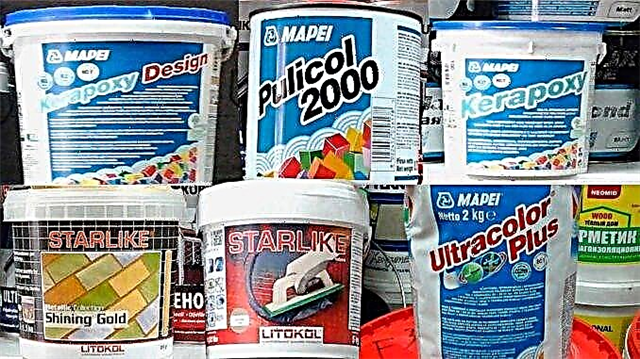 The one in the buckets is polymer, the one in the bags is cement
If you need perfectly smooth seams, use two-component tile grout. An epoxy resin is used as a hardener. If the composition is mixed correctly, the seam is non-hygroscopic (does not absorb liquid), perfectly smooth. In addition, the composition does not change color, the fungus does not develop in it (with good ventilation). The only drawback of epoxy grout for tile joints is that it is very difficult to remove. Only with a diamond blade and angle grinder.
 The difference is not so critical, but in many ways it's true.
You can wipe the seams on the tiles in the bathroom or kitchen with an epoxy compound, which is painted in any color. It can be used with porcelain stoneware, and with any type of ceramic tile, and with mosaics. And in the composition can be added glitters (sparkles).
When to overwrite seams on a tile
Grouting should only begin after the tile adhesive has finally set. The exact date is indicated on the packaging of the adhesive. It can be different - from 8 hours to 24 hours. So just look at the composition that was used.
Sometimes the term “jointing” of tile seams is used. This is the same process, but in special terminology. Then the trowel is also called “fugue”.
Before wiping the seams on the tile, we clean all the remnants of the tile adhesive from the tile itself. We remove all unnecessary seams. Remains of glue, dust - we remove everything.When using epoxy grout, it is important that the joints are dry. Watch for this. Moisture is not a hindrance for cementitious compounds (but not water in the joints).
 Before wiping the joints on the tiles, remove excess glue and debris from the tile joints
Note. So that the grout does not fall out and does not crack, the seam must be filled with a composition of not less than 75% of the tile thickness. That is, if the adhesive was squeezed into the seams during installation, you will have to remove it. If the glue is reinforced, it must be done before it finally "stands up". Ideally, immediately after being allowed to walk on the surface. This information is also on the packaging with glue, but tentatively - 6-8 hours after installation. Better at the same time remove all traces of tile adhesive from the surface of the coating. After hardening, it is unrealistic to cope with reinforced glue. Only a grinding disc and angle grinder, and what it is fraught with - you yourself understand. Even ordinary tile glue, one day after installation, is problematic to remove. Therefore, do not forget to clean the surface after installation. And grout, by the way, must be removed even more quickly. Especially polymer compositions.
How to grout joints on a tile with cement grout
When working with cement compositions for grouting joints between the tiles under your hands should be a bucket of water, clean rags, sponges. They are needed to remove excess from the tile and form the seam itself. For work, it is better to have a rubber spatula made of elastic rubber and one or two metal ones for applying the compound to the rubber.
 To grout joints with a cement composition, two spatulas are needed - metal and rubber
Before wiping the seams on the tile, the composition is diluted with water. The exact dosage of water is indicated on the packaging and the procedure is described there, but usually it is necessary to mix in two stages. The first is the main mixing and again after 5-6 minutes. Increasing the amount of water to get a smoother seam is an erroneous technique. When the liquid diluted composition dries, cracks can form, but the surface will still not be smooth. There is no such possibility for cement grouts.
How to grout tiles
For work usually use small rubber spatulas. You can try plastic, but here's how convenient it is. The technology for grouting joints in tiles is as follows:
- On the edge of the spatula, spread a narrow roller of material.
 You can wipe the seams on the tile with a metal spatula, but it is not so convenient
You can not rush much with cleaning, but it is better not to tighten it. Hard cement is difficult to remove. It’s easier to handle when it’s still wet and the composition is crumbling. Wipe, clean with rags, paper towels. You can finally wash the tile from traces of grouting by adding vinegar to the water. And to remove the stains, add a couple of tablespoons of sunflower oil to the water.
How to achieve a smooth seam
Smooth seams not only look better, but are also easier to clean. Therefore, until the trowel is completely frozen, they try to smooth it out using any smooth object:
- piece of round wire,
- round spatula
- a spoon or fork with a narrow and rounded handle,
- finger is dry or wet.
 There are also special scrapers
In general, any plastic or metal object is slightly rounded or flat. You can try a screwdriver if you need a flat seam. In general, there’s a lot of people here. To grind the joints on the tile to smoothness, you need to catch the moment when the composition has dried up, but still remains elastic. The technology for aligning seams is as follows: first along, across, and then separately align at the intersection. The glue squeezed out during smoothing is not removed - we can damage the seam. So we leave to dry for 2-3 hours (but no more, then you can’t remove it), then we take a rag, water and wash it off.
Dry seams are covered with protective compounds - wax, varnish, polish. Not the most fun lesson is to crawl with a brush on the floor. But even this does not save to the end. Until the composition is washed off, everything is fine. But gradually it is washed away, dirt is more and more stuffed into the seams, more and more actively they wash the seams, which erases the protection faster. After about six months, the color of the grout at the seams changes.
How to grout joints on a tile with two-component grout: measure and mix
Most questions arise regarding the mixing of polymer grout in parts. As already said, it is sold in buckets. There are packages of 1 kg, 2 or 2.5 kg, 5 kg. The viability of the composition is very small - claimed about 40-60 minutes. As usual, take half as much (so that you probably won’t catch it). Without work experience, a kilogram, and even a half kilogram, cannot be worked out in 20-30 minutes, and after this time it turns into stone.
 Measure clearly, mix thoroughly
Beginners really need to start with 250 grams. How to knead such a small portion and not upset the proportions? Using conventional kitchen electronic scales. True, it is desirable that they be electronic scales and they have a high accuracy class (permissible error is 1 gram). That is, we will mix epoxy grout in mass fractions.
To be sure of the correct proportions, weigh the "dough" and hardener. Weigh the main component without packaging, hardener in a bag. We take into account that a few grams go to packaging. We write down the exact weight. For example, 1000 g and 80 g. We need to get about 250 g of the composition. So you need to mix 1/4 of each component. We act like this:
- We take plastic dishes, put on the scales. If you can, zero out its weight, if not, just write down how much it weighs.
- We spread the main component - exactly 250 gr. Try no more and no less. Without hardener, it is plastic and easy to lay out the exact amount. The remaining "dough" is returned to the bucket, the lid is tightly closed.
- Add 1/4 part of the hardener. From 80 gr it will be 20 gr. Again, there should be exactly 20 grams.
- We take a metal narrow spatula and thoroughly, until uniform, knead the composition. It takes about 2 minutes.
 Before wiping the seams on the floor tiles, we prepare the composition
On this you need to quickly get to work. You did not forget that before you grout the joints on the tile, they must be cleaned and dried. This must be done before kneading.
How to form a joint from epoxy grout
To work with epoxy grouts, there is a special tool - a grater with elastic edges, white felt to remove residues (you can use a hard cloth), a cellulose sponge. It is convenient to work with a grater, but it costs quite a lot. If the area of the tiled floor is solid, it may be worth splurging. If it's just a few square meters, you can handle the rubber / plastic spatula.
 This is what a special spatula for epoxy grout looks like
The application technology itself is no different. Quickly fill the seam in the transverse direction, remove the remains, but not longitudinally, but at an angle. When using a rubber grater, the composition is removed carefully already in the process. This saves the composition. Once the mixed part has been worked out, remove the excess from the tile. Wash the rest of the composition from the tile first with a dry, hard cloth (ideally with white felt), then with a soft cloth.
 You can fill the seams with a syringe. It turns out more accurately, which is important on a relief coating
Then, it is necessary to form a seam. Manufacturers recommend a special cellulose sponge (sold in the same place as the grout), because traces remain of the usual. The coating, and the grout is not cheap, and there is simply no reason to save on a sponge. Rubbed with a sponge in a circular motion or diagonally. Try not to lead along the seam - this will wash the composition. The seam should be on the same level with tile or porcelain stoneware (maybe lower if you so wish). When polishing and forming a seam, do not press too much - if dents form, they will remain. Adding a thin layer is useless. It exfoliates. You can only clean everything and fill in a new one. Herein lies the difficulty of working with epoxy grout. All of this work should take less time than the time before hardening of the composition. So we work fast.
 This is a cellulose sponge. We wash off the remains with it and form a seam
After working with a sponge, water remains on the tile. Epoxy grout is dissolved in water. If you do not remove it, after drying, stains will remain and you will have to wash everything. For the final cleaning of plaque, which remains on the surface, use a special wash. It makes sense to buy it with grouting of the same company.
There is a way without finishing. The water that remains after washing must be removed from the surface with a soft cloth. We remove not only water, but also the remnants of epoxy grout. But when you wipe the tile, make sure that the fabric does not "climb" onto the seams. You can’t touch them.
Manufacturers
As usual, deciding which grout to use is only half the battle. Choosing a manufacturer is also very important. In general, we can say that the manufacturers are the same that produce tile glue. Usually there is a whole line for laying and grouting tiles. If you are satisfied with the quality of the tile adhesive, you can also look at the trowel in the same company.
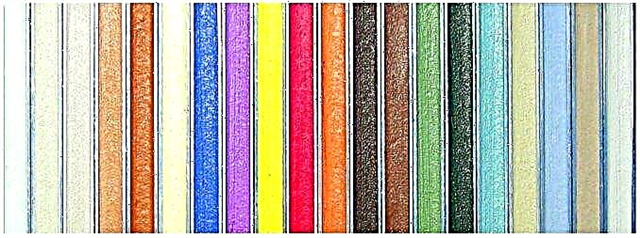 These are the color options for polymer grout for tiles
For example, firms Mapei (Mapei), Litokol (Litokol), Ceresit (Ceresit). From Russian normal reviews from Atlas (Atlas). As a rule, any of these companies have polymer and cement grouting compositions. And not one at a time, but for different conditions. There are for showers with increased water resistance, frost-resistant. If we are talking about polymers, then they are with the possibility of adding glitters (sparkles).
Steps for grouting tile joints
It seems to many that it is very easy to grout - it is worth putting the composition into the seams, removing the excess and that's it, the work is done. However, in the process of termination, technical nuances often arise on which the final result depends. We will try to sort out the final stage and identify tricky and complex moments of such a crucial process.
Step # 1 - preparing tools and materials
The advantage of self-finishing is that you do not need to buy expensive tools and materials. Everything is relatively cheap and is sold in building supermarkets. So, for work you will need:
- set of rubber spatulas for applying grout and distributing it at the seams,
- several buckets or special containers for mixing the solution,
- a construction knife and a paint brush for cleaning tile joints,
- several household sponges for wet cleaning,
- protective accessories - mask and rubber gloves (for aggressive solutions).
Since the process will not last long, it is better to prepare tools and appliances in advance.

A large amount of clean water is also needed - for the bathroom this is not a problem if the water supply is not blocked due to construction work. Of the materials you will need ready-made grout in jars or a dry mix for the preparation of the solution, which is usually sold in small packages.

Step # 2 - preparing the joints and grout
After the glue has completely dried up (time can be different - from 8 hours to 2 days), you can prepare the work surface and dilute the dry mixture with water if you have not purchased the ready-made solution.
The gaps between adjacent tiles must be completely cleaned of glue residues with a knife, and then sweep out small fragments and dust with a paint brush. The cleaner the treated surface will be, the smoother the grout will lie and the stronger it will “adhere” to the edges of the tile and the wall.

Before wiping the seams on the ceramic tile, prepare a solution. We take a clean container, pour warm water (20-25ºС) there, fill in the dry mixture from the pack and mix thoroughly.
If there is no special nozzle-mixer for a drill, an ordinary wooden stick will do. The main thing is that there are no lumps in the solution. After preparing the mixture, you should immediately begin the application process.

Step # 3 - grouting
At this stage, inexperienced home “tilers” make a small mistake: they begin to fill the joints between the tiles “dry”. Professionals recommend wetting the seam with water before applying the composition for better adhesion. Water is applied with a paint brush, preferably a round, large sponge or spray.
You can play it safe and use an antiseptic primer instead of water to prevent mold or mildew.
When applying the solution, pay attention to the movements of the spatula - they should go perpendicular to the seam. The grout should be applied quickly, but gently, pushing inward a little so that it fills the entire space of the seam.
You can draw the sharp end of the spatula along the line of application and once again go through the cross strokes.

Step # 4 - dry and wet cleaning
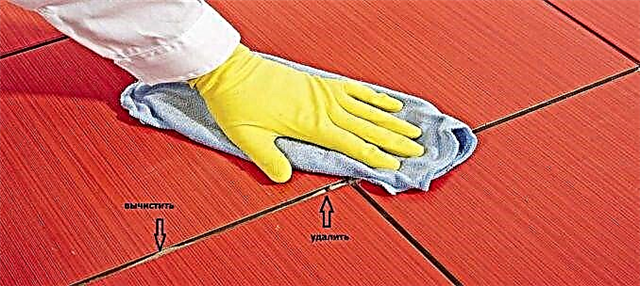
Even with a very accurate application of the composition, stains and traces remain on the edges of the tile. How to grout tiles, leaving a minimum of marks? Even in the process of processing the seams, you can remove the excess: after several transverse strokes, carry out a spatula along, collecting excess solution.
Then, even before it is completely dry, you should take a dry rag or damp sponge and thoroughly wipe off the rest of the solution.
However, be careful: when pressing with a sponge, part of the grout can be squeezed out of the seam, so use only transverse movements.

A wet sponge is preferable for one more reason: removing excess solution, it smooths the seams, makes them smooth and aesthetically attractive. During work, do not be distracted, because the trowel mixture dries quickly, and it is rather difficult to remove it in a dried state.
Get ready for the fact that after the first cleaning you will have to wipe the entire tile several times with a damp cloth - traces of grout, especially gypsum, are very stable.
The nuances of working with floor tiles
Tile joints on the floor are filled in exactly the same way as on the walls, but there are several nuances that make work easier. For example, there is a method that allows you to quickly process a floor with smooth tiles. Instead of an ordinary sponge, they take a hand-held construction grater with a rubber overlay and fill the seams at arm's length with wide, sweeping movements. The solution will lie down evenly and densely fill the voids if it is made more liquid.

This method is not suitable if the texture of the tile is embossed, has protrusions or scars. The grout will fill the cavities on the ceramics, and this is an additional time-consuming cleaning job.
After processing the ceramic cladding, do not forget to fill the seams around the outlets, pipes, plumbing equipment and towel rail fixtures with the solution.
Once again about the types of grouting materials
On the shelves of building supermarkets, you can find many materials for filling tile joints. Domestic and foreign manufacturers offer products of different composition and consistency: dry mixes, ready-made solutions of medium viscosity, dense pastes. Consider the difference between fillers and which ones are better for self-grouting.
The basis for the most common type of dry mixes is cement - similar products can be found at each manufacturer. Some cement compositions contain sand, others are diluted with other fillers. Sand mixtures should be used if the width of the seams reaches 4 cm and above, that is, for bathrooms they are absolutely not suitable.Cement-sand mortars are used for exterior decoration of facades, arrangement of garden paths, construction work in the yard.

For grouting tile joints in bathrooms, bathrooms and kitchens, Portland cement mixed with lime is used. Fine grinding of the components guarantees a uniform uniform layer during application. Polymer-cement mortars are not diluted with water, but with a latex-based composition. There are two types of mixtures: color and light, intended for mixing with the coloring pigment during cooking.
The second type of solution is based on resins. Even professionals rarely take up work with epoxy material, which consists of two components and is prepared immediately before application. The thick mass must be applied quickly and very carefully. Hardened, grouting material in strength becomes equal to ceramic tile and lasts at least 50 years.
Epoxy mixtures are used for joints wider than 6 mm, but sometimes they are used to decorate bathrooms. Designers add gold or silver powder to the powder and get a luxurious frame for ceramic tiles.

The most resistant material is considered to be aggregate made on the basis of furan resin. It is as expensive as epoxy and has another feature - exceptionally black. Despite the high characteristics and exceptional wear resistance, furanol is rarely used.
Sometimes, for the processing of joints, complex sections or places where the tiles adjoin the sink (bath), silicone filler - sealant is used. It is sold in plastic syringe tubes and squeezed directly into the seam using a construction gun.
The sealant has elasticity, antiseptic properties, however, with time it can change its shade: white or transparent material turns yellow from exposure to water and light.

The most convenient placeholder for beginners tilers is a polyurethane grout, sold ready-made in buckets of various sizes. It is universal, that is, it is suitable for sealing joints when laying both tiles and mosaics. The width of the seam can be different - from 1 mm to 5 mm.
The polyurethane composition of the mixture is easy to apply, hardens quickly and does not cause problems with further care.
What should be the optimal width of the seams?
The appearance of the tile depends not only on the color or texture, but also on the width of the seams that surround each element on all sides and affect visual perception. The opinion that wide seams suppress the tile is wrong.
On the contrary, too narrow seams interfere with full visual perception, in addition, they are dangerous from a functional point of view: they are difficult to grout, so it is difficult to judge their integrity and tightness.

The lack of too wide seams in their weak resistance to external factors. Grout cracks, crumbles and requires constant updating. For this reason, sand is added to the cement mixes for wide joints. The average sizes of the sides of the tiles for the bathroom are from 10 to 33 cm, a suitable seam width is 3-4 mm.
How to prevent cracking?
Cement grout cracks more often than others. There are several reasons for the rapid destruction: too thin the consistency of the solution, an unstable wooden base, exposure to hot water or the wrong ratio of components. If the repair is not done on time, water will regularly fall under the tile, which threatens the appearance of mold.
You can embroider and clean the seams, fill them with mortar again, but where is the guarantee that this will last?
It is better to prevent cracking, listening to the advice of specialists. It is necessary that the solution is homogeneous, medium viscosity, and the seam - well cleaned and wide enough. With independent dilution of the mixture, it is necessary that after stirring it stand for 5-6 minutes, and then mix it again. It is not recommended to ventilate the room or use hot water inside it during drying.
And finally, the main tip: follow the instructions on the packaging. There you can find information about the correct application of the mortar, the width of the joints and the drying period.