Reading time: 7 minutes No time?
The high cost of finishing work and (or) the low qualifications of the masters make you think about how to lay the tiles on the floor, observing all the necessary technological requirements. We offer you to understand the nuances of this type of work, as well as get acquainted with the algorithm of actions.

Read the article
How to lay tiles on the floor - general recommendations
To be satisfied with the result, we’ll figure out how to properly lay the tile on the floor:
- the base should be primed in order to improve its adhesion to the tile adhesive,
- it is advisable to first place the tile on the floor in order to determine how it will be laid, and what elements will have to be trimmed,
Advice! When laying an even rectangular tile, draw lines on the floor so that all the seams are perfectly even.
- the seam between two adjacent elements is 2-3 mm. To ensure the same amount of gaps, you should use plastic crosses,
- apply the adhesive mixture with a notched trowel, forming a layer with a thickness of 10-15 mm,
Attention! When choosing a tile for a particular room, consider not only its design, but also the size.
We offer you to watch a video about laying tiles on the floor with your own hands.
What tools and materials are needed for laying tiles on the floor with your own hands: a standard list
The list of tools used may vary depending on the complexity of the pattern being formed, the characteristics of the material and the length of the room. To do the laying of tiles on the floor with your own hands, you should have:
- plastic basin
- a metal grater and a grater with a sponge,
- putty knife. If you will put elements in which the length of one side exceeds 30 cm, it is worth preparing a tool with teeth of 10 mm. For smaller, 4-5 mm teeth are enough,
- a mallet, with which it will be possible to remove the air voids formed between the tile and the base,
- Master OK,
- knife cutter
- plastic crosses or wedges, with which you can provide the required spatial position of the elements of the floor covering,
- grinder
- building level,
- measuring instruments
- pliers.
 Another tool may be required for operation.
The usual way to level the floor
This option is resorted to with a large differential coefficient. The work is carried out in the following sequence:
| Illustration | Action description |
 | The required level at which the screed will be filled is determined. Measurements should be made around the perimeter of the room and in the middle. We fix the beacons on a mixture containing cement and gypsum. |
 | A solution is being prepared consisting of cement, sand and water. One part of cement takes three parts of sand. To reduce the likelihood of cracking, about 3% plasticizer can be added. |
 | The solution is distributed on a pre-moistened base and leveled using the rule. Using zigzag movements we provide better shrinkage of the solution. |
 | After the solution has dried to a state where it can be walked on, the excess solution is cleaned, completely leveling the base. After stripping the screed, the beacons can be removed by closing up the crevices with the solution. |
Tool
First of all, they are determined with the necessary tool. It will be required:
 Tile tool
- Hammer and rubber mallet.
- Chisel.
- A set of simple spatulas, as well as serrated.
- Trowel.
- Level and tape measure.
- Tile cutter.
- Tile adhesive, grout and sealant.
- A set of crosses to create even seams.
- Capacity for water and solution.
Of course, other devices may be needed depending on the specific situation.
Material quantity calculation
This is best done at the initial stage. Many people think that the calculation of floor tiles is quite difficult, but in fact, everything is different. This is done according to the following principle:
 The first thing that begins with the installation of tiles is the calculation of the number of tiles, so it is important to correctly carry out this event
- Define object parameters. Its width and length. The total area is calculated.
- The resulting indicator is divided by the area of the selected tile (you can calculate several options at once).
- Ten percent are added to the amount obtained. This will be the necessary supply.
For example, the floor has a size of 3 * 3 meters. So, the area will be equal to nine square meters. Normal tiles have a size of 30 * 30 cm. The resulting tile area is converted into meters: 0.09 square meters. m. Total: 9: 0.09 + 10% = 110 pieces. When trimming calculations, the size of the seams is also taken into account.
On a note! Any large construction store that sells tiles offers free services for calculating the required number of products.
Work with the surface
Laying floor tiles is only possible on a well-prepared surface. First, everything superfluous is removed from the room. Removed old flooring. Communication checked. It is on this that it is worth focusing attention. The fact is that the entire supply of water and drainage is done in advance. Do not deal with sex until all the problems in this area have been resolved. If possible, it is advisable to immediately hide the pipes.
When all technical procedures are completed, the surface leveling process begins. It is much easier to carry out work when it comes to new houses, apartments that have only screed. In the old rooms - you have to try. The fact is that objects built many years ago can have different bases. Sometimes you have to create a new surface.
On a note! When it comes to bathrooms, which are located in old apartment buildings, they pay attention to skirting boards. They are made of durable cement mixture. They will have to be removed completely, along with the coating.
Floor preparation before laying tiles
- After cleaning, a lot of dust and dirt remains that must be removed. Floor tiles - does not tolerate anything superfluous.
- The surface is measured. It is done in order to determine the existing curvature. Small differences are allowed - no more than 5 mm by 2 meters. Any defects that will be more than the specified parameters need a more serious approach.
- The situation will help fix the leveling mixture. It is better to choose cement-sand compositions. This mixture is poured over the installed beacons. It turns out a flat and smooth base. But such a procedure is performed after all the deep gaps and potholes are closed.
- Wood flooring needs the same approach. The only thing is that the procedure will be a little different. First, the reliability of the lag and boards is checked. Further, wood is impregnated with oil paints. Slots are pre-sealed with elastic putty. A layer of waterproofing will be laid on a dried surface. The reinforcing mesh is pulled from above. The prepared mixture is poured.
- Do not forget about priming with penetrating compounds.
 The primer of the floor before laying the tiles provides a more durable connection of the tile with the surface of the floor
 On a note! Rooms with high humidity require a more careful attitude. A prerequisite will be - waterproofing the bathroom. Materials for this can be used different. Some can be laid (film, roll), others can be applied using a roller and brush (liquid).
Indeed, laying floor tiles with your own hands requires a balanced approach to the surface. It cannot be hoped that minor flaws will be corrected by the final coating.
Markup
There are two main ways of tiling the floor. Each has its own characteristics.
- The easiest option is that the installation starts from the far corner. The movement goes towards the doorway. This method is suitable for small objects, as well as for rooms with complex geometry. Ideal for those who do not have enough experience.
- You can apply a more complex option. In this case, they begin to veneer in the middle. The surface is pre-marked - you need to get four identical squares or rectangles. The lines will go through the center, forming four corners. You should choose one, it will serve as a starting point for work. Material laid according to this principle will require trimming around the entire perimeter. Therefore, such manipulations are carried out with sufficient experience.
 Tile flooring
It is recommended to start work with a preliminary arrangement of elements. That is, laying tiles on the floor is carried out on the "dry". This will help to immediately calculate everything correctly. Especially if there is a pattern that requires adjustment. It is important to consider the presence of seams. This method allows you to once again evaluate the size of the trim, and, if necessary, make adjustments.
Advice! Performing initial calculations - pay attention to areas that will be located along the walls. To get a beautiful floor surface, you should be guided by the principle that tiles should not be cut into narrow strips. The size should be more than 35-40% of the total width.
Stacking
Laying ceramic tiles on the floor begins with the preparation of glue. Even if a ready-made composition was purchased, it needs to be thoroughly mixed. When using a dry mixture, you must follow the recommendations that the manufacturer provides.
Do not immediately cook a large supply of glue. It must be borne in mind that the process can be significantly delayed. Then the composition will begin to lose its properties. It just freezes.
The work is carried out according to the following principle:
- Once again, the surface is well tested. No dirt or dust should remain on it. If priming was carried out, then you should wait until the solution dries well.
- The technology of laying ceramic tiles involves the subsequent wetting of the floor with water. It is better to do this with a spray gun.
- The glue is scooped in the required amount. It is applied to the selected area. Large areas should not be covered immediately. It is better to focus on the size of the material with a margin. You should get a surface that will be devoid of any voids.
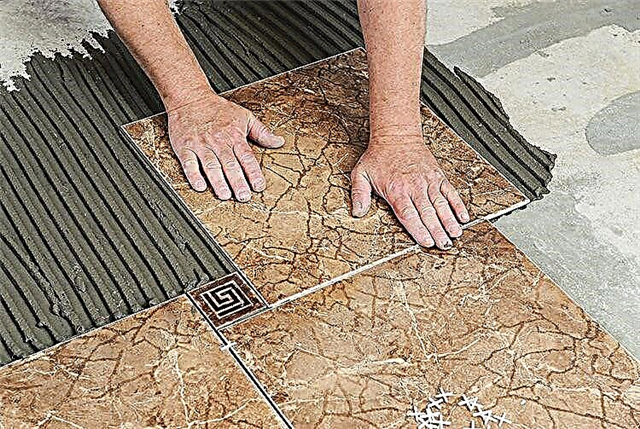
 Tile glue application
 Crosses between floor tiles
On a note! The space near the walls begins to close up at the last stage. Such an approach will help reduce time, since in this case it will be possible to do trimming of all the material at once.
Some tips
- Keep in mind that the technology of laying tiles on the floor - does not allow the presence of voids. Assuming the formation of such a defect, it is likely that the coating will be damaged.
- Excess glue is immediately wiped off the surface. Otherwise, glue will have to be removed with a special scraper.
- The question often arises: how much does the laid material dry? It depends on the mixture used, but two days is not recommended to walk on the floor.
- At the last stage, mashing of the seams is used. This procedure allows you to get beautiful gaps. When the need arises, an additional sealant is used.
If you analyze all the requirements and rules, it will become clear that laying tiles on the floor is a difficult but doable task.
Self-leveling self-leveling floor
The self-level is relevant for minor differences in height. The work is performed as follows:
| Illustration | Action description |
 | The solution is prepared in accordance with the instructions indicated on the packaging of the mixture. |
 | Spread the solution on the surface. We remove air bubbles with a needle roller, the length of the needles of which is greater than the thickness of the mixture. Roll the formed coating with a roller several times, changing direction. |
Start by preparing
Absolutely all manufacturers of ceramics insist: you should start not at all with testing the base for compliance with the standards, but with checking the ceramic finish and developing a plan for its installation.
Your first priority is to choose the right design and caliber of the product. As a rule, in stores the stands are tiled with one collection in the optimal layout, according to the designers of the plant. Approximate variations can be found in professional catalogs on manufacturers' websites or in trading floors.
You can change, supplement or completely redo the proposed design to your taste. To do this, ask us to provide you with several samples of the main tile and its components (borders, decors, panels, etc.) and form a layout suitable for your room.
But keep in mind - when you enter the room, the center of the room or the area that is completely free from furniture and equipment (the so-called free piglet) is the first thing that catches your eye. In small kitchens and bathrooms, this is usually not more than 1-2 m². Therefore, laying tiles on a concrete floor should be planned in such a way that the center falls on the visible square meters of the area. Thanks to this simple technique, solid elements will be glued in the “empty” area, and cut elements will be glued only around the perimeter. This is especially important in the presence of uneven walls.

Design planning with offset.
The next step is the choice of floor ceramic installation scheme. There are several basic types:
- Standard or seam to seam,
- Offset or inversely (similar to laminate flooring),
- Diagonal.

Basic styling schemes.
Due to the wide variety of formats and types of tiles (elongated strips, polygonal, oval products, etc.), floor ceramics can be installed according to parquet schemes (herringbone, wicker, deck, squares), randomly or modularly (using a combination of different-sized claddings).
If you intend to use decorative elements or a combination of colors, then do not be too lazy to make a drawing to scale. You can request the development of such sketches from ceramics of the same series, thickness or manufacturer from consultants in shopping centers specializing in ceramic cladding. As a rule, plants provide not only appropriate computer programs, but also special devices (resembling ATMs in appearance), on which even an inexperienced user can create their own floor design, moreover, in a two- or three-dimensional version. BUT! If you want to assemble tiles of different manufacturers and calibers, be sure to make sure that the thickness matches perfectly, up to a millimeter. Otherwise, laying the tiles on your own is absolutely even, without flaws it will not work.


It is better to think over the layout in advance in order to acquire the necessary amount of facing material. The calculation of the required quadrature is based on:
Surface area
The specified value must be divided by the area of one element, taking into account the tile joints. If the tile has a complex shape or multiformat ceramics is used in one design, then it is better to draw a drawing.
Tile sizes
The number of whole and trimmed elements in one row depends on this. To calculate the first value, you can ask the consultants to make calculations in special programs (provided to sellers by manufacturers) or use the formula:
If, in accordance with the perimeter project, it is necessary to lay out the frieze and embedment (wall section from the main or complementary tiles), then the overall pattern should be designed so that the border strip is laid out from whole elements, and full or cut tiles can be used on the embossing border.

Tiled floor with curb frieze.
When buying ceramic tiles, be sure to take a small supply, that is, you need about 10-15% more than what is required. Partially finishing material will go to scraps, a possible battle or will be useful in the future for repairing damaged elements.
Styling techniques
In what cases is the tile laid with a gap or a seamless method, with a straight or zigzag seam? It does not depend on your desire, but on the characteristics of the floor material. Firstly, the monolithic canvas looks, of course, beautiful, but it is made only from rectified porcelain tile. That is, the facing is the most stable and resistant to temperature extremes with edges processed on special machines. It is very difficult to put this material yourself without a solid work experience.
Secondly, almost all ceramic products for the floor must be mounted with a gap. The larger the size of the products, as well as the load, the wider the seam should be, otherwise in the future various defects (cracks, etc.) will appear due to seasonal deformations. Recommended values:
- For tiles of caliber from 5x5 to 30x30 cm - 1-1.5 mm,
- For ceramics with sizes from 30x30 to 60x60 cm - 2-5 mm,
- For products of large formats from 60x60 cm and more - 5-10 mm.

Tile seams: zero, narrow and wide.
The choice of the seam option - straight or curved - also depends on the shape of the tiles, design features. Some collections include laying the base with inserts, a matching pattern in a certain order, etc. Similar information is available on the box.
So, we have come to the finish line. The cladding is selected, the layout option is approved, you can proceed to the last stage - the selection of floor material for quality. When buying, pay attention to the following:
- Tiles of the highest grades must have a uniform thickness, width and length (maximum deviations, as a rule, do not exceed 0.5 mm), as well as the same shade, without stains, stripes, foreign inclusions, spots, chips, small cracks, scratches, irregularities and other defects in the picture.
- The glaze should be uniform, without smudges and sagging, the surface should be as even as possible with a minimum of negative (concavity) or positive (convex) deviations from the plane, and the side edges should be free of burrs, irregularities, or crumbs. This is easy to check - connect the two tiles together at the ends and faces, carefully inspect. Any deviations negatively affect the evenness and aesthetics of the future floor.
- The purchased kit must be from one batch and one tone, which guarantees the absolute identity of all elements in color, caliber and other parameters. This information is indicated on the box.
- Tiles should be cleaned of packaging and paraffin or wax coatings that are applied to the surface of some collections to prevent scratches during transport.
Step-by-step instruction

The service life and ease of use of floor ceramics depend on the quality of installation work. Unfortunately, this axiom is often neglected, and the result is a fragile, unaesthetic, or defective coating. Therefore, we recommend that you follow all the rules, from the preparation of the base to the aging time of the grout.
The process can be divided into 6 stages:
Foundation preparation
The quality of the subfloor should provide the possibility of creating a layer for a tile coating of adhesive cement mortar with a thickness of 2-15 mm, for a mosaic - up to 20 mm. Therefore, the following actions are required:
- Checking the rough floor for compliance with standards (SP 29.13330.2011 "Floors. Updated version of SNiP 2.03.13-88", etc.),

Checking the concrete base for evenness.
Base must be
- Equal - the difference is not more than 2 mm per meter of surface,
- Dry - the residual moisture content of cement-containing substrates - up to 6%, anhydride - up to 1.5%, wood or wood-based - not more than 12%. At elevated rates, it is recommended that treatment with moisture-proof primers or special emulsions for wet substrates. The choice depends on how quickly you need to prepare the rough floor,
- Durable - at least 15 MPa or 150 kg / cm²,
- Capless - without cracks, hollows and knolls,
- Clean - without stains of oil, bitumen, glue, coatings, soot and other compounds that prevent adhesion of the adhesive to the base.

Repair cracks in the screed.
By the beginning of work, pipelines and other types of communications laid in the ceilings should have releases in accordance with the design of the premises. Do not forget that for large areas you need a uniform arrangement of expansion joints to compensate for temperature and hygroscopic deformations of the base. When laying tiles on concrete or mineral screed indoors, it is recommended to arrange thermal gaps every 20–25 m² of area, with an external cladding - 16 m².
In small rooms, the role of heat-shrinkable joints is played by a gap of 4-5 mm wide around the perimeter between the ceramic coating and the walls.
Recall once again that the floor should be monolithic. Many masters believe that irregularities are easily leveled with tile glue - the layer will be thicker than laid. However, it is forgotten that the cement-polymer mortar shrinks, so a perfectly even coating will not work. All recesses, cracks and bumps greater than 5 mm must be eliminated - filled with repair mixtures or chipped, and dust and debris removed. Treat the surface with primers with the required properties - hardening, adhesive, etc.

Priming on a concrete base.
If you are thinking of laying tiles in a shower, bathroom or toilet, pay special attention to waterproofing. To create a reliable water barrier, you can use polymer coating, coating penetrating agents, impregnations, membranes or any other material available to you. The main thing is to properly form a layer with an institution on the walls 10-15 cm in height and carefully sealing the corners.
Base leveling

Layout of the floor for laying tiles.
A prerequisite for leveling the floor is the absence of drafts in the room. It is necessary to close all doors and windows in the process of filling the base. The temperature of the base itself is also important, its maximum permissible minimum temperature is + 5 ° C. In order for all alignment processes to go correctly, it is necessary to maintain cleanliness and dryness in the room. Before starting work, you need to vacuum the surface and remove all debris. If there are traces of paints and varnishes, synthetic or natural oils on the floor, then you should carefully remove these traces, as they may interfere with the effective adhesion of the mixture to the floor, and the coating may crack over time. The leveling process needs to be controlled with a level so that the surface is perfectly smooth. If the differences in different corners of the room are large, then it makes sense to first make a screed.
In order for the mixture for floor leveling to be prepared correctly, you need to carefully study the instructions for diluting this mixture before starting work, since in practice there are times when water is poured onto the eye and the mixture becomes either too liquid and loses its properties, or too thick and unevenly applied to the substrate. The solution is poured immediately after its preparation. The solution is evenly applied to the surface over the entire area of the room, in case of puddles or sagging, they need to be leveled.
Be careful when pouring, try to follow the instructions of the manufacturers, which concern the permissible layer thickness. After about 12 hours, the mixture dries. You can start laying tiles after 2-3 days have passed.
Choosing floor tiles
In the process of choosing a coating, you need to decide for what purposes it will be used, where it will be laid, with what intensity it will be walked on. For different places you need to choose ceramic products with different characteristics.

Comparative table of characteristics of tile coatings.
The tile in the bathroom is selected regardless of its abrasion class, because the intensity of walking on it is usually small. It is necessary to emphasize the water-repellent properties and resistance to household chemicals. The glossy finish in the bathrooms is unacceptable: when water gets on the ceramic coating, it turns into a skating rink.
In the kitchen, it is better to lay tiles with a third class of abrasion. In the kitchen, they often drop something, pour it, so it should be resistant to mechanical and physical influences. Tiles with a porous or textured structure are not suitable for the kitchen, as in the future you will encounter difficulties in cleaning it.
Most often, people move in the hallway, which is why you need to choose a floor covering with wear resistance of grade 4.
To lay the tiles on the floor you will need the following tools and materials:
- tile,
- a cutter for her
- primer,
- tile adhesive
- level,
- pencil,
- special blade
- roulette,
- scraper with nozzle.
Tile Laying Technology
First you need to spread the purchased tiles over the entire area of the room in order to determine its most advantageous placement and estimate the amount of trim in the corners of the rooms. In order for the seams to be even and regular, plastic crosses must be placed in the process of laying the elements. The glue mixture must be applied to an area of not more than a square meter in order to have time to lay out the products before the mixture dries. If surpluses appear during the application process, they must be removed immediately. Before you start laying tiles on the floor, you need to mark the floor, it is carried out as follows: you need to stretch the cords along the length and width of the room in its center to see the direction in which to lay. Laying tiles on the floor starts from the center of the room, while constantly looking at the cords so as not to deviate from the desired direction. Check each new element with a level and do not forget to put crosses. After the whole tiles are laid out, you can begin to trim.
Features of laying tiles on the floor:

Technology for laying tiles on the floor.
- The spatula for applying glue is selected depending on the size of the tile, if the size is large, then it is necessary to use a spatula with large teeth. If not, then the putty knife, respectively, should have small teeth.
- If the tile will be laid on the underfloor heating system, then you need to use special reinforced adhesive mixtures so that under the influence of heat from the underfloor heating system the tile does not begin to peel off from the floor.
- It is advisable to lay the tile immediately after applying the glue so that it does not partially dry, as a result of which the elements do not stick properly.
- Alignment of elements in height occurs through a rubber mallet.
- If the tile is below the level of the remaining tiles, then it must be removed and an additional layer of glue should be spread.
- If you plan to use clipping along the walls around the perimeter of the room, then this will look unaesthetic. Best of all, when buying material, take care of the supply of tiles by 10-15% of the total.
- To stack in a checkerboard pattern, lay one row with a whole tile, the next one is already trimmed.
Tile trim
To correctly and evenly trim, you need a tile cutter. First, marking takes place, and then the tile is installed in the tile cutter and pressed against it, and cut with a quick movement from itself. After that, a slight pressure on the tile is enough to break it. Many neglect the tile cutter and use improvised means, but in such cases, the edges of the tile may be uneven, and the surface of the tile may be chipped.
There are several options for laying tiles on the floor:
- Seam to seam is a method when tiles are laid to each other with virtually no gaps. If the tile is multi-colored, then it can be laid in a checkerboard pattern. This option is very problematic when laying, the seam between the tiles laid in this way turns out to be uneven, often curvy, it is difficult to fill it with special grout, since the distance between the tiles is very small. During operation, the seams of the tiles laid by this method are destroyed, and water and household chemicals freely get into them, which contributes to the quick disconnection of the tiles.
- Unscramble - this is when the tile is laid with a shift along the seam. Such a shift needs to be done in each row.
- Open seam method - it consists in leaving a gap as a seam between the elements when laying tiles. This will smooth out all the flaws and irregularities of the tiles.
After laying the tiles should be at least 24 hours. But it is better to withstand three, so that all the glue hardens and the surface is not exposed to loads earlier than necessary for safe movement on it.
Primer surface
For base treatment, a deep penetration primer should be chosen. Carefully read the instructions on the packaging. Using a wide brush or paint roller, apply the composition to the base. If the solution is absorbed quickly enough, it is necessary to form 2-3 layers.
 The base should be carefully primed.
We believe that the thematic video will help to better understand the intricacies of the process.
Expand or Offset
For tiles manufactured in the form of elongated strips, it is wrong to use the simple angular method. Installation should be made from the center of the room. The method is quite time-consuming, requires care and accuracy in the work.
First, the reference point (central) is calculated, the first row is laid from it, Then subsequent lines are formed as shown in the figure below.

Laying pattern with offset or off center.

Laying scheme from the center of tiles of different calibers.
The offset coefficient of each subsequent row relative to the previous one depends on your desire - by 1/2, 1/3 or more. Since this is not a laminate or parquet board, there is no need to sew seams here. It is rather a decorative effect, allowing you to create a decking, brick or typical for the laminate.
In two perpendicular rows
To lay the tile in a room with incorrect wall geometry (including various protrusions, bay windows, etc.), this method is used. We mark the center of the room, from it we set the first element. Regarding this cladding, we apply two perpendicular central lines along which we lay the floor covering to the wall. From the finished rows we lay down the remaining ceramics. It is very convenient for forming panels and various decorative or accent inserts.

Laying scheme for rooms with incorrect wall geometry.
Diagonally
In addition to the finished center lines, you need to draw more diagonal from opposite angles. The calculation is carried out either from the center, or from the far corner of the room. The pattern can be any.

Diagonal tile laying scheme.
After the necessary marking lines have been applied, lay the ceramics on a dry floor surface. This is necessary for precise adjustment of the general layout scheme, as well as cutting of extreme tiles or shaped elements by a tile cutter (including for forming curly cuts for various plumbing fixtures, water pipes and other communications).
The instructive and technological map for facing works, developed back in 1973 and updated in 2003 by the Design and Technological Institute of Industrial Construction, recommends that craftsmen make landmarks for themselves on large areas: either from a mooring cord stretched between the extreme reference points (for example , along a long wall or diagonally) or install so-called lighthouse tiles. These are single ceramic elements or a series of facings laid along an extended surface, which allow you to control the level of finish and the correct formation of strips.

Laying scheme of lighthouse tiles.
Glue mixture preparation
The solution should be perfectly homogeneous and sufficiently fluid so that it can be easily applied to the surface and distributed. The dry mixture is shut with water in the proportion recommended by the manufacturer, thoroughly mixed with a mixer until a homogeneous mass without lumps is formed. Remember that the finished glue can be used for a certain time (20-60 minutes), therefore, with large areas of installation, it is better to prepare the solution in batches.

Elastic polymer mixtures for ceramics are one- and two-component. Mix them thoroughly before use, and apply with a notched trowel.
Grouting
Gaps can only be filled after the coating has been completely laid and the adhesive has hardened. As a rule, 24 hours is enough.

Wipe dry cement grout with water in accordance with the manufacturer's instructions, apply with a spatula and fill all joints without exception. After 15-30 minutes, collect the remains of the colored mixture with a damp sponge. After an hour, rinse the surface again with a wet cloth, and the next day treat the seams with water-repellent impregnation.
Coating cleaning
The tiled floor after finishing the troweling has a whitish coating that must be removed with a solution of special detergents for ceramic based on acid (Pramol Ceracid, Pufas Glutoclean acid, Italon A-CID), then rinse with clean water until all foreign liquids and dirt are completely removed. In the future, it is recommended to use neutral detergents or a mild soap solution, and to eliminate stains or strong contaminants, purchase professional concentrates that do not damage the surface and do not leave streaks (Litokol Colored Stain Remover, Bellinzoni Mangia Macchia, etc.).

Do not use abrasive cleaners that can cause scratches, especially on polished, lappated, or glossy ceramic surfaces.
You can load the finished coating with furniture and other household items in 48-72 hours.
Advice! If you need repair masters, there is a very convenient service for their selection. Just send in the form below a detailed description of the work that needs to be done, and offers with prices from construction crews and companies will come to your mail. You can see reviews about each of them and photos with examples of work. It is FREE and does not oblige you to anything.
Materials, tools and equipment
Here is a list of materials and tools that you will need in the process of laying, cutting and grouting floor tiles.
Tools and equipment:
- Tape measure, metal ruler and corner,
- Construction pencil for marking,
- Building level and rule
- Construction mixer or drill with a mixer nozzle,
- Tile cutter or electric tile cutter,
- Core or glass cutter (needed for curved tile trimming),
- Tile nippers (for cutting curvilinearly),
- File (for grinding trimmed edges),
- Putty knife,
- Notched trowel (6-8 mm),
- Master OK,
- Rubber trowel for grouting,
- Rubber mallet,
- Bucket with a sponge and a rag,
- Knee pads and household. gloves.
In addition to the tile itself with a 10% margin, you will need:
- Glue for the tile corresponding to the base material (for concrete, wood, old tiles, etc.), as well as the characteristics of the tile itself,
- Crosses of the desired size,
- Grout of the desired color,
- Primer.
Step 2. Drawing markup
Once the floor is dry, you can start drawing markings. There are many ways to draw markup, but everyone has one goal:
- The floor should be marked so that, firstly, the trimmed tiles were not placed in plain sight, and secondly, undercutting was required as little as possible. Ideally, the tiles should be trimmed by a third or a maximum of half.
So, for example, markings can be constructed so that whole tiles are placed at the entrance, along the axes of the window opening or, say, at the threshold of the balcony door. In our article, we will consider one of the most popular ways of laying tiles on the floor - along two perpendicular axes from the center of the doorway.
So, draw a line from the center of the threshold to the center of the opposite wall using a cord or laser level. Further along this line, start laying a number of tiles with crosses “dry”. After laying the last whole tile, draw a line along its outer edge, so that you get two strictly perpendicular vertical lines as in the diagram below. It is advisable to use a square to make sure that the angles are straight at 90 degrees.

In the corner of the perpendicular, we glue the first tile, and from it we will lay the first row (along the horizontal line).