In the production of various construction works on their own, often there is a need to cut ceramic tiles at home. To do this, it is not necessary to have a professional tool - a tile cutter. We’ll make a reservation right away: It’s not about constant work and large volumes, but about small batches or even piece goods in general. In such cases, buying an expensive tool does not make sense, it is quite possible to do with improvised means.
Types of cut
- Trim in a straight line. In this case, it is necessary to distinguish where the cut is. If less than 2 cm remains to the edge of the cut line, then this cut can be attributed to a figured one,
- Round holes in the tiles of various diameters,
- Curly clippings
- Mosaic elements. If there are requirements for precise geometric shapes, then this view also applies to curly cuts. Otherwise, it is actually crushing tiles into pieces. Products are placed in a bag and with a heavy tool (hammer, sledgehammer) are crushed to the desired proportions. An exception may be non-ceramic tiles.

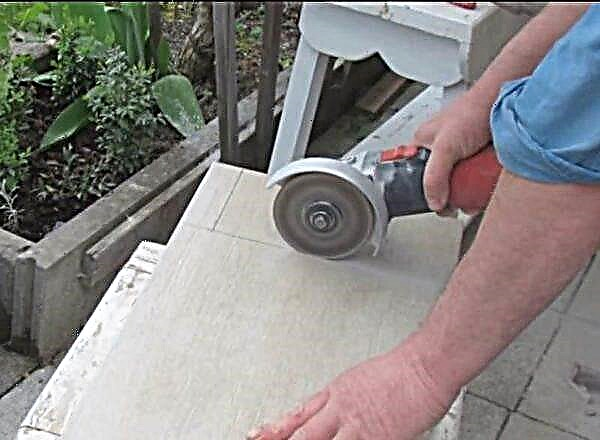
Angle grinder (grinder)
Generally speaking, this is a universal tool. As before, masters with the help of one ax could cut down a house, and now with the help of one grinder they can cut anything. The author witnessed how they cut a smooth round hole with a diameter of 5 cm.
Note! The method is suitable for straight, curly shapes and in the presence of minimal skills with the tool of curved lines of any configuration.
For cutting you will need:
- Bulgarian. Any power and any kind
- Cutting wheel (stone or diamond),
- Safety helmet or goggles (required),
- Protective fully enclosed suit and mittens (recommended),
- Respirator (recommended)
- Clamp. Additionally in some cases (clamp or vise).
Pre-mark the tile, preferably with scratching the line with any sharp tool. In an extreme case, drawing a line with a construction marker is allowed. When working, a lot of dust is formed and marked lines can be erased when it is removed.
Direct small sections along the edges of the tile can be made by laying the tile on a flat surface on the table or on the floor. First, they cut the surface by several millimeters. With such an operation, the tile’s own gravity and friction force are enough to keep the product in place. With deeper passages, you can optionally step on the edge or hold an assistant. With curly cuts, it is better to attach the product with a clamp to the countertop or fix it in a vice, after placing pieces of cardboard or a dense fabric under the lips.
Advice! Place a piece of plywood under the product to prevent damage to the surface of the table or floor.
Res is carried out in several ways:
- On the outer edge of the marks pass several times along the entire length. Deepen to 3 mm in one pass. Repeat the operation until the result is achieved,
- For small segments, up to 2 cm long, immediately over the entire thickness,
- Marking is applied on both sides. On the front side is a surface cut (up to 3 mm). Then they cut from the back (up to 3 mm per pass) until they reach the goal. This method avoids accidental damage to the front of the cutting tool.

It is recommended for complex cuts: at the edges or curved. The fact is that with this method there is a lot of dust, the consumption of the cutting blade, time and labor costs. An ordinary straight line can be cut in much simpler ways.
Jigsaw
If there is no tile cutter or grinder, then an electric jigsaw may be available. Unappreciated by many tool!
Note! Similarly, you can use a manual jigsaw with a file on the stone. But the cut speed will be an order of magnitude lower.
- Jigsaw. Any power
- Stone file,
- Safety glasses (recommended).

Sawed in the usual way. Cutting too rounded cuts is problematic, the file is stuck. Not thick (wall) tile is sawn well. It is very difficult to cut floor porcelain tiles in this way. For a little relief, it is suggested to pre-soak the material.

It is recommended to use if necessary to cut curved segments with large radii of curvature.
Glass cutter or any pointed tool
In this way, only tile can be cut. And only in a straight line. Another limitation is that the parts should not be less than 2 cm wide.
Would need:
- Glass cutter. Instead of a glass cutter, any tool with a sharp cutting edge can be used. It is desirable that the cutting tool be made of solid materials: diamond, win, etc. As an example, cutting tools: drills, spear-shaped drills, utility knife, etc.
- A metal ruler or any straight metal rail. As a last resort from any material. But then you need to very carefully scratch the cut line, since you can cut the ruler and the scratch will go to the side on the tile.


To get a clear cut without chipping and leaving to the side, the scratch must be applied carefully. Just scratch the top, glossy layer.
Advice! When applying risks, pay attention to the beginning and end of the scratch. Often at the very beginning and at the very end the scratch is not deep enough. This is due to insufficient pressure and psychology. At the very beginning we just try on and the pressure is weakened. At the very end, acceleration occurs and the risk is “lubricated”. This can lead to the fact that the fault in these places will go to the side.

When applying the risks with a knife, make several passes to get a deep scratch.
Scratching depends on the hardness and sharpness of the tool used. If the tool is sufficiently solid and sharpened (glass cutter with a sharp roller, spear-shaped sharpened drill bit, etc.), then one pass with good effort is enough. If the tool is blunt or made of soft material (utility knife), then several passes will be required. Ultimately, the furrow should deepen below the glossy layer.
Several split methods:
- On a flat sharp angle. Take the tile with both hands from different sides from the risks. To strike sharply from a distance of 5-10 cm about an angle from the back of the product. Before this, it is good to aim so that the blow falls, as accurately as possible at the place of the fault. The angle can be any, the main thing is that it is sharp and solid (metal corner, wooden beam). For convenience, it is advisable that the corner rise above the surface of centimeters by 10. Otherwise, there is a chance of hitting the surface with a blow, the blow will go sideways and the tile will not break at risk
- On a solid rod. The tile rests on a long solid rod with the back side, the risks are aligned on it in place. Then it is sharply pressed on both sides with two hands. The rod can be any - even, with a diameter of about 8 to 15 mm (drill, round pencil, etc.). It is desirable that the length is not less than 2/3 of the length of the fault. You can break out parts, and not through the entire length of the tile,
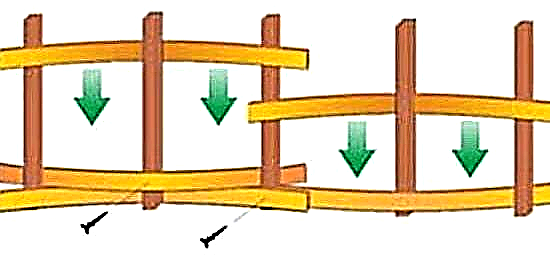
- Between the clamps. The method is suitable both for breaking off over the entire tile, and for breaking out large parts. The approaches are different, but the essence is the same. It is required to fix the product between two clamps at the fault point. It can be two whetstones or thick plywood. You can make a small machine: fasten two sheets of plywood at one end with screws, the tile is placed inside, with effort pushing them apart. The main thing is to ensure smooth sharp edges and the accuracy of installing the material on the line risks. After installation, we additionally clamp the structure with its own weight and sharply press on the protruding edge.

Cracking of sandwiched tiles.
It is recommended to apply to wall tiles, limited to floor. Porcelain in this way is very difficult to break.
Round holes
Depending on the diameter of the holes, the tool and nozzles are selected. For making holes in the tile, any tools with a rotating tip (drills, screwdrivers, punchers, hand rotors, etc.) are most suitable.
Note! The power of the tool does not matter, the rotation speed is more important. It is desirable that you can set a low rotation speed. Above 500 rpm only to the detriment of the cutting tool. Although the hole is made faster, the cutter heats up very much and quickly fails. In addition, a high rotation speed increases the likelihood of chipping along the edges of the hole.

Various nozzles for drilling holes in the tile.
Nozzles for small diameter (up to 15 - 30 mm):
- Special drills with one-sided sharpening. The best option, but quite expensive. Enough for a long time, they drill almost any hard tile surface,
- Lance-shaped drill on the tile. Cheap drills, for one-time work is the best option. When used on a simple tile, they are enough for several dozen holes,
- Carbide tipped drills (for concrete, stone, perforator, etc.). Not the best option, but if necessary a couple of holes can be made with them.
Nozzles for large diameter:
- Crowns with various materials (diamond, corundum, tungsten carbide). Are professional tools and are expensive,
- "Ballerina." In the center is a spear-shaped drill, the location of the second incisor is adjusted by moving the rod, bolted to the central leg. A cheap option that will allow you to cut through several holes of different diameters.
Starting from a diameter of 50 mm, holes can be cut through with a “grinder”. All work is recommended to be carried out in a protective mask or glasses.
Figure breaking
Sometimes you need to make curved lines. The lines can be not only straight, but also semicircular. Such breaks are more problematic when they do not start from the edge. In such cases, you will first have to make a hole and then break it out.
For figured breaking, it is recommended (whenever possible) to put deep risk in any way along the entire breaking out border. This will reduce the number of possible chips.
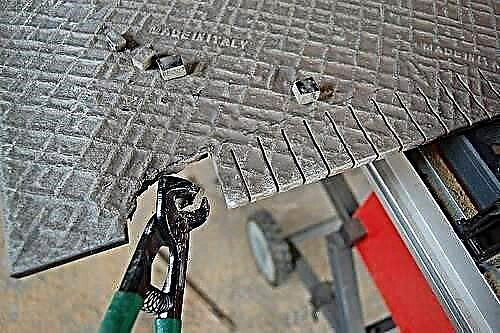
Figured breaking out of a tile.
There is a special tool for breaking out - tongs with a wheel. But for one-time work, it is not practical to acquire a special tool. Therefore, you can do with ordinary pliers.
Breakout technology is very simple. Pliers (or tongs) are strongly compressed, the material crumbles at the same time, or are compressed and sharply rotated (only far from the fault line, at least 5 mm). Small pieces break off. When you try to break off a large piece at once, you can spoil all the work. A part may break off behind a line of risks.
Long, straight, narrow pieces through the entire tile are broken off by a sharp turn of the pliers to the side. Pre-clamping them along the line of risks (a scratch, of course, should be applied). At the same time, the tile may not break off over the entire length and the procedure will have to be repeated on the remaining part. Then they also gently break the remaining sharp protrusions.
The easiest way is to take risks and hit an acute angle. In this way, you can easily and quickly prepare most of the elements.
Sawing is used if it is not necessary to cut a piece through the entire length. In this case, several sides are trimmed, and one breaks off along a solid rod or through clamps.
Advice! If you need repair masters, there is a very convenient service for their selection. Just send in the form below a detailed description of the work that needs to be done, and offers with prices from construction crews and companies will come to your mail. You can see reviews about each of them and photos with examples of work. It is FREE and does not oblige you to anything.
GLASS CUTTER

For small volumes of work and straight cuts
Glass cutter is used when you need to cut literally several tiles and complex or curved cuts are not supposed.
- Mark with a pencil and a square.
- Lay the tile on a hard, flat surface (workbench or plywood sheet).
- Move the square slightly away from the drawn line so that the cutting part of the glass cutter stands directly on it.
- Place the glass cutter on a line at the edge of the tile, press it on the tile and guide it along the line using the square as a guide. You should hear a characteristic rattle, meaning that the tile is being cut. Pay special attention when cutting the beginning and end of the line - if the glaze is not drawn along the entire length, the tile will break unevenly.
- Tap the glass cutter handle or something along the cut line.
- Take a wire hanger or other similar object, place it under the tile along the cut line and press on both sides of the tile with your hands. It should break clearly along the line. If the cut goes close to the edge, break off the smaller part using the tongs. You can also place the tile over the edge of the workbench along the cut line so that the unnecessary part hangs, and push your hand on this unnecessary part.
- If the cut edge of the tile is sharp or rough, it can be sanded with a grindstone or sandpaper.
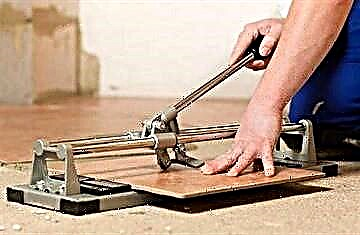
Tile Cutter

For medium volumes of work and straight cuts
Tile cutter is a professional tool for working with tiles, which does not cost a lot of money. It is used when you need to cut a lot of tiles directly or diagonally. Not suitable for very small cuts, curly cuts, cutting along curved lines and oversized tiles that do not fit inside the tool
According to the principle of operation, the tile cutter is similar to a glass cutter, only it is more accurate, convenient and fast. A round incisor cuts a groove in the tile, along which the tile is broken, placed on a special tubercle.
How to cut
- After marking, lay the tile on the base of the tool so that the marking is aligned with a special mark on the tile cutter. Make sure the marking line is exactly under the blade.
- Lower the handle while applying a little pressure so that the blade snaps firmly against the tile. Then gently move the blade away from you. You will hear a characteristic rattle, which is a sign that the tile is being cut.
- Use the legs of the tile cutter, which fall with a sharp and quick movement, from which the tile breaks, because it lies on a special tubercle.
- If the cut edge of the tile is roughened, sand it with sandpaper or a grindstone.
You may need it
Tile Cutter
For medium volumes of work and straight cuts
Tile cutter is a professional tool for working with tiles, which does not cost a lot of money. It is used when you need to cut a lot of tiles directly or diagonally. Not suitable for very small cuts, curly cuts, cutting along curved lines and oversized tiles that do not fit inside the tool
According to the principle of operation, the tile cutter is similar to a glass cutter, only it is more accurate, convenient and fast. A round incisor cuts a groove in the tile, along which the tile is broken, placed on a special tubercle.
How to cut
- After marking, lay the tile on the base of the tool so that the marking is aligned with a special mark on the tile cutter. Make sure the marking line is exactly under the blade.
- Lower the handle while applying a little pressure so that the blade snaps firmly against the tile. Then gently move the blade away from you. You will hear a characteristic rattle, which is a sign that the tile is being cut.
- Use the legs of the tile cutter, which fall with a sharp and quick movement, from which the tile breaks, because it lies on a special tubercle.
- If the cut edge of the tile is roughened, sand it with sandpaper or a grindstone.
You may need it
Hand held
 This group includes glass cutters, tile cutters, nippers. A manual glass cutter is like a ballpoint pen with a roller at the end.
The roller is made of such materials:
The second variety is the hardest and most durable. The glass cutter is used as follows: with a pressed force, it is rolled along the tile along the ruler, as a result of which a groove appears on the material. Next, the module is broken along this furrow, laying it on the edge of the table or placing a bar under it.
Disadvantages of glass cutter:
- suitable only for the thinnest wall tiles,
- not able to cut along a curved path.
Nippers are designed specifically for cutting tiles. At the bottom there is a cutting roller, the same as a glass cutter. Having drawn a furrow, the master grabs the tile with the jaws of the nippers (one of them is flat) and breaks the fragment along the drawn line.

Advantage: you can bite the material along a curved line. Disadvantage: fragments of small width are cut off at a time. A manual tile cutter acts just like a glass cutter - it makes a furrow with a diamond roller, after which the tile is broken.
But the working tool is fixed in the carriage, moving along the guides and equipped with a lever. Thanks to the lever and precise positioning of the roller, the master has the ability to press on it with greater force than in the case of a manual glass cutter, so the tile cutter copes with the thickest tile and even with porcelain.
The tile is placed on a bed with anti-slip pads and an emphasis that prevents displacement and rotation of the tile. Some models are equipped with a ruler - it allows you to accurately measure the width of the cut part. For cutting at an angle, you must choose a tool with a swivel base.

Tile breaking is done right there, on the tile cutter. To do this, there is a round stop at the base, and support legs on the movable carriage. The master sets the paws on the tile and breaks it with pressure on the lever.
Signs of a quality manual tile cutter:
- bearings in the mechanism of movement of the carriage. Bearing tile cutters have two advantages - the smooth running of the carriage (this is a condition for an even cut) and durability. Cheaper tools with bushings instead of bearings have a smooth stroke only in a new state, after a short operation the carriage moves with jamming,
- lack of play in the carriage. If there are gaps, the roller will not be able to correctly draw a furrow, and the tile will break unevenly,
- stiffener in the lower part of the base, preventing its deflection. If the base bends when broken, the tile will break crookedly.
Electric
The category of electric tools include:
 electric tile cutter. Desktop machine armed with a cutting disc. Advantage - high quality cutting. There is a water cooling system, therefore, only solid disks are used to ensure high quality. The cooling system is arranged in two ways: place a container under the working base, so that when filling with water, the lower part of the disk is immersed in it, or a device for supplying water through the flowing method is installed. Submission of tiles to the disk is carried out automatically. In some models, the table is movable, in others - a carriage with a disk. A conventional electric tile cutter is designed for cutting in a straight line. Performing a curved cut is possible, but skill and dexterity are required. It is better to purchase a model designed specifically for curly cutting. The cutting element in such a tile cutter is not in the form of a disk, but of a ring,
- a circular saw. Works like an electric tile cutter if a diamond cutting blade is installed. The only difference is that the tiles have to be fed to the disk manually. Cutting quality - high,
- waterjet machine. A stationary device that cuts tiles with a thin stream of water (diameter - 0.2 mm) with the addition of abrasive powder ejected under high pressure. Hydroabrasive machine cuts efficiently, quickly and on any path. But it is expensive, because it can only be found in large workshops,
- angle grinder (grinder). Advantages of the grinder: versatility, the possibility of cutting along a curve. Disks for cutting tiles on a grinder are of two types: stone - inexpensive, but have a significant thickness and wear out quickly, metal - are more expensive than stone, but thinner and last longer.
 electric tile cutter. Desktop machine armed with a cutting disc. Advantage - high quality cutting. There is a water cooling system, therefore, only solid disks are used to ensure high quality. The cooling system is arranged in two ways: place a container under the working base, so that when filling with water, the lower part of the disk is immersed in it, or a device for supplying water through the flowing method is installed. Submission of tiles to the disk is carried out automatically. In some models, the table is movable, in others - a carriage with a disk. A conventional electric tile cutter is designed for cutting in a straight line. Performing a curved cut is possible, but skill and dexterity are required. It is better to purchase a model designed specifically for curly cutting. The cutting element in such a tile cutter is not in the form of a disk, but of a ring,
- segmented (dry cutters). They are used most often. The disk is divided into segments by radial slots, which ensures effective heat removal, so they can be cut without liquid cooling. After working for a minute, the disk is allowed to cool, rotating it for 20 - 30 seconds. at idle. Cutting quality is low, the process is accompanied by intense dust formation and vibration,
- solid (wet cutting discs). Without cooling with water, they work for no more than 15 seconds, therefore they are almost not used with grinders. But the quality of work they have, compared with dry cutters, is higher, so some prefer to purchase a special device for supplying water, attached to the casing of the grinder. An important advantage - when wetted, dust is not released,
- combined. They cut both dry and with cooling. In terms of quality and duration of work without cooling with water, they are located in the middle between dry cutters and wet cutting discs.
Cleaning of dry cutters and wet cutting discs from debris clogging them is done by rearranging the other side. This cannot be done with combined discs: there is an arrow on them indicating the direction of rotation, and this requirement must be precisely followed. Such discs are cleaned by cutting concrete or cement-sand brick.
The most durable cutting discs with diamond spraying, it is fixed in different ways:

- by refractory solder. Such discs are cheap, but when overheated, they lose spraying and therefore do not last long,
- geometric closure method. Diamond chips are fused into the edge of the disk heated by electricity. It holds on more reliably, while the disk, although more expensive, remains accessible,
- laser soldering. Very expensive and extremely hardy wheels. Commonly used in industrial installations.
How to choose the right cutting tool?
The tool is selected taking into account the amount of work:
 small. If the tiles need to be customized a little and only once, it is impractical to purchase a tile cutter and other specialized tools. It is more correct to use a grinder: it is used for a number of tasks and therefore is available in almost every household. Glass trimmer is suitable for trimming thin tiles. Also, for one-time work with a small volume, you can order cutting of tiles on a waterjet machine in the workshop,
- middle. The purchase of a manual tile cutter is justified. Nippers are also useful - for cutting fragments of small width or along a curve,
- large. Significant amounts of work are faced by professionals. It is worth buying electric tile cutters for straight and curved cutting. If a serious workshop is equipped, purchase a waterjet machine.
 small. If the tiles need to be customized a little and only once, it is impractical to purchase a tile cutter and other specialized tools. It is more correct to use a grinder: it is used for a number of tasks and therefore is available in almost every household. Glass trimmer is suitable for trimming thin tiles. Also, for one-time work with a small volume, you can order cutting of tiles on a waterjet machine in the workshop,
How to cut tiles without chips?
The key to a smooth cut without chips - compliance with the following rules:
 when using a glass cutter, manual tile cutter or wire cutter, the furrow with a cutting roller should be done in one pass. When you try again, the roller will not get to the same place, you will get two furrows and the tile will break crookedly. With a lack of experience, it is recommended to practice scrap. It is required to learn how to create sufficient effort along the entire path of the tool and move it with uniform speed,
- when working with a disk tool, cutting starts from the front side: chips are formed when the disk leaves the material,
- at the beginning and end of cutting with the disc, its rotation speed should be reduced.
 when using a glass cutter, manual tile cutter or wire cutter, the furrow with a cutting roller should be done in one pass. When you try again, the roller will not get to the same place, you will get two furrows and the tile will break crookedly. With a lack of experience, it is recommended to practice scrap. It is required to learn how to create sufficient effort along the entire path of the tool and move it with uniform speed,
If there is no self-confidence, it is recommended to leave a processing allowance of 3-5 mm. The edge with chips and bumps is removed with a grinding wheel or nozzle.
Recommendations
Before cutting, it is useful to soak the tile in warm water for 40-50 minutes. (except for porcelain tile), this will give a triple effect:
- ceramics soften and make it easier to cut,
- the number of chips will decrease,
- there will be less dust (when cutting with a disk).
Standing the tile in the water for a longer time is not worth it - it will deteriorate. It is possible to supply water to the cutting zone when using a grinder without a special device.
Craftsmen attach hose clamps to the tool case and connect it to the water supply. A simpler option is to invite an assistant and equip him with the same hose or spray bottle made from a plastic bottle.
Water cooling allows you to:
- improve cutting quality through the use of a solid disk,
- exclude dust emission.
TIPS FOR TILES
For small volumes of work, cutting along curved lines and breaking out
A simple and inexpensive tool for working with ceramic tiles. It looks like ordinary tongs or pincers, except that there are carbide blades at the ends of the jaws. They allow you to effectively bite off the edges of the tile.
Using forceps, you can make curved cuts, cuts of an unusual shape or bite small pieces from the tile. They are used when laying tiles around objects of unusual shape, for example, around the toilet bowl, the base of the sink or pipes.
With tongs, you can cut very complex shapes up to the full circle and do it cleanly. Only accuracy and patience are needed, as it takes a lot of time.
How to cut
- Make markup. Draw with a pencil a curved line along which the tile will be cut (or use a glass cutter). Use patterns, cans, lids and other round objects as a template. If the area you will be cutting with forceps is far from the edge of the tile, first cut the tile using one of the above methods.
- Place the tile between the tongs of the forceps. Tighten forceps.
- Break off small pieces one by one. Start at the very edge of the tile, even if your layout line is farther. If you try to bite off too much at a time, the tile may break or crack. Continue to work, gradually approaching the marked line. As you get closer to the line, take smaller and smaller bites.
- When you get to the markup, break off clearly on it.
- The cut edge will be rough, so sand it with an emery cloth or grindstone.