While planning the future interior of housing, everyone thinks about the future comfort, beauty and style. After all, the desire to create an original interior, your own zest, and often you want to do it yourself. And also do it all quickly and economically. We all know how long the repair lasts and what unearthly money it costs.
Recently, the use of decorative plaster of various types has become fashionable and popular. Painted walls or wallpapers gradually recede into the background, giving every homeowner the opportunity to express themselves with the help of an original and unique interior, plastering the travertines of the same walls and sometimes the ceiling.
That is why we advise you to consider the type of decorative plaster - Travertine. It is this material that can show all your uniqueness for a little money, help express the owner’s inner world and make the apartment or house unique. After all, this plaster can be applied in completely different ways and thereby this gives it a unique picture and atmosphere. This type of plaster fits perfectly into any interior style - from classic to modern, or even high-tech. Plaster elegantly imitates the natural originals of the stone.
What is decorative travertine plaster
Travertino (Travertine) - a type of decorative plaster, which includes limestone and it perfectly imitates the texture and texture of natural stone. It is used for both exterior and interior decoration. Now it is one of the most popular ways of decorating the surfaces of a room. This plaster has a refined aesthetics. And the one who at least once came across her will not remain indifferent.
 What is decorative travertine plaster
It is impossible to resist the desire to have this work of art in your home. A popular travertine work is drawing a World Map on a wall. It is also popular to make a decorative fireplace using drywall and putty on it a drawing of natural stone. The stucco fireplace interior looks spectacular and natural. This type of plaster was widely used in Italy in Ancient Rome during the construction and decoration of the walls of the Coliseum. Composition of decorative travertine plaster:
Features of travertine
Travertine plaster consumption per 1 m 2 is only 1.5 - 2 kg. And also, if necessary, this plaster can be restored. You can buy this finishing material at specialized points. Decorazza is considered a very good company, in which there is decorative plaster for the interior decoration of travertine walls (Traverta).
The price of which is not cheap, but the highest level quality Travertine plaster types: silicate and mineral. Silicate consists of acrylic polymers, and mineral - of cement or lime.
Surface preparation and plastering
Before plastering, we need to prepare the surface - an important step in order to improve and extend the life of the plaster. Surface preparation includes the following steps:
- We clean the walls of paint, layers of chalk, wallpaper, etc. It is better to remove all the old elements of the wall covering.
- It is necessary to level the surface. An important step is the plastering of the walls, with their large bends. It is also necessary to close all the cracks, since in the future this can lead to the destruction of travertine.
- The final stage of preparation is the priming of the walls. This is necessary, otherwise the old wall covering will absorb moisture from Travertine, which will lead to the destruction of the latter. First, the first layer is applied to saturate the wall well, to close all pores and wait for it to dry completely. And then they are primed with a second primer layer and also wait for complete drying.
Travertine application
- Stucco itself
- Mixer Drill
- Solution mixing tank
- Rollers
- Rags
- Small and large spatulas
- Trowel
- Hard brushes
- Sponge
- Sandpaper or grinder
Work with plaster only at room temperature:
- We put putty on a wide spatula or trowel, you need to apply a thin layer of a couple of millimeters on the surface
- Leave to dry completely, at least 12 hours
- After complete drying, grind the surface. If this is not done, then the color of the paint will change in the future.
- Next, choose the technique of applying travertine
- After drawing, it is necessary to grind again
- Then, if necessary, paint the surface
- If there was no staining, then open with wax, and when staining it is necessary to coat with varnish.
Variety of textures and reliefs
As for diversity, there are two application techniques:
- Continuous coating
- Partial coverage
In continuous coating, the method is to evenly cover the entire surface, but to create gaps in the idea of dimples (indentations) using different thicknesses of spatulas. And in a partial coating, you need to randomly create tubercles in different places on the surface. And they create these irregularities with a hard brush, sponge or rags. And in that and in that technology the textured stone looks very natural. The effect is amazing. As for the picture, it happens:
- Vertical
- Horizontal
- Mixed
- Spotted
Advantages, disadvantages and properties of plaster
It is worth mentioning that the odorless travertine decorative plaster is non-toxic and non-combustible. So, the plaster has a very small fraction (crumb), and therefore it is easy to hide scratches, chips, cracks, etc. The material is applied with a thick layer, and therefore it can be used to correct all surface irregularities. The material has a wide gamut of colors and shades, but it is worth remembering that after drying, the plaster becomes a tone, or even 2, lighter, so you must initially choose the right color and tone.
 Advantages of decorative travertine plaster
The main advantages of the material:
- Ease of application
- Environmentally friendly material
- Vapor permeability
- Low cost
- Strength
- Masking imperfections of walls and other surfaces
- Unique pattern
- Easy care
- Wide color gamut
- Resistance to water, moisture, fire, biological factors
As for the shortcomings, these are some difficulties in the professional application of the material. But this can hardly be called a disadvantage, since everything comes with experience. We advise you to purchase this product. With the help of travertine, a unique style is created, and you can do all this with your own hands, even a beginner without special training can do it. And because of the economical use it can be done for little money. And the end result itself will pleasantly surprise you. A long service life, resistance to physical factors and ease of use also will not leave anyone indifferent.
Advantages and properties of Travertino plaster
It should be noted right away that this material is not cheap. That's just its decorative properties are able to captivate almost anyone. One has only to see once the surface, which is covered with such plaster, and you will probably want to repeat it in your house or apartment.
And there are explanations for all of this:
- Trevertin has a specific look. It seems to one that it is divine, to another that is quite peculiar, but literally everyone remains impressed.
- Unable to create repeating pattern. Each time a unique composition is obtained, which depends on the master’s technique.
- The material is of high quality. Even after several decades - an unsurpassed style and texture is preserved.
- There is the possibility of using various coloring options (tinting).
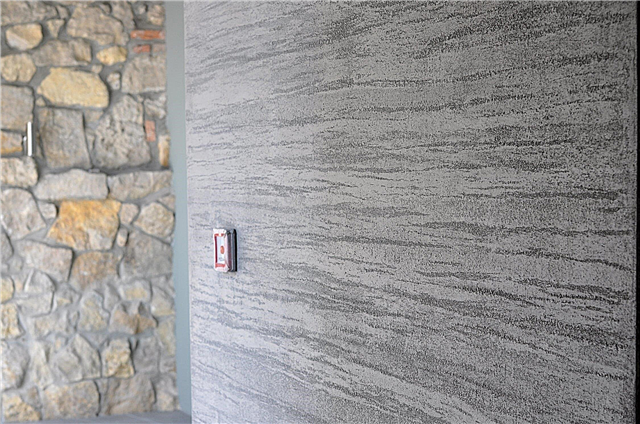
 Stucco Travertino allows you to create amazing drawings on the wall surface
 Decorative plaster Travertine has another positive quality that facilitates the work on preparing the surface - it successfully covers small scratches, chips and other minor damage. This is facilitated by the composition of the mixture, the main components of which are as follows:
- Marble. It is crushed into a fine fraction.
- Lime.
- Acrylic resins and polymers.
This plaster has no smell, and due to the fact that all the components are crushed, it fills even the smallest cracks. Accordingly, a sufficiently thick layer is obtained, which makes it possible to level another disadvantage, namely, to correct the geometry of the surfaces.
 The main components of the plaster travertine
Wall alignment
Old decorative layers (whitewash, paint, lime) are removed from the surface. Deep cracks are repaired using a reinforced mesh. Of course, if there is a desire to get a really durable finish, it is better to completely remove the old coating. Yes, dismantling will require additional costs, but it is better than starting a new repair in a couple of years.
This mixture is able to correct small surface irregularities, but do not neglect the alignment. So, with the curvature of the walls more than one centimeter - it is necessary to plaster the walls.
Important! For such work, you can not use solutions that are "stronger" than the old layer. For example, if you put a layer of gypsum or cement putties on a sand-clay wall, they will literally destroy the foundation.
Plastering
Work begins with the guidance of the plaster solution. The dry mixture is diluted with cold water in the proportions indicated in the instructions for the material. The plaster is mixed, preferably with a construction mixer, until smooth. In some species, a colorant is added, others suggest a glaze topcoat of the desired shade.
Apply plaster evenly to the wall. It is better to apply it in two layers, then the texture should be given to the second layer. The first is applied thinly and waiting to dry for a day.

The simplest option is to apply the plaster with a spatula or trowel, a layer thickness of 1.5-2 mm. And then with a brush or a hard brush to apply the picture. Using pins to give the surface a porous travertine texture.

The second option - a trowel with a small amount of composition is applied to the wall with poking sticks. Roughness islands are created on the surface. After setting, the remaining protruding tops are smoothed out with a Venetian trowel, slightly pressing it to the surface.

There is a third, longer version, when the plaster is applied with a brush with pokes. Stitches create the desired texture without additional manipulation.
The finish layer is sanded to smooth out the rough surface. Before setting the mortar, 15-20 minutes after application, the plaster is smoothed. It is carried out by the Venetian trowel with light pressure movements, moving in waves or in an arc. The result is a perfect imitation of travertine - smooth areas are replaced by rough blotches.

You can draw joints on the surface to create an imitation of a stone wall.
The coating is left to dry for 12-15 hours. After that, the walls are varnished with the addition of toner of the desired shade. For example, Goldshell recommends ASTI Creative Matte varnish as a topcoat for its ASTI Traverto plasters. Toner staining ACS metrico. Varnish dries for 4 hours. Shades usually use soft natural ones - beige, light brown. But you can create bright walls.

Some manufacturers recommend a decorative wax, which is applied with a roller, and polished with rags after 5-10 minutes.
The finish gives the final effect of natural stone travertine.
Conditions and nuances of work
Indoor conditions
The temperature of applying decorative plaster is 5-25 ° C.
Humidity - not more than 80%.
Plasters are not fire hazardous and explosive.
Wear personal protective equipment - gloves, special glasses.
Avoid contact with eyes, in case of contact with skin - wash with soap and water.
Ventilate the room or use a respirator during work.
The tool is washed with warm water.

Application Tips
The beginning of work with decorative plaster should be training. Prepare a primed surface, such as a sheet of drywall. Apply plaster and drawing in accordance with the instructions. Rate the result.
If you don’t like it very much, try again. Try all the application techniques to find out which suits you best.
When the result will please you, proceed to decorate the walls.

Still have questions? Advice will be given by our specialists. Call t. 296-21-20.
You can choose decorative plaster with travertine effect in our catalog. The types and effects of decorative plasters can be found in previous articles.
Origin history
The name of this decoration material comes from Italian. Travertine - mineral rock, which can be white, yellow or have shades of these colors. Visually, the stone has a porous, nosolate structure and can be used as a building material. It was widely distributed in ancient Rome, from where it got its name. Well handles. However, this breed is rather expensive directly for construction, and for this its decorative analogue - travertine plaster was created.
It was with the use of travertine that the Roman Colosseum was built. Given that this historical monument is still standing and, it can be concluded that this building material is durable and resistant to external damage and negative factors. It is also worth noting that travertine looks rather harmonious in any direction of design. Decorative plaster allows at the stage of final construction or repair to give the surface the appearance of a noble Italian stone, which can be given any color and shade.
Advantages and disadvantages
Imitating the surface of natural stone, decorative travertine plaster approaches it in other parameters.

- good strength
- aesthetic appeal
- environmental friendliness
- steam conductivity
- moisture resistance
- fire safety
- good adhesion
- good resistance to biodefeats,
- resistance to aggressive substances,
- multivariance of application techniques,
- maintainability
- it is easily painted without losing its texture,
- richness of color mixes,
- ease of care
- universality.
Some disadvantage of plaster was:
Types of mixtures
You can wrap the walls of the house in travertine without buying natural stone. To do this, it is enough to use plaster compositions and a technique for simulating the texture of travertine. Fortunately, there are enough materials for this.
To simulate, you can use:
- Travertino ready mix, which includes sand, lime dough and marble chips,
- dry mix Liquid travertine, the components of which are polymer binder and travertine crumb of a fine fraction (the composition is diluted with the volume of water indicated on the package). 92% liquid travertine consists of natural Roman stone,
- cement-sand plasters with white cement, in which you want to add a dye (you can prepare it yourself, then the coating will be cheap),
- gypsum plasters or plasters (sand and pigment are added to them).
For travertine, plaster of any kind is suitable, except for silicate, roller, pebble and flock.
Main and auxiliary tool
There are several techniques for applying travertine. The following are accessories and tools you may need:
- Ironing trowel (must have rounded corners),
- spatulas
- spray gun (hopper),
- hard brush
- brush (for varnishing or trimming),
- Sander,
- rollers
- masking tape
- level, ruler for marking,
- capacities
- mixer,
- sandpaper
- clean rags.

Decorative plaster for travertine may not require professional tools, it will work out well if the application technology is followed, the materials will meet the conditions (this is especially important for outdoor work), the walls will be well prepared.
Application technology
The imitation can be like a polished or unprocessed stone massif, or a stone wall made of blocks. For each of these cases, travertine plasters and types of application of the compositions are different. The imitation of massive polished stone is performed using the Venetian plaster technique. The following are other application methods.
Continuous application
In the case of creating a travertine, the decorative layer can be applied in different ways. In general, applying such a plaster is very similar to a plaster technology called a world map.
The three most commonly used methods are:
- The prepared solution with a trowel or putty knife is applied in an even layer up to 2 mm. Then the coating is treated with a hard brush or a wide brush with pokes, which simulates the porous surface. Porous sections at this stage can make up to 80% of the area. These percentages will decrease after smoothing the plaster layer.
- The solution is transferred to the wall with the end of a stiff brush with jabbing movements. The embossed surface of the stone is created immediately. This method is somewhat more painstaking and slower.
- The stone surface is simulated by cutting the applied solution with the working plane of the trowel, on which the mixture is spread with a spatula. The “stick” method creates the required surface roughness.
After 15-20 minutes, the surface of the layer is slightly smoothed with a clean, damp trowel. This is done so that smooth sections are mixed with rough ones. The direction of movement of the trowel should be multidirectional.
Partial application
There is a way in which decorative plaster with a travertine effect may not be fully applied.
The sequence of work is as follows:
- contact soil with quartz filling is applied tightly (without gaps) to the prepared wall with a roller. Even better, if two layers are applied, since in this case the soil will not completely overlap from above. If the coating is planned to be made in two-color, then the soil can be tinted.
- The working composition is applied to the dried soil. This is done with a trowel by the method of trimming. A small amount of the mixture is applied to the trowel with a spatula and evenly distributed, which is transferred to the wall with a “stick” technique in some places (not over the entire surface). After drying begins, the mixture is smoothed and redistributed in different directions with the edge of the trowel. The trowel is held at an angle of up to 30 degrees to the wall.
- After the coating has dried, the wall is cleaned of flaws with sandpaper or by mechanical means.
Horizontal drawing
The drawing is done with a putty knife.
- A basic thin, even layer is applied to the dried primed surface. After drying with a trowel, a decorative layer with an area of about 2 square meters is applied to the thickness of the grains. Let the layer dry so that the solution does not stick to the fingers. A level is applied horizontally to the wall. Along it, a layer is carried out with a spatula blade perpendicular to the wall. In this case, part of the solution is removed from the wall. They try to make strips of tear so that they look natural. Material removed with a spatula is thrown into a bucket. It is suitable for repeated wall application.
- While the treated area dries, apply the mixture to the next. After a short break, the section with prodirs is smoothed and compacted with a clean trowel along the prodirs. The next seal is done similarly after 10-15 minutes. Then let the layer dry completely. Three-time smoothing makes the wall smooth. Sandpaper stripping is not required. Here and there, grains of sand remain on the surface. They are easily removed with a brush.
Vertical drawing
The drawing is applied similarly horizontal, but in the direction from top to bottom (with little experience, you can not use the ruler). Imitate travertine with decorative plaster can also be applied diagonally.

Masonry
For masonry or wall cladding, travertine is usually used in blocks or plates. Masonry from travertine blocks or cladding can be simulated by applying a grid of “seams” to the wall. The first way is to scratch the lines with a chisel or other sharp object. A ruler is applied to the wall with a drying decorative layer, the surface of which is already framed in stone, and seams are scratched on it. After this, the “seams” are slightly smoothed with a moist, semi-dry brush to smooth out the burrs.
The formation of brickwork by the method of "scratching".
Another masonry simulation technique that uses decorative travertine plaster is similar to masonry imitation.
- Prepare the mixture to mix the prepared, dry - combine with water.
- Apply evenly 1-1.5 mm. trowel or wide spatula.
- After 5-6 hours, mark the wall, stick, leaving tails, ribbons (first horizontal, vertical on top of them).
- Stir the mixture with water until it drains. Hopper to apply the 2nd layer 1-1.5mm.
- After 15-30 minutes, you need to smooth the layer with a wet trowel (you can then additionally apply another layer of plaster for expressiveness, smooth it after the same period of time).
- Remove tape tape.
- At the time of drying, smooth with a trowel to gloss, or after 10-12 hours at an air temperature of + 15 ° C (after the layer has completely dried), grind it with a grinder (with an abrasive from 150 to 500).
- Blow air through the compressor to remove dust.
- Apply ProtectGuard STUCCO Protective Impregnation in 2 coats, wet to wet.
From this number of methods, anyone, even a novice finisher, can choose the one that will suit him. A place for testing and applying the mixture will be a piece of drywall.

Staining, varnishing or waxing
After the plaster layer dries, the walls, if desired, are painted with decorative glaze or other colorful compositions. Travertine coating can be painted in one color or made in two-tone.
You can give color to the solution itself, but you need to remember that after drying it will be lighter. Therefore, it is advisable to make a test color when tinting the mixture.
The finish of the travertine effect is waxing. Wax can be applied with a roller, brush or sponge. In a circular rubbing motion of the sponge, the wax is applied and immediately shaded. He is allowed to dry a little and wiped with a dry rag, removing the traces left by the sponge.
Often prodirs tint in a different color. To tint the prodirs, you need to wait for the previous layer of wax to dry. Wax in a separate container is tinted with pigment in the desired color and applied abundantly with a sponge to the wall. Immediately from the tops of the wall surface tinted wax is removed. It is better to make it an ordinary car wiper, which copes with this task better than a rubber spatula. In this case, tinted wax remains only in the recesses of the prodirs. The wax is allowed to dry completely, after which the wall is polished with rags.
Another means of protecting travertine coatings is varnishing. The varnish is applied only after the composition has completely dried. It can be tinted by adding color and depth to the “stone” wall decor.
Mixture consumption and popular manufacturers
The thickness of the applied plaster is small. Therefore, the material consumption is usually small - an average of only 1.5-2 kg / m2. The consumption of the mixture depends on the formulation, coating technique and skill level. For an accurate calculation, you can use our online calculator of decorative plaster.
Finished travertine mixes or in powder form are produced by many manufacturers:
- Travertino (Russian manufacturer Wowcolor),
- Calce Antica a Spatola (Italian company J COLORS S.p.A.),
- Travertinus (Italian manufacturer Adicolor),
- Verona (Russian manufacturer),
- Decorazza Traverta (Russian holding Interra Deco Group),
- Marmo Antiko and Intonachino Minerale (Italian manufacturer San Marco),
- Traverto Sol (Russian company MascaradE),
- Jazz travertino (Italian manufacturer Colorifico Sammarinese),
- Travertino Clavel (French company Clavel),
- Roman stone (Russian company Optimist-Elite), etc.
Do-it-yourself decorative plaster is not only a “bark beetle” or “fur coat”, but also more complex imitations. Dress your house in travertine romano, and you will feel at the crossroads of time and on the crest of progress.
Priming
This is a mandatory process that should be carried out when it is planned to use a mixture of Travertino. Why is that? The answer is quite simple - the decorative layer will be weakened. This is due to the fact that an old unprocessed primer quickly absorbs moisture from the new mixture and destroys it.
On a note! The primer is applied in two layers. The first is the saturating one, which saturates the surface and covers the main part of the pores, then the primer, it fixes the result.
All events are held in the following order:
- apply a layer of soil and wait for it to dry,
- cover the surface with the next primer layer and wait again when everything is dry,
- only now can the decorative layer be applied.
Main works
To work, you need the following tool:
- Grater and set of spatulas, trowel.
- Brushes, sponges, roller.
- Drill with nozzle mixer, bucket, rags.
- Whetstone and sandpaper (grinding machine).
 Tools required for work
Decorative plaster is being prepared, it will serve to apply the first layer, which will be the basis for further work. So:
- The mixture is typed. This is done with a narrow spatula, and then transferred to a trowel or wide spatula.
- It is put on a wall. The layer thickness should be 2-3 mm. This provides the following benefits:
• reduced consumption of the composition,
• quality of drawing increases,
• less drying time. - It remains to dry. It is better to leave the surface for at least twelve hours. It should be borne in mind that work should be carried out at room temperature.
- It is well polished. For work, fine sandpaper is used. In principle, such manipulations are optional, but then the gloss and color will change after painting.
Create continuous coverage
Work begins with surface preparation. Do not forget about the first layer of plaster, which should not exceed three millimeters. Only after it begins the magical process of creating a unique picture.
- Formation of the invoice. It appears due to the creation of differences in the thickness of the layer.
The technique of creating a decorative layer is quite unusual. It consists in the fact that a second layer of Travertino solution is applied to the wall, which is left alone for a while. That is, they give him the opportunity to dry out a bit. At this moment, the following occurs - the inner part of the layer begins to dry out, while the outer remains plastic. It is at this moment that grooves begin to form: they take a steel grater, the surface begins to literally “tear”. How this will happen depends on the final design.
 Forming a decorative layer with a grater
On a note! If there is no experience, then it is better to practice on a small surface, and use a brush with hard bristles as a tool.
In principle, when creating a continuous layer, it is possible to carry out all the work quickly enough. But there are also drawbacks - the surface dries longer, and the process requires minimal skills.
We offer you to watch a video - a master class on applying decorative Travertino plaster.
Partial plastering
This process allows you to get a decorative layer very quickly, even in the absence of experience. So do the following:
- As a tool, use a brush or sponge.
- The tool is dipped into the solution and "poked" it is transferred to the wall.
- The mixture is applied in random order. Take into account that 50% of the uncovered surface should remain.
- Now the plaster is given a little grasp, after which it is leveled with a spatula.
 Creating a decorative coating with a sponge and spatula
Additional work
After all the work that has been described above, you can perform some more manipulations or leave everything as it is.
- Grinding. This process allows you to get a glossy surface. It is possible to get an amazing effect: the pits remain dull, and the bulges are glossy.
- Staining. This work is carried out after priming. Paint is applied, after which they take a rag and begin to rub the applied layer. It turns out that on the surface of the paint will be less, and in the pits more.
- Waxing. Wax protects the surface from moisture and extends the life of decorative finishes.
- Varnishing. If surface staining was performed, then it would be desirable to apply varnish.
Thus, all the work can be done independently, if you approach this thoroughly.
Advantages of Travertine
The advantages of decorative travertine plaster include:
 The presence of small cracks, chips and dents creates an original design of the room.
- Sufficiently long service life, reaching up to forty years.
- Strength / stability, allowing to withstand both atmospheric and mechanical influences.
- Simplicity in work. Using plaster is quite simple for both a specialist and an ordinary person without special skills.
 The presence of small cracks, chips and dents creates an original design of the room.
Preparing for plastering
Travertine plaster is available in two types: for external and for internal use.
For interior work the material is made from marble chips, quartz sand and lime. The basis for it is white cement with the addition of dyes. Masters of painting and decorating do not recommend independently making mixtures for travertine, since it is quite difficult to get a good final result. It is better to use ready-made compounds: they cost more, but they will justify themselves in the process of application and operation.
To achieve an excellent result, in addition to the putty mixture, it is necessary to prepare the necessary tool. For this, classic plasterer-painter tools are intended. For the putty and plaster phase you will need:
- Spatulas, possibly of several types.
- Metal graters.
- Trowels.
For decoration (depending on the planned relief), sponges, rollers, bristles or fishing lines are needed.
 Final finishing will help to create:
In addition to this list, it is advisable to prepare a construction mixer, a spray for water, sandpaper, cotton rags may be useful.
Stages of decorating
First you need to prepare the surface. Here you need to take into account the properties of various building materials. For example, when drying and at the same time shrinking, a fresh, more durable layer will break the soft old (if any). Therefore, it is impossible to finish the clay-sand surface with gypsum putties or cement mortars.
Large surface damage (depressions, cracks, etc.) must first be reinforced with a metal or plastic mesh. The preparatory stage is extremely important when using decorative travertine plaster, since it is extremely difficult to repair a crack in it even for a professional, and it will be simply impossible for an amateur.
At the first stage need a deep penetration primer.This type of decorative plaster is quite expensive material, so you should not save on the preparatory stage of priming. Primer is recommended to be applied at least two times. In this case, remember that each subsequent layer of soil or putty should be applied only after the previous one has completely dried.
 In the second stage directly plastering occurs. Using a mixer, mix the mixture thoroughly. The prepared solution is applied using a trowel. The thickness of the layer will depend on the grain filling the mixture. As a rule, a layer is obtained from one to three millimeters. Important: the tool should only be stainless steel, otherwise rust stains will spoil the final result.
When conducting this work, one should not strive for even laying, as the material is textured. Therefore, even an inexperienced builder can master the work with travertino plaster quickly enough. A narrow spatula is useful for applying the solution to the trowel. After applying the first coat, it is necessary to allow the surface to dry, according to the manufacturer's instructions, as a rule, at least 12 hours.
After drying the stage of formation of the future surface relief begins. The plaster layer is reapplied and time is given for it to dry. The material must be moist and ductile. It is necessary to moisten the trowel well with water (you can also spray it with water from the sprayer), and then it will rub the surface. Grouting can be done in different directions, the final texture of your wall will actually depend on this. This work can be done on individual sections of the wall.
It is more convenient and practical to carry out this stage when two people are working: one person is putting putty, and the second is grouting. The main thing is to take into account the drying rate of the material itself, since if it becomes overdried, the final result may not be of high quality.
After mashing the surface is sealed with a spatula. This manipulation allows you to smooth the surface, and as a result, successive bands appear. They can be done in any direction, under any slope. Everything will depend on the idea of the master. At this stage, we get a decorative pattern that resembles a layer cake - this is what the corporate look of travertino looks like. At the stage of forming the relief, highly qualified specialists can use several types of finishing material.
Decorative plaster (travertine) enables specialists to conduct various experiments: the use of various mixtures allows you to create a unique, incomparable picture.
The final stage of work with travertine is tinting. Traditionally, travertine is treated with tinted wax, which includes high-quality dyes. This helps to increase the visual attractiveness of the surface and creates a water-repellent coating that contributes to a long life of the final result. If the surface does not collide with moisture, then simpler methods of painting can be applied: almost any paint can be applied to the surface.
 When tinting, it is important to remember that after applying the paint, it must immediately be wiped with felt or a paint mitt. The paint will remain in irregularities, but on a flat surface it will become lighter, which will further emphasize the texture of the relief. Once the paint is completely dry, the surface can be varnished if necessary.
As a result of working with travertine it turns out an exquisite relief. But you need to remember: for an excellent result, you should not save on materials, but you only need to choose high-quality building materials that have passed all environmental and safety tests. In this case, the repair in the house will not only be of high quality and durable, but also safe even for the smallest residents.