Own sauna for many people seems an impossible dream. Lovers of dry steam can use the empty space of the balcony to equip the complex. To get a personal steam room, you must purchase a ready-made mini-sauna or build it yourself. If you strictly follow the instructions and take into account all the nuances, you get a full steam room with dry steam.

Disadvantages and advantages
A loggia sauna can replace visits to wellness centers. It gives less stress on the heart than in a classic bath, it can be used even by older people and children. It is comfortable to stay there, and the warmth has a relaxing and calming effect. The advantage of the device of the sauna on the balcony is the fact that due to previously unused areas, the living space is expanding. Another advantage will be the absence of the need to install a chimney and a powerful stove.
The disadvantages include its small size (accommodates no more than 1-3 people). In addition, its installation is not permitted in all structures, but only in those that have 1 category, i.e., brick or monolithic apartment buildings with reinforced concrete floors.
Differences between the Russian steam room and Finnish sauna
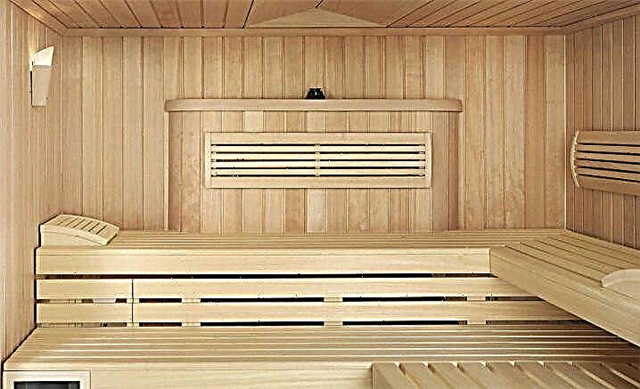
Before you build a structure on the balcony, decide which one it will be. For example, if the internal structure of the Russian steam room and Finnish sauna is almost the same, then the heating and heating systems are completely different. In a Russian bathhouse, these are classic firewood and stones, to which water is supplied, resulting in wet steam. And, of course, the presence of a broom is mandatory, with the help of which the body will be cleaned. But more modern Finnish saunas are usually equipped with an electric furnace and produce dry steam.


Of course, a simpler and more practical option is a dry steam roomwhen you do not need to take up additional space for firewood and clean the ash in the stove and on the floor, and the stones heated by an electric fireplace will increase the temperature in the room in just a few minutes. But the Russian steam room has its own "soul", and who does not want to take a steam bath with a fragrant broom. The choice of type of sauna is up to you.

Advantages and advantages of a compact steam room
The idea of a sauna on the balcony is ideal and quite easy to implement. Most of the reviews about such a sauna are positive, and the advantages and advantages of the design of the steam room on the balcony abound:
- minimum financial costs
- the effect of a real sauna,
- small sizes
- use of firewood is not required,
- fast heating of the room,
- personal hygiene and safety (own steam room protects against diseases that can be transmitted in public places),
- convenience (no need to leave them at home, you can steam at any time of the day or night).


How to build a mini bath on the balcony yourself
Since the inlet and outlet of water from the balcony to establish is very problematic and unprofitable, it is worthwhile to confine yourself to paired procedures in a mini sauna, and water to continue in the bathroom or shower. Before starting construction work, it is advisable to strengthen the balcony structure with props, and then take care of the insulation of the premises from the inside and outside. It is better that the sauna adjoins the walls of the building, and does not go out on at least one side to the street. Indeed, if the heat loss is too high, then the room will not be able to warm up to the required temperatures.

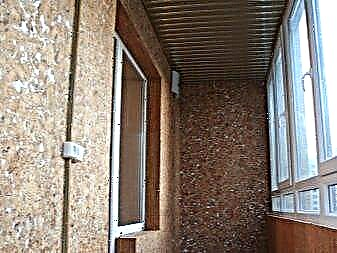
The walls of the steam room are made "deaf", and in the "waiting room" (the glazed part of the balcony), double-glazed windows are placed. Do not forget to provide a place for ventilation. Be sure to equip the steam room with a vent plug type. After each bath procedure, ventilate the room well to get rid of excess moisture, or do it during the washing process, if there is a need to lower the temperature in the steam room.


Necessary materials
For the installation of the sauna, a minimum of 2 people and the following building materials:
- insulation (mineral wool around the perimeter of the entire room),
- bars on the height of the balcony,
- waterproofing membrane
- asbestos cardboard,
- folgizol
- cable,
- lining
- trumpet,
- Styrofoam,
- boards
- metal sleeve
- auxiliary tools.


Sauna insulation
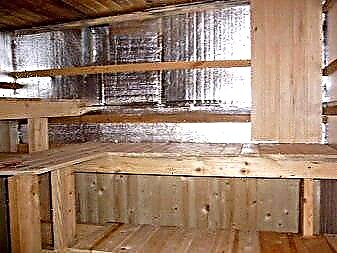
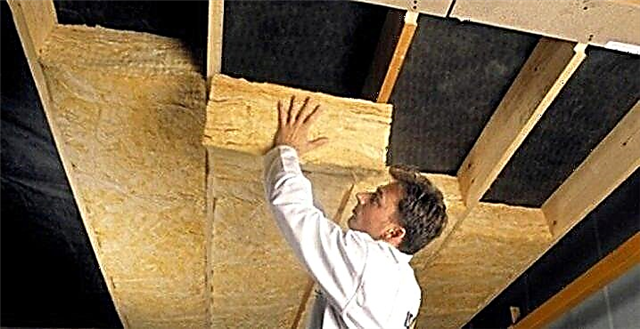
Along with reliable plastic windows, which will help to keep the temperature in the “dressing room” as best as possible, additional insulation and insulation of the steam room will be needed. To insulate the ceiling of the room, such a heat-insulating material as mineral wool is suitable. It is durable and absolutely safe to use. On the ceiling, the bars are fixed about 35 cm from each other and mineral wool is placed in the space between them, and then the foil insulation is fixed.
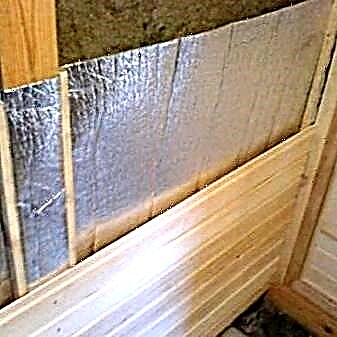
Before processing the walls, you need to install the wiring from the electric meter to the sauna. It is worth using a special heat-resistant cable. To save the area of the balcony outside, it should be insulated with foam. Bars of 50x50 mm are placed vertically inside at a distance of about half a meter. The space between them is filled with mineral wool for insulation. Then the walls are covered with foil insulation, on which the slats are subsequently nailed. This construction is finally sheathed with lining or other wood material. Perfect for finishing boards with shrinkage of less than 10%.

Before insulating the floor, keep in mind that the floor structure itself must be mounted with a slope to the street so that condensation and moisture do not accumulate indoors and do not cause problems for you and your neighbors. Logs 30 cm apart are filled on the floor and filled with mineral wool. The floor is first covered with waterproofing, and then with boards. And in the steam room, the floor is made at least 10 cm higher than in the rest of the room to provide an additional outflow of liquid.

Installation of heating elements
The main heating element in the steam room of the sauna is an electric heater or a factory oven. If you choose an electric fireplace, an infrared burner will heat the room. The container for stones from above helps not only to quickly warm up the room, but also releases steam. By the way, the total weight of the stones should not exceed 15 kg - this is enough to warm the steam room. The stove is connected via its own RCD on the 25A machine to a separate outlet.


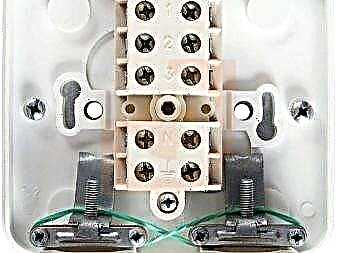
Choose heating elements that are adapted to the conditions of the sauna and protected against condensate. On such furnaces, the terminals are usually located at the back and are protected from moisture. In addition, it is desirable for the stove to have a fireproof grill and a special water tray. For safety reasons, the surfaces around the heater should be finished with asbestos cardboard, which has high heat resistance.

Lighting
When installing the steam room, pay particular attention to where the electrical wiring will go. From the switchboard it is worth laying a cable with a safety circuit breaker. But from sockets and distributors inside the sauna should be abandoned for security reasons. For lighting in the steam room, indoor spotlights are used, for example, IP54 class devices with water protection.
Read the instructions for the lamp - the operating temperature should be indicated at least 120 C. So that the light does not hit the eyes and does not interfere with the person sitting, mount the lamps in the corner on the back wall. In the shops you can find all kinds of lampshades made of wood - they fit perfectly into the design of the sauna room.

Finishing work inside the sauna
As a material for finishing the steam room, wood from larch, linden, poplar or aspen is best suited. The use of excessively resinous species is best avoided, since resin can be released from the wood at a particularly high temperature and create an excessively strong odor.

Depending on what type of sauna you choose (corner or wall), it is important to rationally plan the location of the seats and stove. A compact steam room on the balcony is usually designed for 2 people, and the shelves will be small - the width of the balcony. For the construction of 2 tiers, the bars are attached to the floor and between each other, and then seats are created with a minimum distance between them of 50 cm.

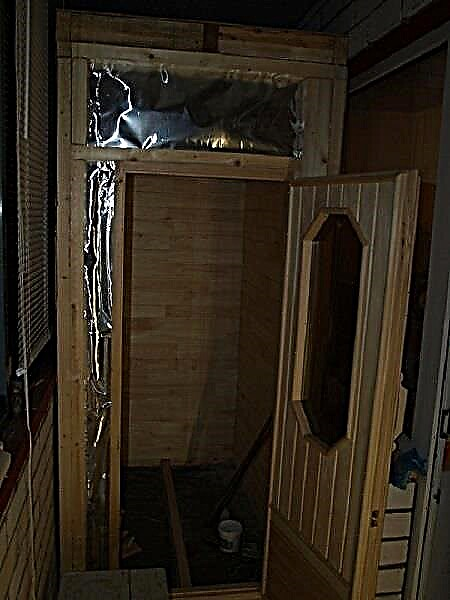
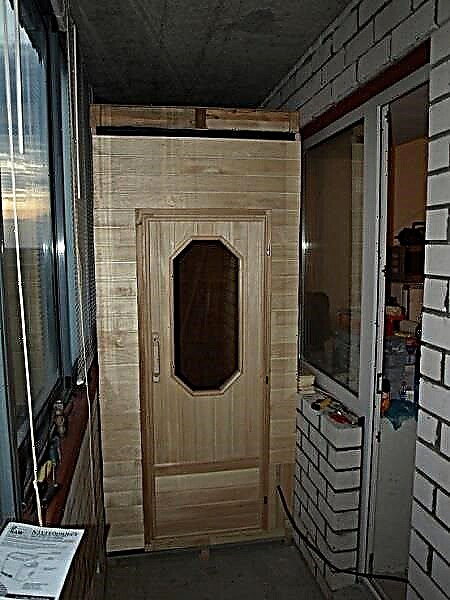
After fixing, all surfaces are sanded and covered with a solution against swelling from moisture and drying from excessively high temperatures. Steam room doors can be made of wood or heat-resistant glass. In order to save space, the doors must open outwards. And do not use a lock on the door, because if a person becomes ill in the sauna, access to it should be open. And one more important nuance: be sure to cover all the screws in the steam room with wooden plugs. This will help you avoid possible burns from hot metal.

Sauna decoration
At the end of construction work, it is worthwhile to beautifully and practically design the room for the steam room and the dressing room. Hangers for clothes can be made with your own hands. Get a special thermometer to control the thermal conditions inside the steam room. Please note that in the sauna you should use decorative elements exclusively from wood or other natural heat-resistant materials.


Since health largely depends on hygiene and cleanliness, do not forget to clean and dry the sauna after each session, and observe safety measures when using electrical appliances and a stove.
Conclusion
For a long time, balconies and loggias have ceased to be exclusively a place for a break, a pantry for winter blanks and a storehouse for unnecessary things. More and more modern people are trying to use this space in the apartment with benefit, making such functional rooms as a kitchen, room or even a sauna out of balconies. To someone, the “bathhouse” on the balcony would seem an impossible task. But this is not at all true, especially since the majority of Russians live in small-sized apartments and they simply do not have the opportunity to take a steam bath.
Surely you will not regret it if you choose the option of a sauna on the loggia, because such a procedure will help not only relax, but also improve health, since steam removes toxins from our body. Having spent not so much time and money, you can realize your dream, and then you will not need to envy the owners of private houses. It is so pleasant to relax after a long working week, “recharge the batteries” and just have a good time with family and friends in our own sauna.

An overview of the sauna on the balcony, see the next video.
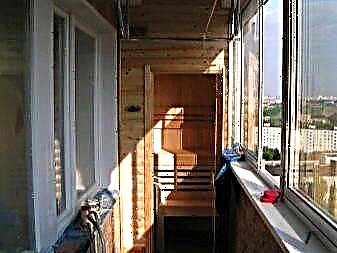
Balcony preparation before construction
Starting to do the sauna on the balcony with your own hands, all work on its arrangement must be carefully planned. The area for the future building should be well prepared. It is important not to separate the sauna and the balcony. Both of them will need to be given special attention.
The balcony should be
This will prevent moisture from wetting the ceiling to residents below and the floor to neighbors above. When arranging, you must remember that the sauna must be adjacent to the main wall of the house in order to reduce heat transfer. To ensure fire safety and the desired level of comfort, the dimensions of the sauna should correspond to certain dimensions: 0.8 m wide and 2.1 m high: it will not turn around in a narrow steam room, but it will be very hot in a low steam room.
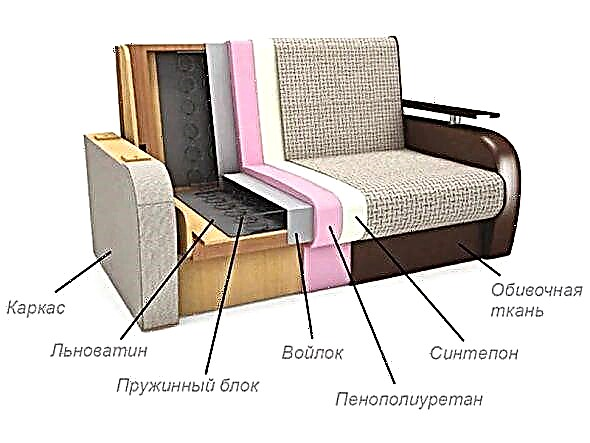
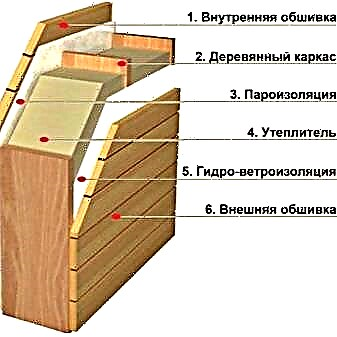
For walls and ceilings, wood is traditionally used, which must be well dried, treated with antiseptic protective compounds and have a moisture content of not more than 10% (otherwise the boards will begin to dry out).
This natural material easily withstands high temperatures. It is recommended to use boards from poplar, aspen or linden. Coniferous wood (such as cedar, pine, spruce), when heated to 100-120 degrees, emits a persistent smell of rosin, which affects the mucous membranes and respiratory tract. Contact with hot tar can cause severe burns. Moreover, at high temperature, it can ignite spontaneously.
Stages of the construction of the sauna
Due to the possibility of overloading coatings, it is prohibited to use brick and concrete on the balcony during the construction of the mini bath complex.
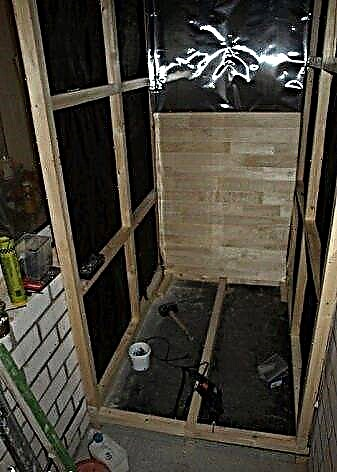
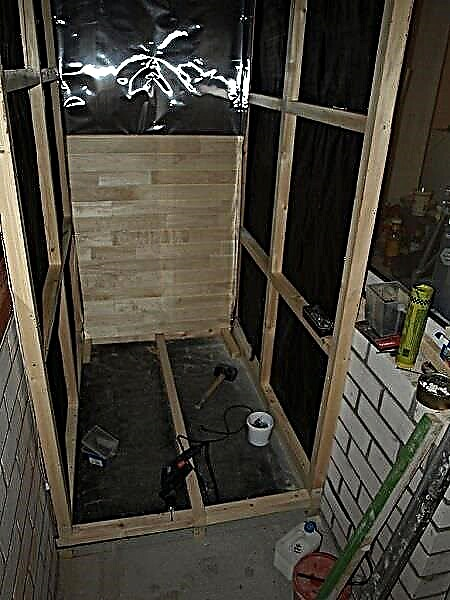
The steam room device begins with the exposure of the frame
Your actions
Important Features

Construction of a sauna on the balcony
The walls on the balconies of the houses are usually curved, and therefore on the outside the frame is lined with 4 mm plywood. The door to the sauna is set so that it opens outward: then it will be possible to leave the room without any problems if you feel unwell. To avoid injuries and burns on the body, screws and self-tapping screws must be drowned in a tree or hide their hats with wooden caps.
The floor in the sauna is made 10–20 cm higher than the level of the balcony concrete base. To prevent moisture from stagnating and flowing freely on the surface, it is installed at an angle to the entrance. The process of laying the floor takes place in several stages. First, a moisture-proof layer is lined. At a height of 6–8 cm, logs are mounted from a bar with a cross section of 25–40 mm and in increments of 40–50 cm. A heater is laid between them, which is covered by another layer of waterproofing. Next, the floorboards are mounted. Since the metal fasteners are very hot and they can burn their legs, they are attached closer to the walls.
Now you need to equip the sauna with a shelf. They place it on separate supports, so that it can withstand several people. Work on its construction consists of the following stages.
- Fixing bars with a cross section of 80 mm to the floor.
- Mounting on them boards with rounded edges, 4-6 cm thick (set with a gap of 0.5–1 cm to ensure free air circulation).
- Processing shelf oil for wood.
If the room allows, then you can install the upper shelf with a ladder. At the same time, the lower boards are located at a distance of 60–80 cm from the floor, the upper ones are 150 cm.
What communications need to be summed up
The choice of wiring in the sauna should be approached very responsibly, as it relates to a source of increased danger. It is desirable to equip it with a protective shutdown system. Experts recommend purchasing electrical wiring for a sauna with a permissible insulation temperature of 170 degrees.
To calculate the required power of heating devices, it should be taken into account: to warm up the sauna in 1-2 hours, it will take about 1000 watts per square meter. Thus, with a steam room measuring 3 square meters, about 3,000 watts of electricity are needed. Therefore, in order to ensure such power, it will be necessary to draw a separate branch of a heat-resistant and moisture-resistant cable from the meter that can withstand such a temperature regime.
Inside the sauna itself, only moisture-proof fixtures are allowed. The sealant between the base and the ceiling is made of heat-resistant silicone, and not of rubber (it can crumble under the influence of high temperature). Degree of protection of the lamp - IP54.Outside saunas place sockets and a switch.
It is very important to pay attention to ventilation. In a sauna where it is absent, it is difficult to be due to the large amount of carbon dioxide and stagnant, moist air. In the absence of ventilation, favorable conditions are created for the occurrence of mold and fungus.
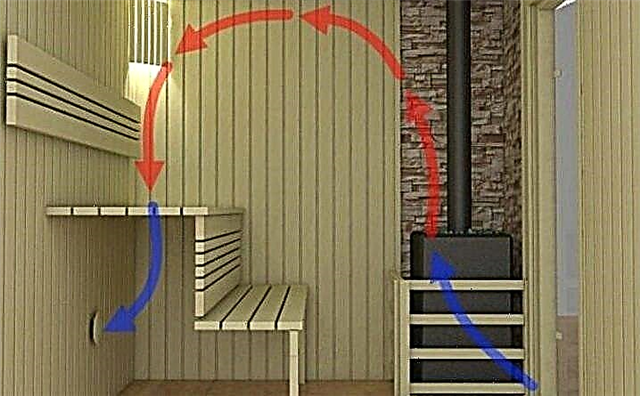
It is advisable to make an air intake in the lower part of the box so that a fresh stream passing through the furnace is heated and exits into the ventilation hole in the upper part of the sauna. The opening, 30x30 cm in size, should be equipped with a tight plug in the wall: it is better to use a board that is 5–7 mm larger. A piece of foam is cut to it, cut so that it fits snugly into the air vent. Foam can be wrapped with felt, which will increase the life of the product. A handle must be installed on the inside of the structure to make it convenient to use the plug.
Where to begin?
First of all, you must determine for yourself whether you will equip the sauna yourself or buy it from the manufacturer. Both of these options each have their own advantages, so the solution here lies only with you. If you decide, at your own peril and risk, to do the sauna yourself, then at the very beginning you need to check the materials. They must be fireproof, especially those that will come in contact with the furnace. They should also not release toxic substances when the sauna is heated.
Still need to consider the severity. The sauna box should not be too heavy, otherwise the balcony may not support the entire weight.
Ideally, under the balcony, metal supports should be added that will support its weight.

And also, before starting work, it is worth expanding the balcony a bit to create more space. It does not take a lot of work. It is necessary to make the walls completely deaf, not to forget about good glazing, due to which the level of thermal insulation will increase and high-quality double-glazed windows will be installed.
Even at the initial stage, you must immediately determine where the ventilation hole will be located.

On the loggia, you can build a sauna in the shortest possible time, if you follow all the recommendations of specialists and take into account the law. Finnish sauna has the most positive reviews.
Warming
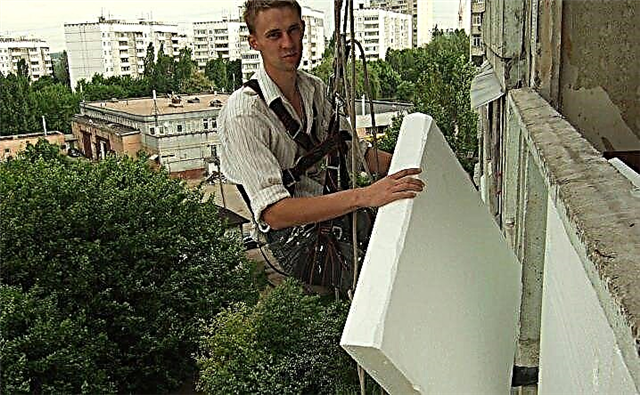
The balcony must be insulated with mineral wool. If you insulate it from the inside, then there will be almost no room for the sauna itself, and it will be too small for the permitted standards. Therefore, upholstering it is better outside. To do this, you need foam boards that will not let the cold in, since they themselves have heat-insulating properties.
Once the thermal insulation is ready outside, you can start work inside the sauna, arranged on the balcony.
Internal arrangement
After warming the balcony itself, we proceed to finish the flooring inside. We do it around the perimeter of the balcony. In the steam room itself, it must be made 10-20 centimeters higher so that it is always dry in the cabin.
The arrangement of the sauna should occur in the correct sequence:
- The first thing to do is to lay waterproofing material. Next, install logs from the bars. In height, about 5-8 centimeters in increments of 40-50 centimeters.
- Then a heater is laid between them and another waterproofing layer is lined.


- After that, the floorboards are nailed to the walls so as not to get burns while visiting the sauna. An ideal tree that will be suitable for a sauna is hardwood with shrinkage of about 10%.
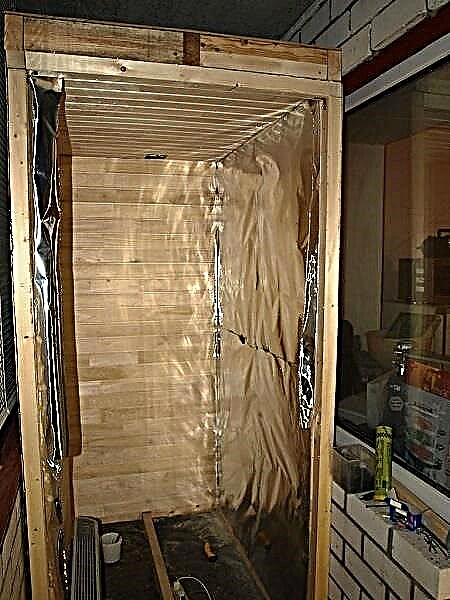
- We nail the bars with a cross section of 5 cm2 onto the wall. The walls inside the cabin must be covered with plywood, so that the insulation completely adheres to the inner surface and does not allow heat to pass through.
- A foil vapor insulator is carefully inserted into the openings between the bars. It must be laid with the reflecting side out.

- Minvata should be cut so that it is 4-5 centimeters wider in size. This will provide a more secure fit to the walls of the sauna.
- Next, lay the insulation in the space between the bars.
- In conclusion, aluminum foil is attached to the heat shield with nails so that the reflective surface is inside. The joints are connected with a specialized adhesive tape using metal. And as a cladding use a lining.

Creating a ceiling
So that during the use of the bath there are no troubles, you need to pay a lot of attention to vapor barrier. This is very important, since at the time of using the sauna, hot steam rises and settles on the ceiling in the form of water droplets. If you do not follow this moment, then soon the neighbors from above will begin to come and complain about dampness and mold.
In these works, it is important to do everything in stages:
- The first thing we do is stack the bars 5 centimeters thick. Their step should be around 40 centimeters. The distance between them must be filled with waterproofing material.
Choose only quality material from a trusted manufacturer.
- Next, we equip the insulation: we press it to the ceiling with a wooden plank and nail it with nails. In some cases, it can be fixed with a stapler.
- After this, the vapor barrier membrane must be fixed in two layers, at the end, the ceiling should be lined with clapboard, which should be of high quality and moisture resistant.

How to lay wiring?
In order for the wiring in the bath to serve for a long time and with high quality, as well as to comply with all fire safety standards, you need to approach this very responsibly. You must have a cable that has heat-resistant insulation.

It is very important to prepare for this, because it is a very painstaking work in which you cannot be mistaken. Therefore, it is important to monitor the sequence of actions:
- The first step is to install the distribution panel.
- After that, you need to check the power supply. It must be provided with an RCD (residual current device).


- A separate outlet must be made from the distribution panel.
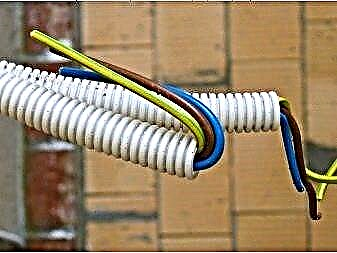
- To connect, it is worth using a corrugated pipe. This will increase fire safety.

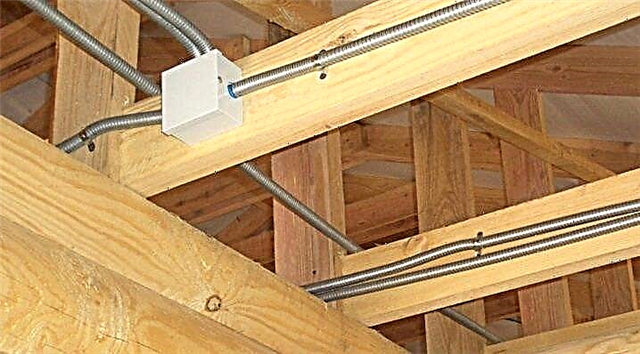
- Next, the wire that is used for the lamp must be placed in a special metal hose and placed above the ceiling. These lamps can withstand temperatures of 120 degrees, which is very convenient.
Create a vent
Ventilation must be done outside so that odors do not pass from the inside. Adequate size for the ventilation window of the bath is 50x50 centimeters. A part is cut that fits close to the walls. There should be no gaps between them. After that, the handle is glued where it will be convenient to use.
We equip the bath frame
In order to make the sauna convenient, comfortable and, most importantly, safe, you must correctly determine the size. The ideal option is a width starting from 80 centimeters and a height of 210 centimeters.
Since the frame device is a rather delicate and scrupulous job, you need to do it in steps:
- At first, 5 centimeter thick bars are attached vertically and horizontally to the floor. The pitch should be about 40 centimeters.
- After the outer side is upholstered with plywood sheets on which a waterproofing film is fixed.


- Inside the cab, hydro and thermal protection is attached. In order for the material to completely adhere to the walls, the mineral wool is cut out more widely by several centimeters.
- A vapor barrier membrane is laid on top.
- All joints should be connected using a special adhesive tape made of metal.
- On both sides of the cabin you need to mount a wooden lining.
- The result is the installation of a door, which for convenience should open outward. This will help to save the already small space of the sauna. In no case should you make a castle from the inside.

We begin to install the furnace
The safest and most convenient stove for a sauna on the balcony is a stove with a heating element (tubular electric heater). It has a power of 4000-4500 watts, which is enough for a small sauna.


The heater itself should be connected to a separate outlet through an RCD. But also do not forget that the stove must fit all the wiring parameters in the apartment itself, otherwise nothing will work.
It is best to consult with a specialist in this matter. After all, the terminal boxes of good stoves are located behind, and thanks to this, moisture cannot get there. In addition, a quality stove necessarily has a fireproof steel grill and a water tray, which is also important.

Furnace parts are installed in a certain sequence:
- Start with the heater. It must be installed on an electrically insulated stand. It should be placed inside the chamber, which is made of foam blocks or refractory bricks.
- From above, the camera remains open and a basket is placed on it, which is welded from a metal corner.
- In order to comply with fire safety, the entire surface around the furnace should be finished with asbestos cardboard, because it is fireproof and heat resistant.
- And finally, stones are placed inside the basket for the stove: jadeite, quartzite and / or talchochlorite.
It is important that the weight of the stones does not exceed 15 kilograms, otherwise the room will not warm up well.
Shelving
In a bath it is best to have two shelves of different heights. Installing them yourself will be disproportionate work, so the most convenient and easy solution is to use special racks, since the shelves must support the weight of two people.
It is best to use linden or poplar as wood. This is the most suitable tree for the sauna. This material is quite moisture resistant, but it also needs to be processed. It is desirable to additionally varnish the wood.

These are the last works that will be carried out in the bath, but this does not mean that they are not important. Therefore, it is better to do this in stages:
- Bars must be attached to the floor, with a thickness of 8 centimeters.
- Boards of 5 centimeters with rounded edges are attached to the bars on top. The boards should be perfectly sanded, and the opening between them should be 15 millimeters so that the air can circulate quietly.
- After that, it is necessary to cover the entire structure with special oil.


That's all! Sauna is ready for use. Now it remains only to attach the thermometer and the clock inside. A self-assembled sauna is many times more pleasant and comfortable. After all, you know how much work and effort you put into its arrangement, therefore, upon completion of work, you will relax twice as much as when going to a public bathhouse. Have a good time, and with a light steam!


You will learn more about how to equip a sauna on the loggia by watching the following video.
Preparation for construction
An abstract idea should always be embodied primarily on paper, that is, in terms of reconstruction of the balcony. This document must meet all the requirements and standards for the conversion of balcony structures.
 Drawing of the sauna from above

What you need to consider in terms of reconstruction of the balcony:
- The maximum possible load on the floor,
- Ways to strengthen the balcony slab,
- Hydro and thermal insulation of the room,
- If necessary - arrangement of the roof,
- Fire safety materials.
Another important point is the consent of the neighbors to the reconstruction. Even if the balcony outside looks exactly the same as before the construction, attentive neighbors can see potential danger in it.
All prepared papers should be attributed to the BTI and urban architecture, then to collect the permissions of other authorities (firefighters, medical inspections, etc.). After obtaining permission, you can begin construction.
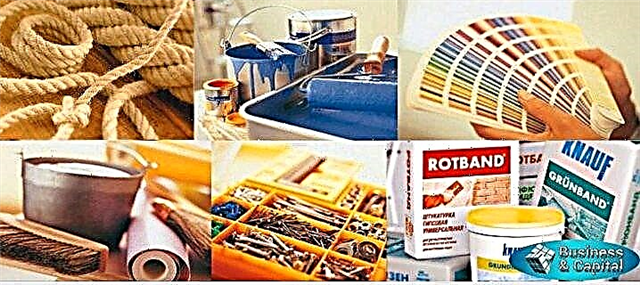
Selection of materials for a balcony sauna
It is better to choose and purchase the necessary materials in advance, since in the case of sauna insulation, accurate calculation is important. Correcting mistakes on the go and changing the plan of action is a bad idea.
As for hydro and vapor barrier, as well as insulation, nothing new has to be invented. You can safely use:
- Polyfoam or foam, etc. for outdoor work,
- Mineral wool for internal insulation,
- Foil vapor barrier,
- Thick waterproofing film
- Foam and various sealants.
The main thing when choosing materials is to pay attention to their quality and fire safety.

As for finishing materials - the best solution for the sauna will be wood. Moreover, it is for the steam room that it is better to choose a lining from larch with a 10% degree of shrinkage. Softwoods are good for the rest - when heated, they will give the room a pleasant aroma.
Finishing a balcony for a sauna
Next, you can begin to prepare the balcony itself for sauna equipment. First of all, you need to glaze the balcony (and only with high-quality double-glazed windows with a strong frame), or close the wall facing the street completely to reduce heat loss. Which option to choose depends on the wishes of the landlord.
The list of necessary preparatory work includes waterproofing and insulation of the walls, ceiling and floor of the room. The steam room and the rest of the area should be finished separately. In this case, do not forget to leave a ventilation hole.
Flooring
The floor in the steam room should be made 10-20 cm above the floor of the rest of the balcony. This will allow you to properly equip the drain.
Finishing the floor includes the following steps:
- First, a waterproofing layer spreads on the plate,
- Then wooden logs are installed in increments of up to half a meter and a height of 5-10 cm,
- Between the lags a heater is laid,
- Another layer of waterproofing is laid on the insulation,
- The flooring is laid on top.
There should not be any gaps between the walls and the floor, so you will have to calculate the materials as accurately as possible - it will be very difficult to fix the jambs after laying the flooring.
Steam room wall decoration
The next step is to proceed with the insulation and decoration of the walls of the sauna. Here you need to remember that the thickness of the insulation layer will depend on how quickly the room warms up.
Warming occurs as follows:
- The bars are packed on the wall with a pitch of about 40 cm. In the place of the steam room equipment, you must first install the plywood sheets - this will help the thermal insulation to fit as tightly as possible to the wall,
- In the space between the bars, the heat insulator is laid with the foil side out,
- A heater is placed on top, and, for a more snug fit, the sheets need to be cut a couple of centimeters wider,

- Another layer of vapor barrier is mounted on top of the insulation, but with the light-reflecting side inward,
- All seams and joints can be glued with metallic tape.


After that, you can beat the walls with decorative material.
 From the inside - lining, from the outside you can use siding. It is important to ensure that the material for the walls fit snugly against each other, without wide gaps and irregularities.
Ceiling work

When decorating the ceiling, it is important to pay special attention to vapor barrier, since all the steam will rise up. Flaws in this case can lead to the formation of condensation, the appearance of dampness and mold on the ceiling of the steam room, and, accordingly, on the floor of neighbors from above.
The arrangement of the ceiling is performed in the following order:
- A crate of beams is packed on the ceiling from the bars in increments of 35-40 cm,
- A layer of waterproofing is attached between the bars,
- A heater is placed on top of it,
- The last layer is additionally fixed with wooden planks,
- Next, two layers of a vapor barrier membrane are attached to the ceiling,
- The last layer is the final finish of the ceiling.
Partitioning
In any case, the steam room will be smaller in size than the space of the balcony itself. But it is worth considering that for a safe and comfortable stay in it, it is worth observing certain dimensions during the construction of the partition. The width of the room should be at least a meter, and the height - from two meters.
The principle of building and insulating the walls of the steam room coincides with the principle of insulating the walls of the balcony. First, a frame of beams is mounted, then plywood is stuffed, on top - waterproofing, insulation and exterior decoration.
The steam room door needs to be made small to reduce heat loss. It should open outwards - this will save a place in the steam room. But to install internal locks is not worth it for security reasons.
Carrying out electrical wiring in the sauna
Remember that in such rooms all wiring must be perfectly insulated. And since sauna stoves are very powerful equipment in terms of energy consumption, they need to carry a separate cable.
The order of work is as follows:
- A separate machine is connected to the switchboard. His choice is determined by the power of the furnace. For a heater with a capacity of 4500W, an automatic machine at 25A is optimal.,
- Then, an RCD is connected to the network to protect against overheating and power surges,
- The required number of sockets is mounted on the walls (the recommended number is no more than two),
- Using a corrugated pipe, an electric cable is connected to the sauna,

- Lighting wiring must be protected by a metal hose. It is best to wire up the ceiling right above it.


It must be remembered that directly in the steam room, in no case can you install sockets, lay cables on its territory or install inside an electrical panel.
Arrangement of ventilation

Ventilation in the sauna is necessary so that no extraneous odors are retained in the room, as well as for airing and drying from moisture.

The ventilation duct must be left in the wall of the balcony at the stage of its isolation and decoration. The optimal size is up to 30 cm in diameter. The walls of the channel can be a metal corrugated pipe, then the diameter of the hole is selected according to the diameter of the existing pipe. All gaps when installing ventilation must be sealed with sealant.
To close the hole from the inside, you can make a kind of cover made of foam and wood. The foam circle must be cut exactly to the size so that there are no gaps. A wooden circle with a handle is attached on one of its sides.
If necessary, the lid is pulled out of the pipe, and the room is freely ventilated.
Installing a stove in an apartment sauna
For a sauna in the apartment you need to choose electric models of stoves - they do not need a chimney.
Features of an electric sauna heater for small balcony saunas:
- Boxes with terminals are located on the back of the oven, which prevents moisture from getting on them,
- Such furnaces are equipped with a fireproof steel grate and a water collecting pan,
- The mass of stones in the mini-stove does not exceed 15 kg.

When installing the oven, you should clearly follow the instructions given to the device. Failure to comply with elementary rules can lead not only to equipment breakdown, but also to fire.
After installing the furnace and testing it, you can do additional improvements to the balcony sauna. Comfortable seats can be put together in the steam room, and convenient hangers in the space adjacent to it.

If the size of the balcony or loggia allows, you can even put a comfortable table and a couple of chairs for a comfortable stay in your own apartment sauna.
What we can get as a result, see in our video:
Balcony preparation
Before you make a sauna on the balcony, you should strengthen it - the weight of the hinged structure will increase significantly, and you may need metal supports for a concrete slab.
The room must be insulated. Since the area of the balcony is most often quite modest, warming is recommended to be done outside - so the heat-insulating material will not affect the size of the room. Mineral wool is best suited for this purpose - non-combustible and non-fusible material, unlike polystyrene and polystyrene.
Additionally, isolation will be required, which will perform several tasks at once:
• protect mineral wool from moisture,
• protect the floor and ceiling of neighbors above and below from heating during use of the sauna,
• improve the soundproofing properties of the structure.
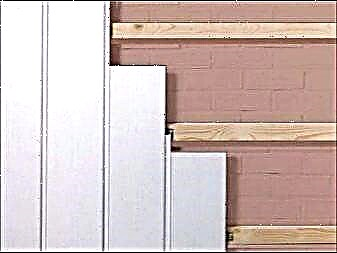
The choice of material for cladding
The most suitable material for decorating the walls and ceiling of the sauna on the balcony is a lining made of hardwood (alder, linden, aspen). When heated, they emit a pleasant smell, the structure of the material is smooth.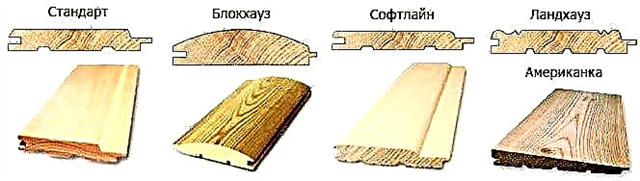
Materials made of coniferous wood - cedar, larch, pine or spruce - are not recommended: when heated, they emit tar, which gives not only a strong smell, but also affects the skin.
In order not to get burns or injuries, all self-tapping screws, screws and other metal structural elements should either be drowned in a tree or the hats should be hidden with wooden caps.
Ventilation organization
In the sauna on the loggia, proper forced ventilation must be organized. The exit of the ventilation duct should be done outside.
To do this, a small hole (up to 50 * 50 cm) is punched in the wall, which, when used by the sauna, will be closed with a special stopper.
For cork, take a wooden board, cut out a part of such a size that it covers the ventilation hole by 5-7 cm on all sides. A piece of foam plastic of such parameters is attached to it so that it fits exactly into the ventilation duct, snug against the walls. It is not recommended to use mineral wool - it will quickly become unusable.
Additionally, the foam is wrapped in polyethylene.
Organization of electrical wiring
The cable must have good heat-resistant properties. Sauna stoves are very powerful and consume a lot of electricity, so you need to connect them through a separate cable.
1. A separate machine is installed on the switchboard, taking into account the power of the heater.
2. The power supply network is equipped with a residual current device.
3. A separate outlet is mounted on the balcony.
4. The cable is laid protecting it with a corrugated pipe.
5. The wire to the lamp is laid in a metal hose.
As a lighting device for a sauna, it is recommended to use special sealed point heat lamps. They work properly at temperatures up to 120 ° C.
Switches, sockets and junction boxes must not be installed in the steam room. They need to be taken outside this compartment.
Shelf installation
In order for the structure to be reliable and 2 people can be placed on it at the same time, do not attach the shelves to the wall - it is more reasonable to place it on racks.
• bars with a cross section of 80 mm are fixed to the floor,
• well-sanded boards with rounded edges (thickness of about 5 cm) are attached to them, placing each at a distance of 1-1.5 cm from each other to ensure air circulation,
• the assembled structure is treated with wood oil.
If the size of the room allows this, it is allowed to install the upper shelf with a ladder.
The most suitable tree for the regiment is poplar, linden, abashi. The fixture of the installation is either hidden with wooden hats or pressed into the bars, because when heated, they, in contact with the skin, can cause a burn.
Choosing a sauna stove
Unlike a bath, in the sauna you can use electric stoves, so you do not need to organize a chimney.
It is recommended to use special designs designed for mini-saunas. They are affordable, safe and tailored to the needs of small spaces. Home-made heating systems will cost a little cheaper, but no one can guarantee their smooth operation and compliance with safety standards.
The terminal boxes for the sauna stoves are located on the rear wall, which provides protection against accidental ingress of water on the elements.
Finished devices can vary in size and the presence or absence of additional functions.
When choosing a device, you should pay attention to the area of the existing room. This will help reduce heating costs.
When installing the selected furnace in the room, the recommendations given in the instructions for the device should be strictly observed. Otherwise, not only premature failure of the device is possible, but also a fire.
Additional items
Hangers for towels, clothes and hats are installed after finishing work. At the same stage, a thermometer is mounted on the wall - it will be required to monitor the thermal regime during the use of the sauna.
It is also recommended to place the clock in a conspicuous place so as not to be in the room for longer than the recommended time.
To decorate the room, you can use only wood products or materials resistant to high temperatures.
Infrared sauna
The design of the infrared sauna differs from the usual arrangement of heating devices: they are installed around the entire perimeter of the room. Infrared rays do not increase the air temperature in the room, but directly affect a person.
An infrared sauna is a safer structure, which also consumes less electricity.
After studying the recommendations and looking at the photos of the finished options, you can begin to carry out your own sauna project on the balcony.
What kind of oven do you need
After completing all the finishing work, place the stove. Experts recommend installing electric heaters that are designed specifically for mini-saunas. They are affordable, safe and made considering the characteristics of small rooms. Get it at a specialty store. Homemade heating items will cost a little cheaper, but no one can guarantee their uninterrupted and safe operation.
At the installation site of the electric furnace, the walls and floor must be lined with heat-resistant material, such as asbestos cardboard. Typically, the heater is placed at the door, so that it is convenient to arrange the shelves. You must remember: you can not use an electric furnace without laying stones in it. This may cause a fire. The stones are laid so that convection occurs, that is, the heat transfer between the stove and the air in the sauna is accelerated (achieved by means of the gaps between the stones and good traction).
The innovation is infrared heaters. The main difference between such a sauna and a classic steam room is the method of heating. In an ordinary steam room, heat is transferred in the following order: fire (or ten) - stones - air - object (person). In an infrared sauna, heat is transferred by the radiation of a heater just like the sun's rays increase the temperature of objects in its path. Therefore, the infrared furnace is also called the "artificial" sun.
After completing all the work, a clock and a thermometer are installed in the steam room.